Native Seed Production Manual
Native Seed Production Manual parkecag
About the Manual
The intent of this manual, once completed, is to provide basic information for native seed production of nearly 100 species of the tallgrass prairie flora of the upper Midwest. The information presented is compiled from published accounts coupled with native seed production experience at the Tallgrass Prairie Center at the University of Northern Iowa. Critical to this effort were publications from the USDA-NRCS Plant Materials Program, published research articles and technical notes, personal communication with other native seed growers, and Internet resources. Botanical nomenclature follows Flora of North America, wherever possible. Common names follow USDA Plants Database.
The first edition of this manual was written in 2007 with support from USDA NRCS, the Tallgrass Prairie Center, University of Northern Iowa, and the Iowa Crop Improvement Association. A pdf of the original manual can be downloaded here.
The updated and expanded second edition is being produced as an eBook and made available for free on the Tallgrass Prairie Center website. For those who prefer a print copy, printable versions (pdf) of each general information chapter, species production guide, and appendix table will be provided. You are welcome to download and print the pdf versions to create a printed manual that includes the material of greatest importance to you.
This manual is a work in progress, and new information will be added as it is completed.
Funded by:
Iowa Living Roadway Trust Fund

University of Northern Iowa
Written and Edited by:
First edition (2007)
Greg A. Houseal, Program Manager, Iowa Ecotype Project
Second edition (2024)
Revised and expanded by Laura Fischer Walter, Plant Materials Program Manager
in collaboration with Green Iowa AmeriCorps members Bri Hull, Mallory Sage and Andrea Fager
and UNI students Laura Spies, Josie Hutchings and Alex Hanson
General Information
General Information parkecagThe first part of the manual consists of four chapters providing general information on greenhouse propagation, harvesting, seed processing, and issues of seed source and quality. Specific examples referencing native species are given to help illustrate the application of the techniques being described.
Propagation of Native Species
Propagation of Native Species parkecagRefer to Appendix A Table 1A [to be added soon] for establishment recommendations for individual species.
Propagation of native species through agronomic methods is necessary to scale up seed supplies for restoring native vegetation in highly fragmented landscapes such as the Midwestern Corn Belt of the US. However, information and techniques for propagating the diverse species needed for restoration are often in short supply, or are closely held secrets of private native seed producers. Here we present methods gleaned from a variety of sources, many of which we have used at the Tallgrass Prairie Center in production of source-identified stock seed for regional native seed growers.
This chapter focuses on establishment of production plots using transplants grown in a greenhouse. This approach has advantages: making efficient use of small amounts of stock seed and achieving more reliable seedling establishment (hence, efficient use of prepared plot space). However, it requires specialized facilities and involves considerable labor. Direct seeding is an effective method for establishing some native prairie species, notably the dominant grasses. Preparing a clean, weed-free seed bed and ensuring that seed is planted at the right depth (i.e., not buried too deeply) are crucial. In the species production guides, we provide estimates of the amount of seed needed, row spacing, and planting depth for direct seeding. However, we do not have experience with direct seeding all of the species and include a disclaimer to that effect when applicable.
Most of the species produced at the TPC have been grown in single-species plots of up to ½ acre or in 4-ft wide rows up to 150-ft long. Some growers produce seed using native or introduced grasses as cover crops within forb rows, in mixed cropping systems of a few species, or by reconstructing prairies for the purpose of seed harvest.
Wild species grown for seed production may show signs of adaptation to production conditions over several generations. At each step in propagation, there is potential for selection for genetic traits that improve fitness in an agronomic production system but may alter the ability of the seed to produce plants capable of establishing, surviving, and reproducing in the wild. Within each of the following sections, we will point out the risk of unintended selection and strategies for avoiding it. These strategies are also summarized in the Chapter: Seed Source and Quality. They will sometimes be in tension with the need for private seed companies to produce a profitable crop.
- Seed Dormancy
Dormancy describes seed that does not germinate even when presented with favorable conditions of moisture, temperature, and light. Dormancy is an adaptive trait, allowing germination to occur over time and in the proper season. This vital trait prevents the germination of all seeds at a time that might be suboptimal, or even lethal, for seedling establishment. Staggered germination over time is normal, even with stratification, and should be expected when propagating native prairie species.
The benefits of removing dormancy are twofold: First, more seeds germinate in a shorter period of time, which means limited and costly greenhouse space is used more efficiently. Second, increased germination means that more individual plants will potentially establish, flower, and reproduce, contributing their genetic diversity to the next generation.
There are two main categories of dormancy – primary and secondary. Primary dormancy occurs when seed is dormant upon dispersal, which is typical of many prairie species. Species with secondary dormancy produce seed with the ability to germinate readily upon dispersal (fresh); however, the seed may enter a dormant state if conditions aren’t favorable. Many woodland spring ephemeral species belong to this category of dormancy.
Within the two primary categories, there are several types of seed dormancy, and appropriate strategies are required to remove each type (Table 1). The most common type of dormancy in prairie plants of the grass and sunflower families is physiological dormancy, resulting from biochemical compounds that inhibit germination. The compounds may be produced in the seed itself or translocated to the seed from the plant prior to dispersal. Abscisic acid (ABA), for example, prevents premature germination of mature seeds in the seed head, before dispersal from the parent plant. Concentrations of germination inhibitors, like ABA, decline over time, allowing the seed to germinate. Physiological dormancy may respond to chemical treatments such as gibberellic acid or ethylene which counteract ABA. Another type, physical dormancy, is due to a physical characteristic of the seed; for example, the seed coat may be hard or waxy or otherwise impermeable to water and gas exchange, thus inhibiting germination. Species in the sumac, legume, geranium, and buckthorn families have these characteristics. Seeds with physical dormancy require scarification to remove these barriers. A third type is morphological dormancy: the embryo within the seed is underdeveloped upon dispersal, and warm, moist conditions are generally necessary for maturation (55 to 65 °F, 13 to 18 °C). Species with this type of dormancy are found in the parsley, buttercup, arum, lily, and iris families, among others (Baskin and Baskin 1998). Many seeds may have a combination of morphological and physiological dormancy types, i.e., morphophysiological dormancy, a subtype of which is sometimes referred to as double dormancy. Seeds of these species are often slow to germinate and may require lengthy stratification or repeated stratification at different temperatures. Examples of morphophysiological dormancy are found in the lily, gentian, buttercup, and parsley families. Combinational dormancy means that seeds have both a physical barrier to germination and biochemical inhibitors. Such seeds need both scarification and stratification in order to germinate. Some legumes and members of the borage and buckthorn families fit in this category.
Table 1. Types of dormancy associated with family groups and strategies for breaking dormancy (Adapted from Baskin and Baskin 1998).
Type of Dormancy
Cause
Removed by
Physiological
Biochemical inhibitors of germination (i.e., abscisic acid)
Cold and/or warm stratification, treatment with gibberellic acid (GA) or ethylene, light or dark conditions
Most common form of dormancy in the grass and sunflower families
Physical
Seed coat impermeable to water/gases
Scarification to simulate natural breakdown of barriers to water uptake
Found in legume, sumac, geranium, and buckthorn families
Morphological
Underdeveloped embryo
Conditions for embryo development, usually warm, moist conditions
Found in parsley, buttercup, arum, and lily families
Morphophysiological
Underdeveloped embryo and biochemical inhibitors
Lengthy stratification or a sequence of stratification periods at different temps; some species respond to GA
Found in gentian, buttercup, parsley, and lily families
Combinational
Physical barriers and biochemical inhibitors
Scarification (including wet heat) and stratification
Found in borage, buckthorn, and some members of legume family
Choosing Dormancy Breaking Treatments
When planning to propagate native species for seed production, it is important to consider the likelihood of seed dormancy and choose methods to effectively reduce it in that species. Within a plant species and population, individuals vary in their degree of dormancy due to complex genetic traits. If dormancy is not broken, individuals carrying this trait will be eliminated from the production population.
Several sources for finding dormancy breaking information are listed in the references for this chapter, including scientific publications, native plant nursery websites, and a searchable plant propagation database. Information in these sources comes from either scientific studies of germination or practical experience, or both. When different sources disagree significantly, it may be advantageous to divide the seed and subject different samples to each of the suggested treatments. It is also wise to consider the geographic source of the information, as levels of dormancy may differ within a species along a north-south gradient of its natural range (or altitude in other regions). Use caution in applying suggestions from native plant nursery websites: dormancy is a genetic trait that can be diminished in a production population over a few generations unless the grower has applied dormancy-breaking strategies.
For some species, little to no information is available. In those cases, first consider the natural timing of seed dispersal for the species. If its seed typically disperses in fall, cold stratification of different lengths is a good starting point. You may also find protocols for closely related species, divide the seed, and try a range of treatments based on what has worked for other members of the genus. Baskin and Baskin have published a more empirical method called the ‘move-along experiment’ that helps to determine the set of temperature treatments needed to germinate one of these unknowns. If you manage to ‘crack the code’ on a difficult species, consider sharing your techniques on the RNGR Propagation Protocols Database.
- Seed Treatments
Scarification
Scarification is a technique that simulates the natural disintegration of the seed coat to initiate germination. A hard or waxy coat will not allow the seed to soak up (imbibe) the water needed for germination until the seed coat breaks down. Seed is scarified either through natural processes such as weathering, abrasion, or partial digestion, or through artificial techniques. Seeds have natural openings for water uptake and these weather or wear away first, especially in seeds with hard seed coats, allowing the seed to imbibe water so germination can occur. The trick of scarification, then, is to accelerate the process of weathering these natural openings so seeds can imbibe water, but stopping short of damaging the seed. Some simple scarification techniques are presented here.
Sandpaper wood blocks – These blocks can be constructed using rubber cement to glue a sheet of fine-grain sandpaper to each of two flat plywood boards. Lay one sand block on a tray and use light pressure and a circular motion to move the other sand block on top of a quantity of seed sandwiched in between the two blocks. Adequate scarification is achieved after a minute or two, when seed begins to look dull.
Percussion scarification – Seeds are shaken vigorously inside a heavy glass bottle for a few minutes. Allow ample room for all of the seeds to impact the sides of the bottle. This technique is considered less aggressive and less likely to damage seeds than the sand block method. In a variation of percussion scarification, a pneumatic paint shaker was modified by Khadduri and Harrington (2002) to scarify the very hard seeds of native locust tree species (Robinia neomexicana, R. pseudoacacia).
Wet heat – Pour boiling water (212°F, 100°C) over the seeds just enough to cover them and allow to cool to room temperature, or immerse seeds in boiling water for five to twenty seconds and remove to rinse and cool. This technique is reserved for certain species and is not broadly recommended. Some species will also require stratification after wet heat. This is effective for New Jersey tea (Ceanothus americanus), hairy puccoon (Lithospermum caroliniense, followed by 90-day cold stratification), and reportedly for false gromwell (Onosmodium molle).
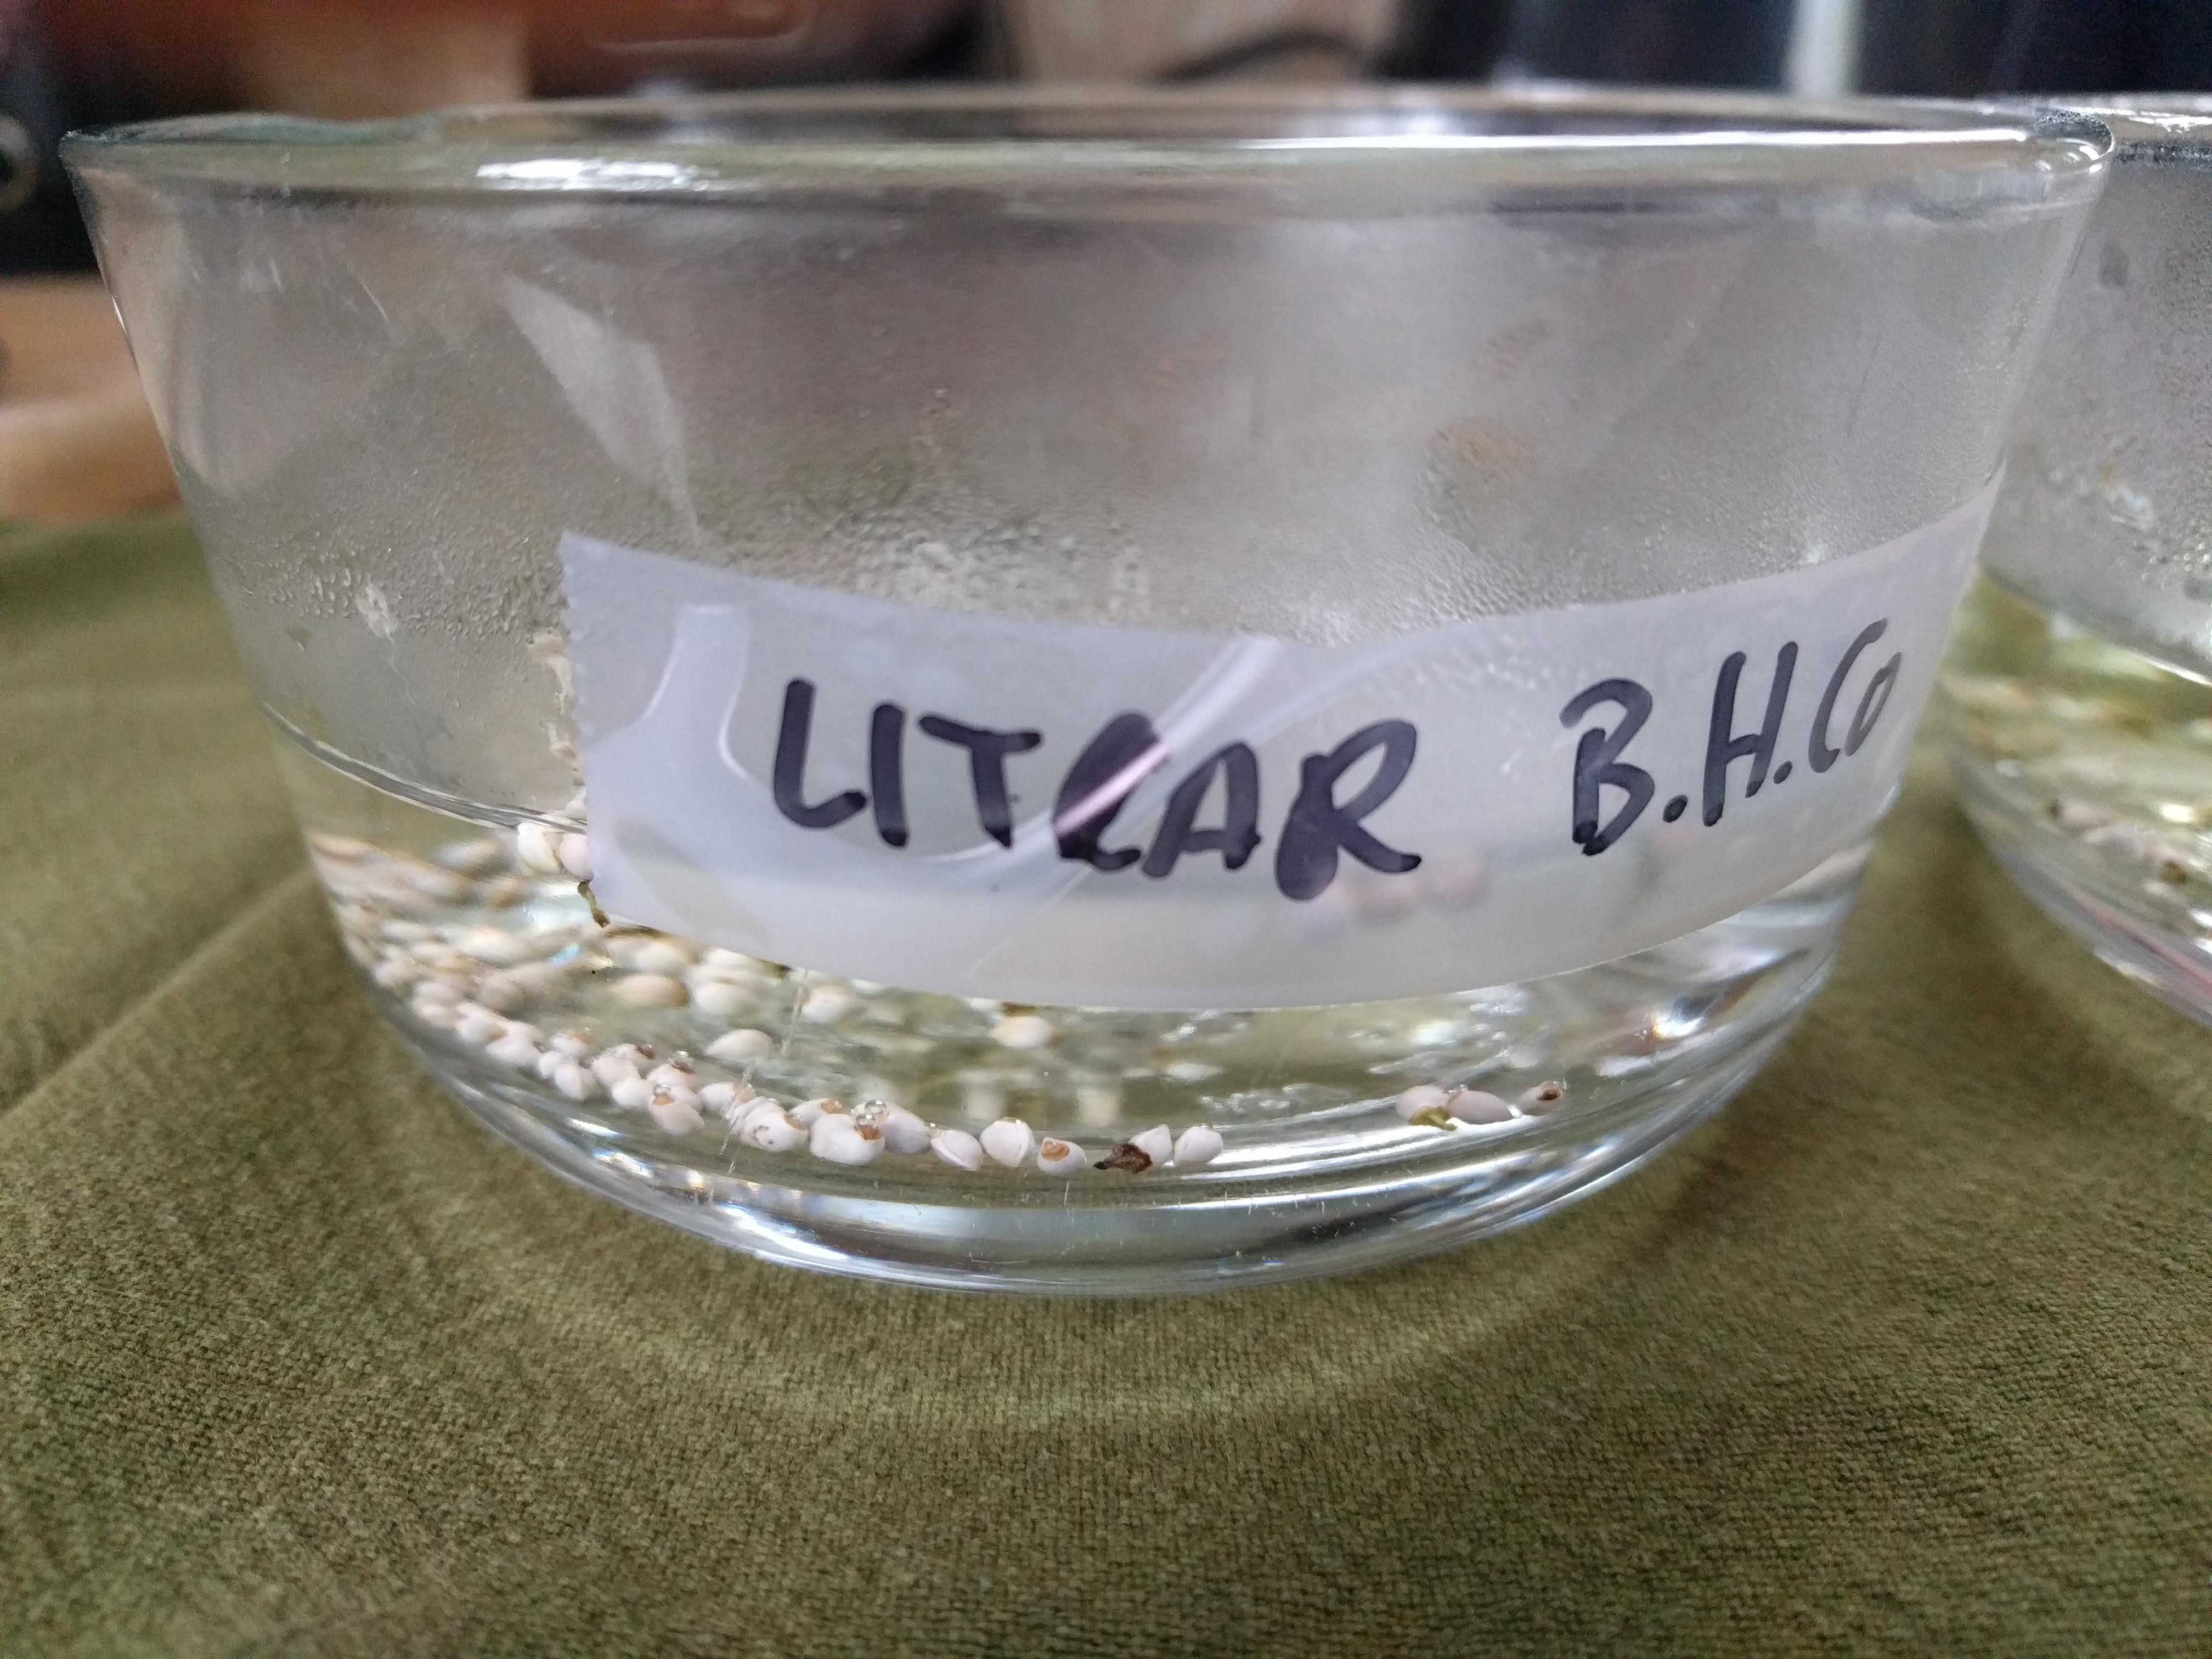
Image: Hairy puccoon, Lithospermum caroliniense, nutlets subjected to boiling water scarification prior to being cold/moist stratified for 90 days. Commercial scarifiers are also available from seed equipment manufacturers, such as a Forsberg scarifier, a sandpaper-lined cylinder with metal paddles that turn and agitate the seed. This is a very aggressive method and only a few seconds are generally needed. Precious seed can be reduced to flour if left on too long. Seed may already have been scarified as part of the cleaning process (e.g., if a scarifier/brush machine was used for dehulling legume seeds). Contact your seed vendor/producer to determine if the seed has been cleaned with a scarifier/brush type machine.
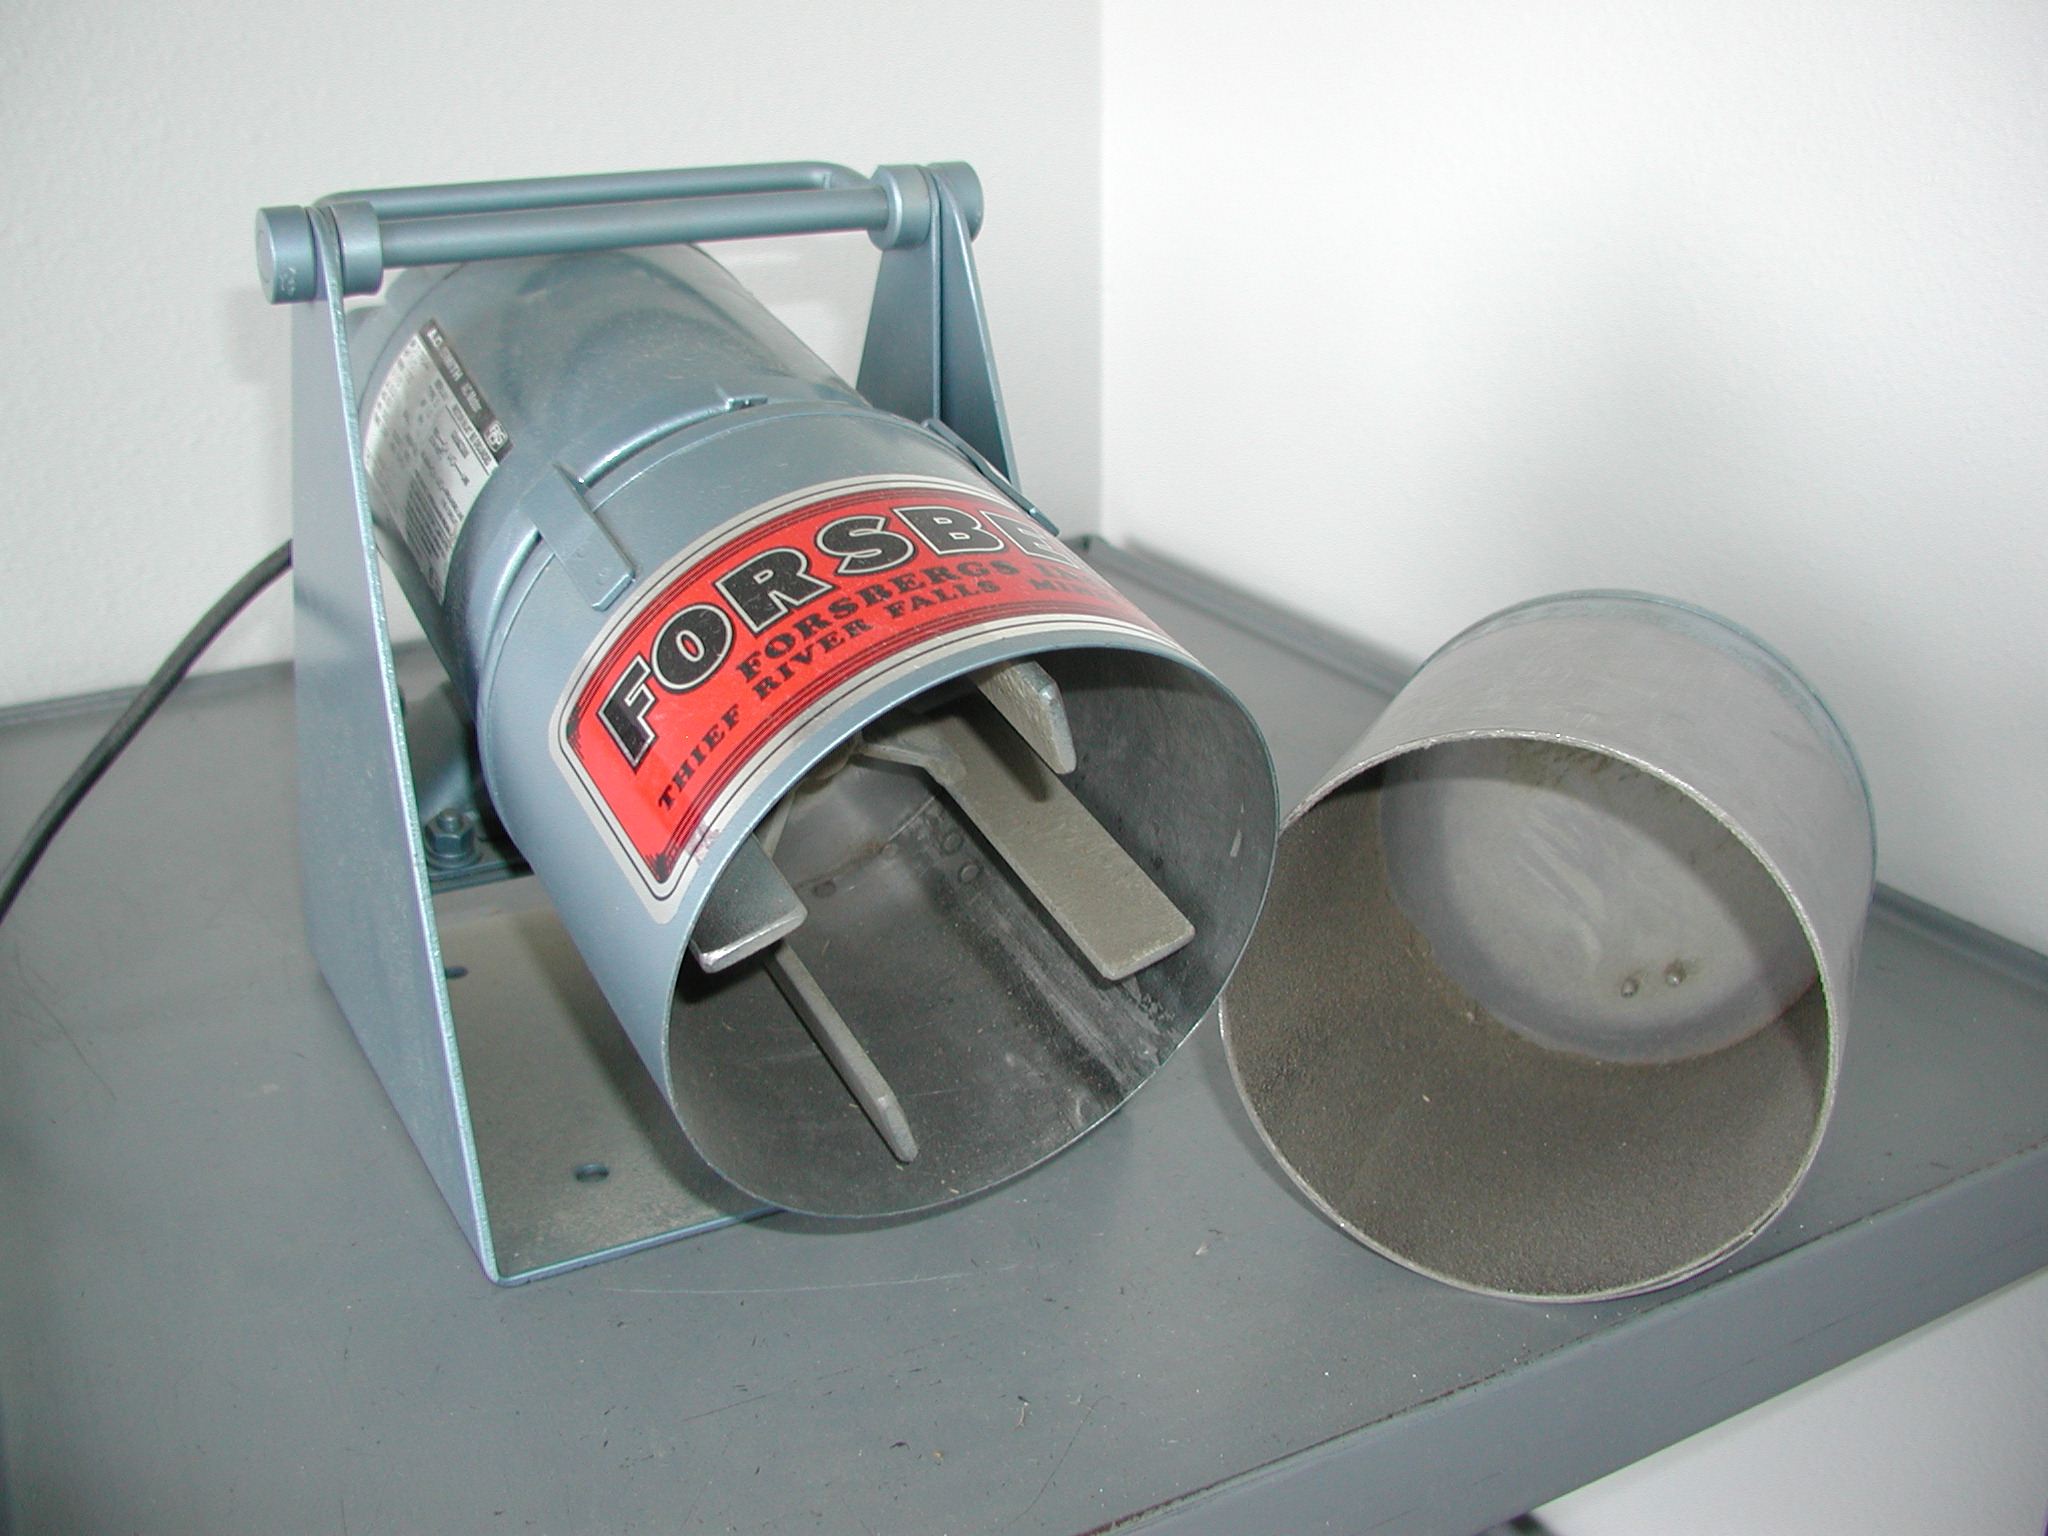
Image: A Forsberg scarifier, to be used with caution. Stratification
Stratification is a process whereby seeds are placed in a moist medium such as clean sand or vermiculite at appropriate temperatures for a specified period of time. The idea is to mimic critical conditions necessary for germination that seeds are exposed to naturally in the environment after dispersal. Generally, if seeds are dispersed in autumn, they may require cold, moist stratification. If dispersed in late spring or early summer, they may require warm, moist conditions, or warm followed by cold stratification, as in Michigan lily (Lilium michiganense). Mix seed with an equal amount of moist, sterile sand, sawdust, peat, or vermiculite and place in a zip-closure bag or small plastic container. Avoid excessive moisture; water should not be pooled anywhere in the bag or container. Use vermiculite if working with species adapted to drier conditions to minimize the risk of rot. If it is desirable to separate the seed from the medium after stratification, one strategy is to place the seed in a small fine-mesh (organza) bag such as those used for wedding favors, then sandwich the bag between layers of moist stratification media.
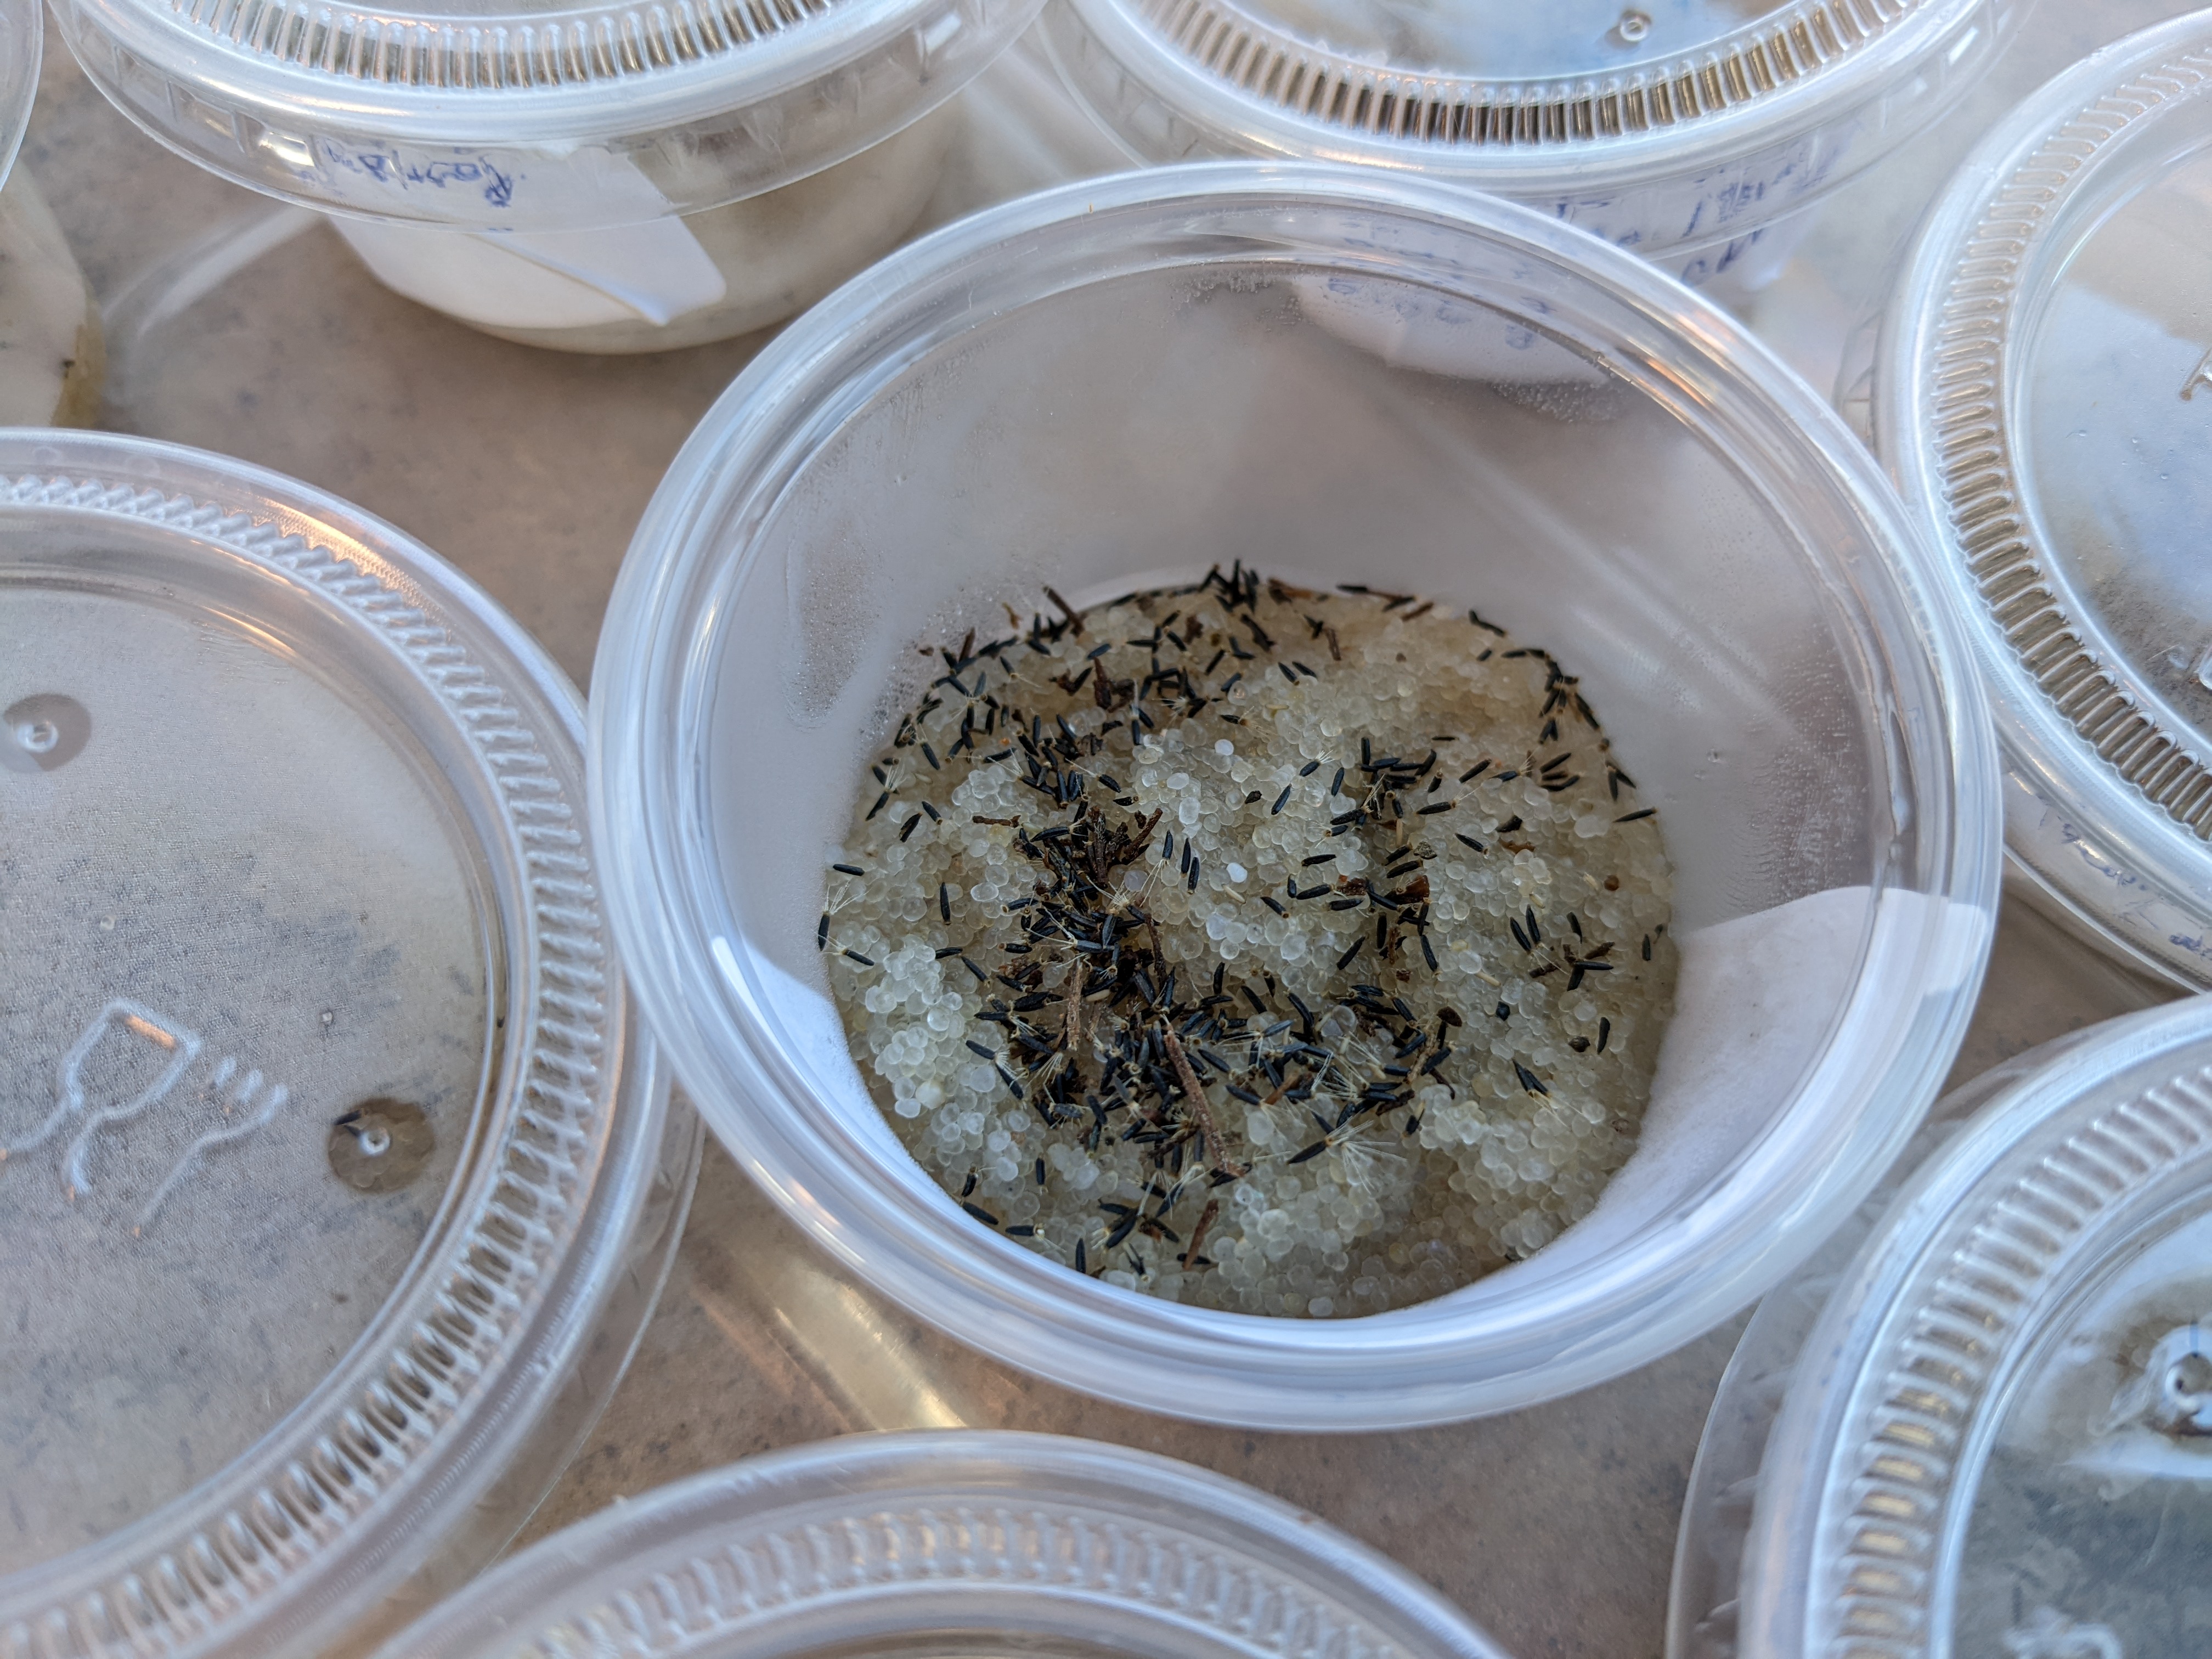
Image: Seeds of common boneset (Eupatorium perfoliatum) in containers of moist silica sand placed at 40°F for 60 day stratification. Effective temperatures for cold stratification are from 32 to 45 °F (0 to 10 °C), with 41 °F (5 °C) considered optimal for many species (Baskin and Baskin 1998). Some species require as little as ten days, others as long as 120 days. A few species, among them American vetch (Vicia americana) and butterfly milkweed (Asclepias tuberosa), will germinate at these temperatures, so check bags weekly to look for emergence of the radicle and plant immediately if this occurs. Some species may germinate best when stratified under natural winter temperature fluctuations (for example, in an unheated building). If sowing seeds in flats for outdoor stratification, cover with screen mesh to protect seeds from being displaced by animals or heavy rains. Cold frames can be used for stratification and extending the growing season in the spring. Effective temperatures for warm stratification are from 68 to 94°F (20 to 35°C), with 68 to 76°F (20 to 24°C) optimal for many species with this requirement (Baskin and Baskin 1998).
Rhizobium Inoculation
Rhizobium are types of nitrogen-fixing bacteria that live symbiotically with the roots of many species, typically forming nodules on rootlets of the plant. They “fix” nitrogen by converting gaseous nitrogen from the air spaces in the soil into plant-available ammonia nitrogen, which directly benefits the host plant. The plant, in turn, provides carbohydrates for the rhizobium. Strains of rhizobium have been isolated and are commercially available for groups of species, notably the genera Amorpha, Lespedeza, and Dalea. Rhizobium comes as a black powder that is mixed with the seed just prior to planting. Greenhouse-grown seedlings of legumes benefit from rhizobium inoculation. It may be unnecessary to inoculate with rhizobium, however, if seedlings will be planted within a few weeks after germination into native soil where rhizobium naturally occurs.
Mycorrhizal Inoculation
Mycorrhiza means “fungus root” and describes a symbiotic relationship between plants and fungi. This is common in many, if not most, plant species. Mycorrhizal fungi are naturally occurring in healthy soil, but may need to be provided for soils that have been fallow, flooded, or eroded over long periods. Sites disturbed by extensive and long-term construction grading or altered by mining will also benefit from inoculation. Commercial inoculum consisting of endomycorrhizal spores, host plant roots, and a sterilized medium is now available, and this can be incorporated into the soil at the time of seeding or transplanting. Inoculation of the site with healthy soil from a different location is another option.
- Greenhouse Propagation
Once viable seed is obtained and pre-treated to remove dormancy, it is ready to plant in the greenhouse. Critical factors include a suitable container and potting medium, water, soil temperature, light, and air.
Containers
Containers should provide good drainage and space for root development and yet be small enough to provide efficient use of potting medium and bench space. Nurseries interested in retail seedling/plant production will first germinate seeds in flats, which take up much less greenhouse space. Seedlings are then transplanted into disposable trays with perforated pull-apart planting cells for retail marketing.
Seedlings for transplant into seed production rows can be grown in plug trays or a modular reusable “cone-tainer” and tray system. In recent years, the TPC has had success with 2.5” deep, 73-cell plug flats that are ridged to direct root development downward and have ¾” bottom openings to encourage root pruning and the formation of firmly rooted plugs for transplanting. It is easier to maintain even watering with these plugs than deeper cone-tainers, and a transplantable plug can be produced in a shorter time for most species. In addition, the shallower depth of holes required for transplanting into production rows means that the holes are less apt to collapse and require re-digging. We observe little mortality of these plugs transplanted into prepared fields in spring, generally in May to early June. In very dry years, we provide supplemental water once or twice a week for the first few weeks in the field, but normal rains are usually sufficient for establishment of transplanted plugs.


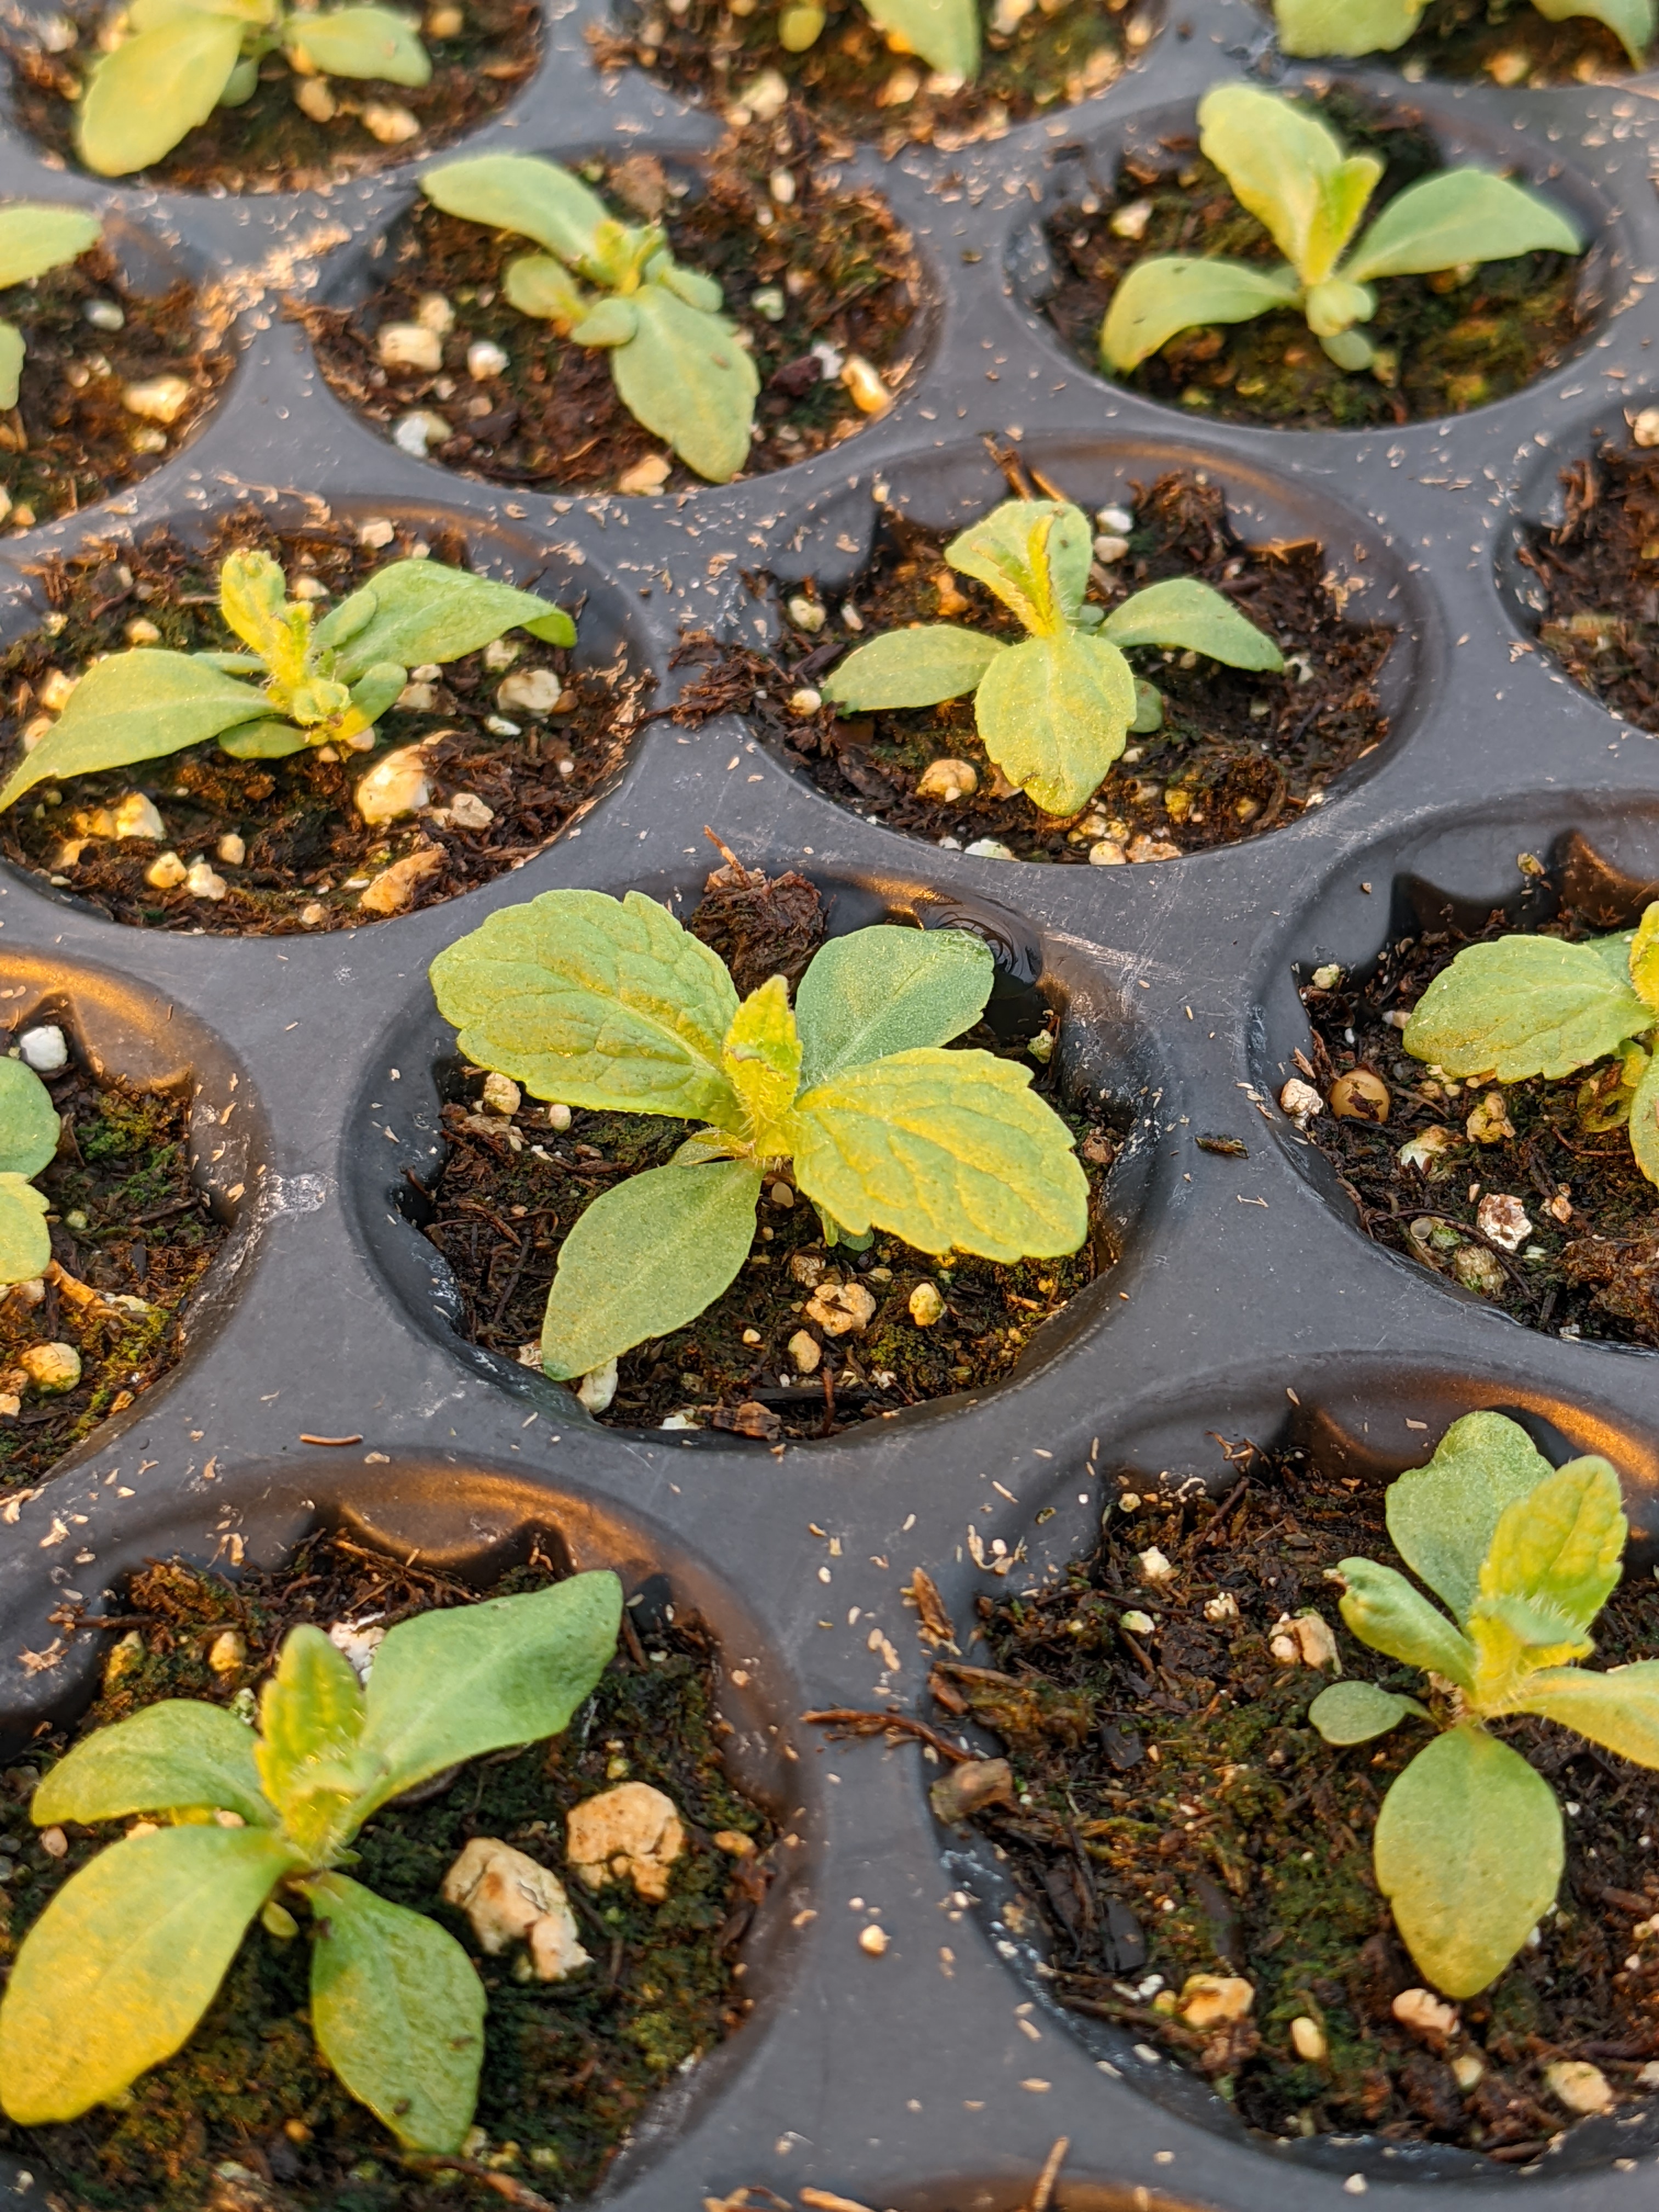
Images (left to right): seedlings of common boneset (Eupatorium perfoliatum) with first true leaves in a germination tray (with wooden chopstick for scale); one of the seedlings extracted with tweezers to show roots at suitable stage for dibbling into plugs (the chopstick serves to dibble a planting hole in each plug); seedlings in plugs two weeks after dibbling.
In the past, the TPC used Stuewe “cone-tainers” for greenhouse propagation. Cone-tainers are designed for accommodating taproot growth in conifer tree seedlings. They worked well for perennial prairie species – particularly those that put down tap roots like compassplant (Silphium laciniatum), butterfly milkweed (Asclepias tuberosa), and Baptisia spp. Various sizes of cone-tainers are available in yellow UV-stabilized plastic for longer life. The so-called “fir” cells, approximately 6.5 in deep with a 1-in. diameter at the top, work well for most native species. Each tray accommodates 200 cone-tainers, 100 cone-tainers per square foot, so it’s also an efficient use of limited bench space. Planting “dibbles” are available that match the size and shape of the cone-tainers. The cone-tainers and dibble system allow the roots of seedlings to be planted deeply enough so that roots can tap into subsoil moisture. Irrigation isn’t necessary, especially with spring or fall transplanting when rains are more frequent.
There is no single “best” container for prairie plant propagation. Some species that form fleshy basal rosettes in the first year of growth (e.g., Lobelia spp.) seem to benefit from being started in wider, shallower plugs or pots. For species that are sensitive to root disturbance during transplanting, consider producing plugs in biodegradable containers such as coir pellets or Stuewe Zipset Plant Bands, made from milk carton paperboard.

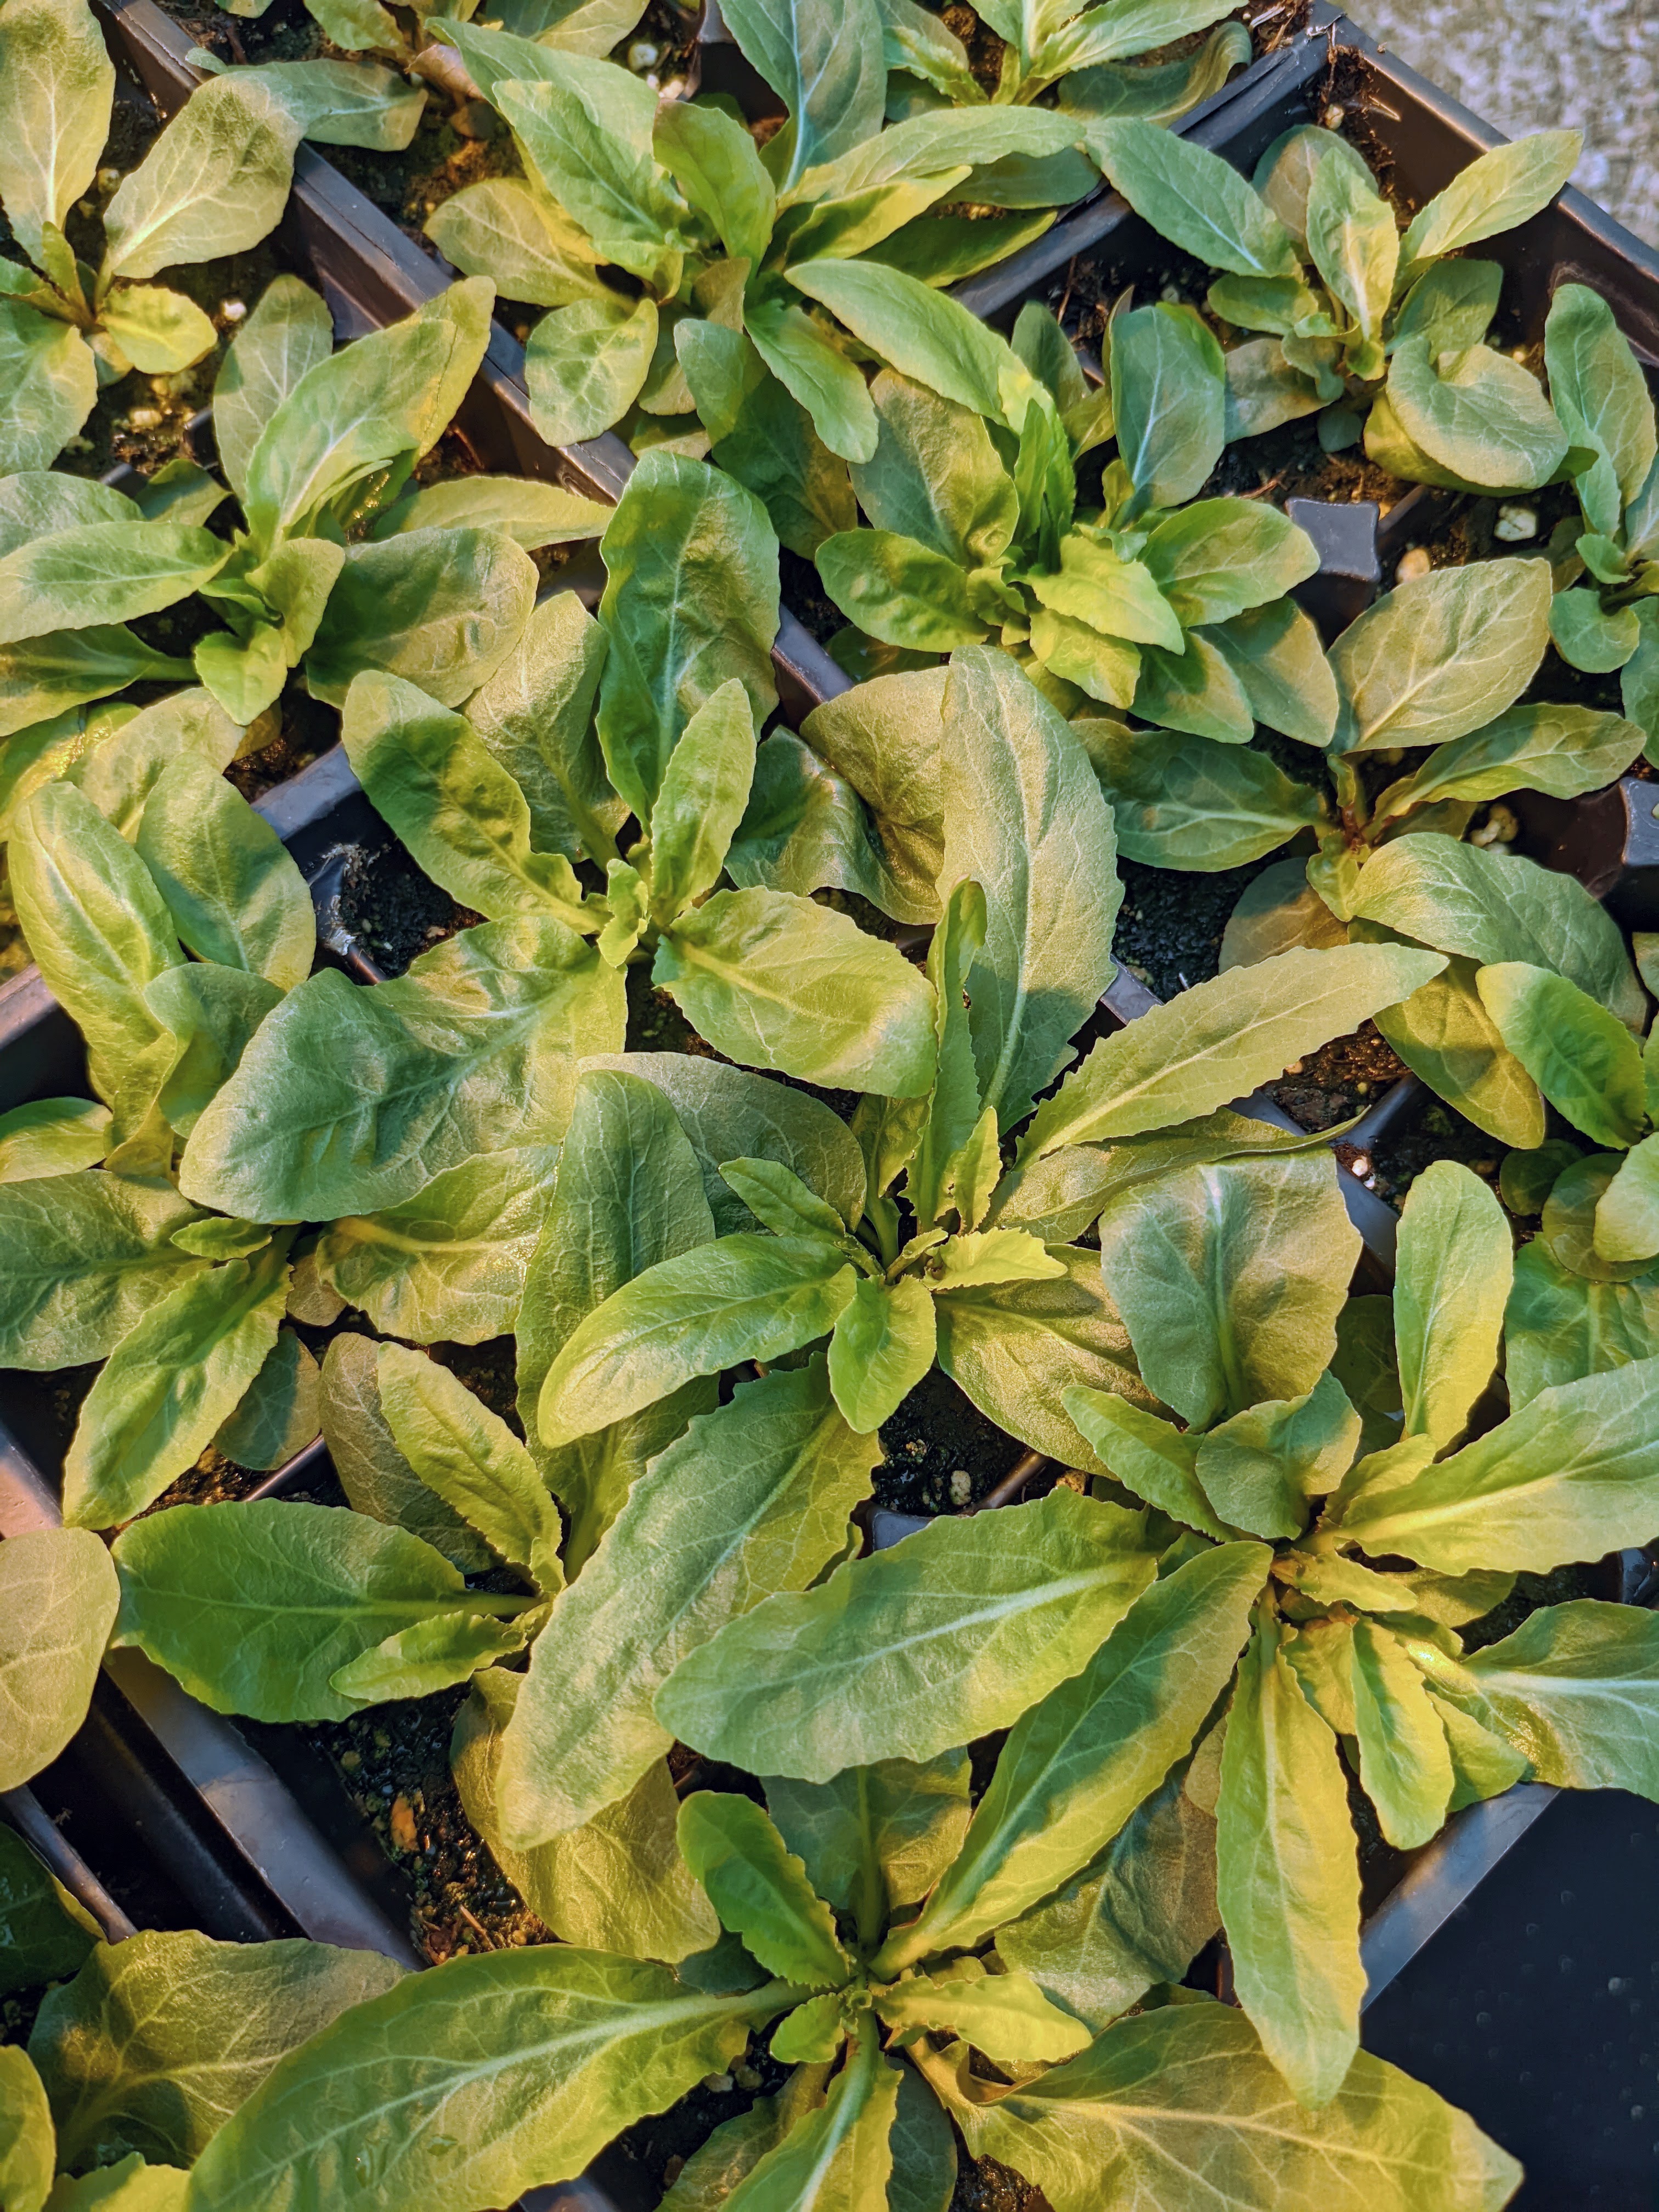
Images (left to right): cardinalflower seedlings (Lobelia cardinalis) nearly one month after dibbling from a germination flat into 6-pack trays; the same seedlings with leafy basal rosettes three weeks later; and plants ready for transplanting to the field six weeks after dibbling into 6-packs.
Potting Medium
A good potting medium should be light enough to allow for good root development, provide adequate drainage, and have enough fertility for seedlings to grow quickly in the greenhouse environment and become large enough for transplanting in a reasonable amount of time. It should also be sterile, meaning free of weed seed and disease organisms. We recommend a soilless mix (less than 20% soil) consisting of 10% sterile soil and 10% composted manure, about 50% milled peat moss or coco coir, and the remainder equal parts perlite and vermiculite.
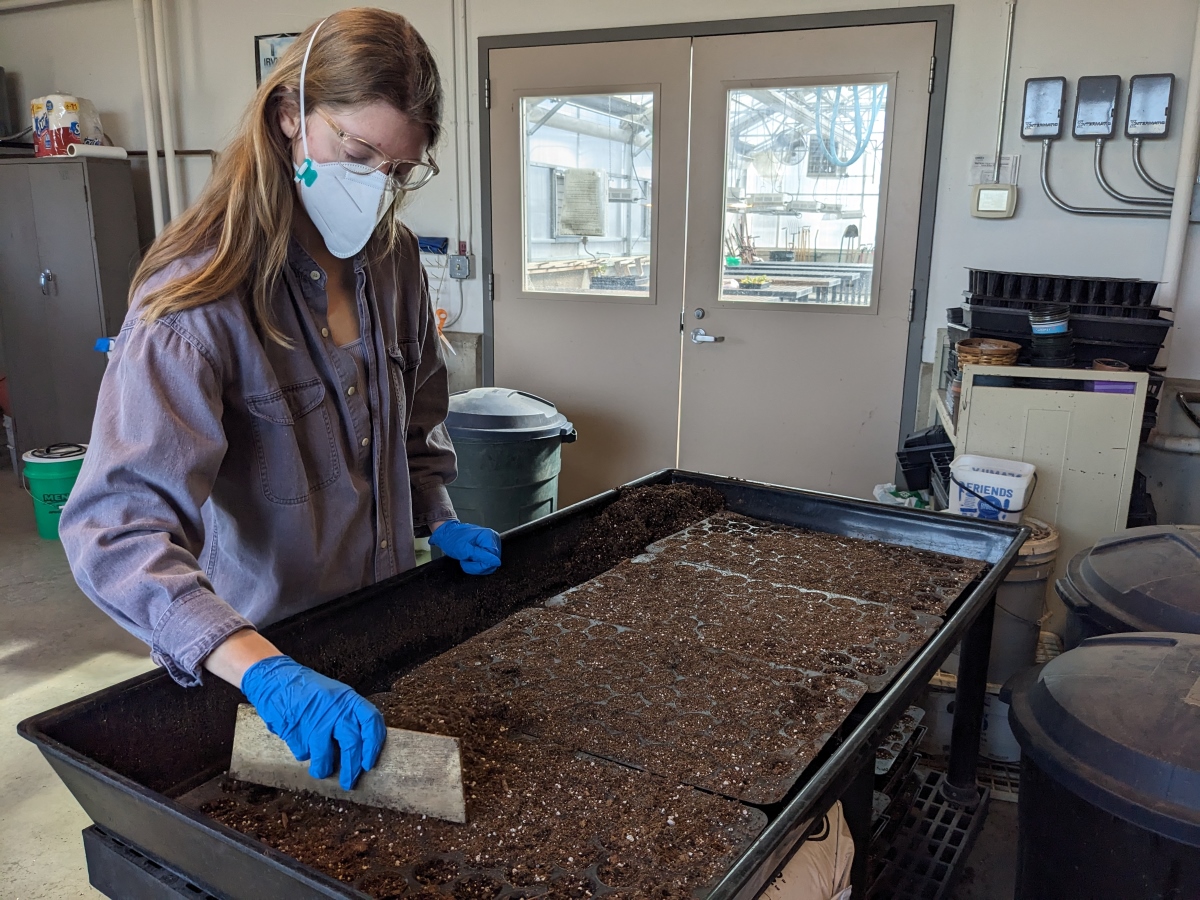
Caution: All of these materials are extremely dusty. Wear a high-quality particulate mask when handling and mixing materials. Gloves and dust goggles are also recommended. Materials should be moistened before mixing to reduce dust.
Pre-mixed sterile potting mix for plug production can be purchased in bulk from nursery and greenhouse supply companies. Some formulations include potentially beneficial additives such as mycorrhizal inoculum (generally a single species) and biological fungicide (a bacterial species). For propagation of most prairie plants, we supplement “general purpose” mixes by adding additional perlite (2.8 gallons), vermiculite (2.8 gallons), and coated, slow-release fertilizer pellets (19 oz, 15-9-12 formulation) per 3.8 cubic foot compressed bale (7 cu ft expanded). Seedlings are susceptible to damage from over-fertilization, particularly legumes. Controlled-release fertilizer has the added benefit of continuing to provide fertility after transplantation of seedlings into production plots. A drill attachment designed for mixing drywall joint compound helps combine these ingredients while also breaking up chunks of compressed media.
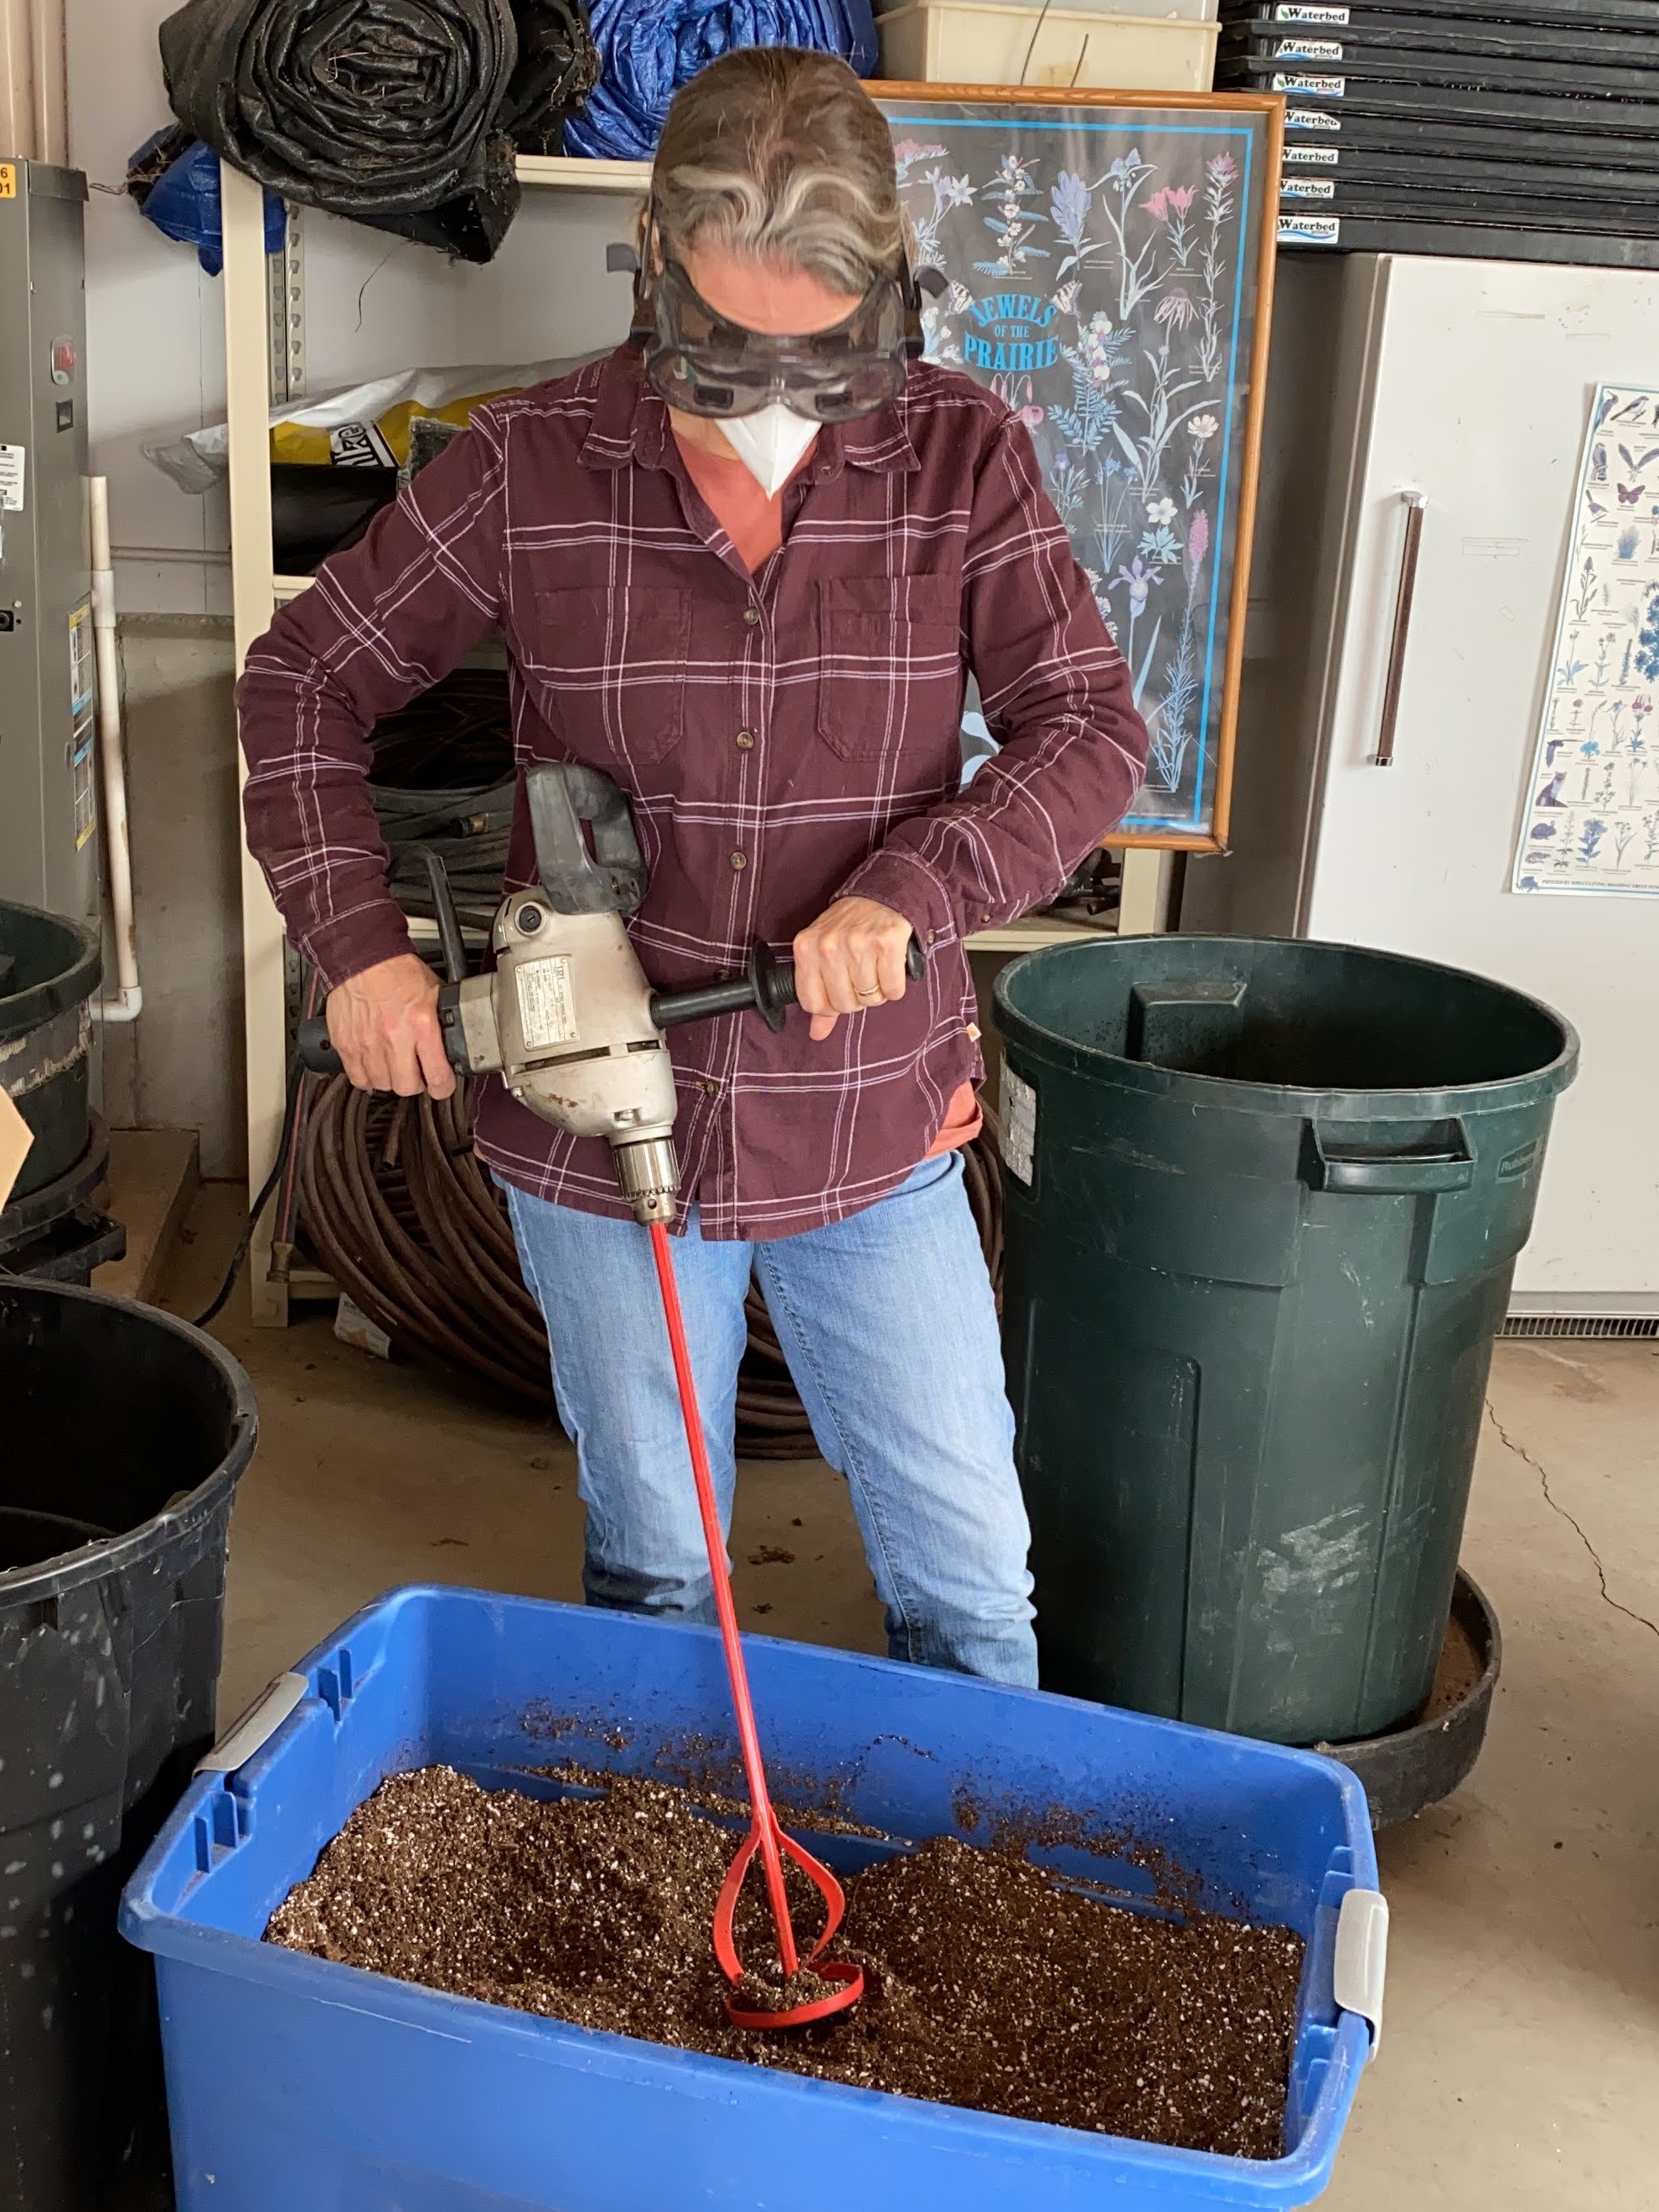
Image: Small amounts of prepared soilless mixes can be amended and mixed efficiently with a joint compound mixer. Goggles and a particulate mask provide protection from dust particles. If you prefer to mix your own potting medium, the recipe below makes approximately 1 cubic yard of soilless mix (enough for 40 trays of 200-cell “fir” cone-tainers). To improve the sustainability of this mix, you could substitute coco coir for the peat moss. Coir is available in compressed, dry bricks that expand greatly when moistened (one 11-lb brick expands to 3 cu ft). If mixing on the floor, sweep and vacuum the area before mixing to remove seeds, debris, and other contaminants:
Peat moss (4 cu. ft/bag) or coir (see above text) 2 bags (8 cu. ft) Vermiculite (medium texture, 4 cu. ft/bag) 1/2 bag (2 cu. ft) Perlite (4 cu. ft/bag) 1/2 bag (2 cu. ft) Sterile soil two 5-gal buckets Composted (sterile) manure manure 40-lb bag Osmocote® Plus fertilizer 15-9-12 (180 days) 8 lb Screen peat moss, soil, and composted cow manure through a ½-in. mesh hardware cloth screen to break up or remove large pieces that would tend to clog and create air pockets as cone-tainers are being filled. Add remaining ingredients, mix with shovels on a clean floor, and fill trays.
Strategy for Filling and Seeding Cone-tainers or Plug Trays
We fill several plug trays at a time within a larger, heavy duty garden tray, banging the large tray several times to settle the medium and sprinkling the plugs with water after each addition of soilless mix, until the level of the medium is consistent across the plugs and flush with the top of the plug tray. It will continue to settle somewhat as the trays are watered in, leaving a little space at the top for water to puddle.
Filling plug flats with potting mix. When filling trays of cone-tainers, tamp the tray on the floor to firm potting medium and remove large air pockets. Avoid overfilling. Leave about ¾-in. unfilled space at the top of each cone-tainer. This space acts as a reservoir during watering, allowing the water to seep in slowly, helping to saturate the entire soil column. Water cone-tainers frequently for a day or two before planting to fully hydrate the potting medium. Refill any cone-tainers that may have settled excessively.
Attempt to sow several seeds per cone-tainer or plug cell. If seed has been mixed with damp sand or other medium for stratification, it may be impossible to distinguish small seeds from the medium. If this is the case, place the damp seed/medium mixture into a shallow dish and mix thoroughly to evenly distribute the seed within the medium. Use a small, flat implement (point of a knife or wood popsicle stick) to place a small amount of mixture in each cone-tainer.
Getting an appropriate number of seeds per cell is guesswork with tiny seeds, but experience will improve efficiency. Thinning may be necessary if too many seeds germinate in each cell, and this could lead to unintended selection. Blank cells will result if no viable seeds were planted, wasting greenhouse space and making it more difficult to achieve even watering. For larger seeds with high purity and viability (90% or more), one to three seeds per container is adequate. Increase accordingly for seed of poor or unknown quality. Cover with no more than 1/8- to ¼-in. of soil for most species. Caution: Very tiny seeds should not be covered! Additional information and precautions on sowing seed of specific species can be found under the following sections on light, temperature, and water requirements for propagation.
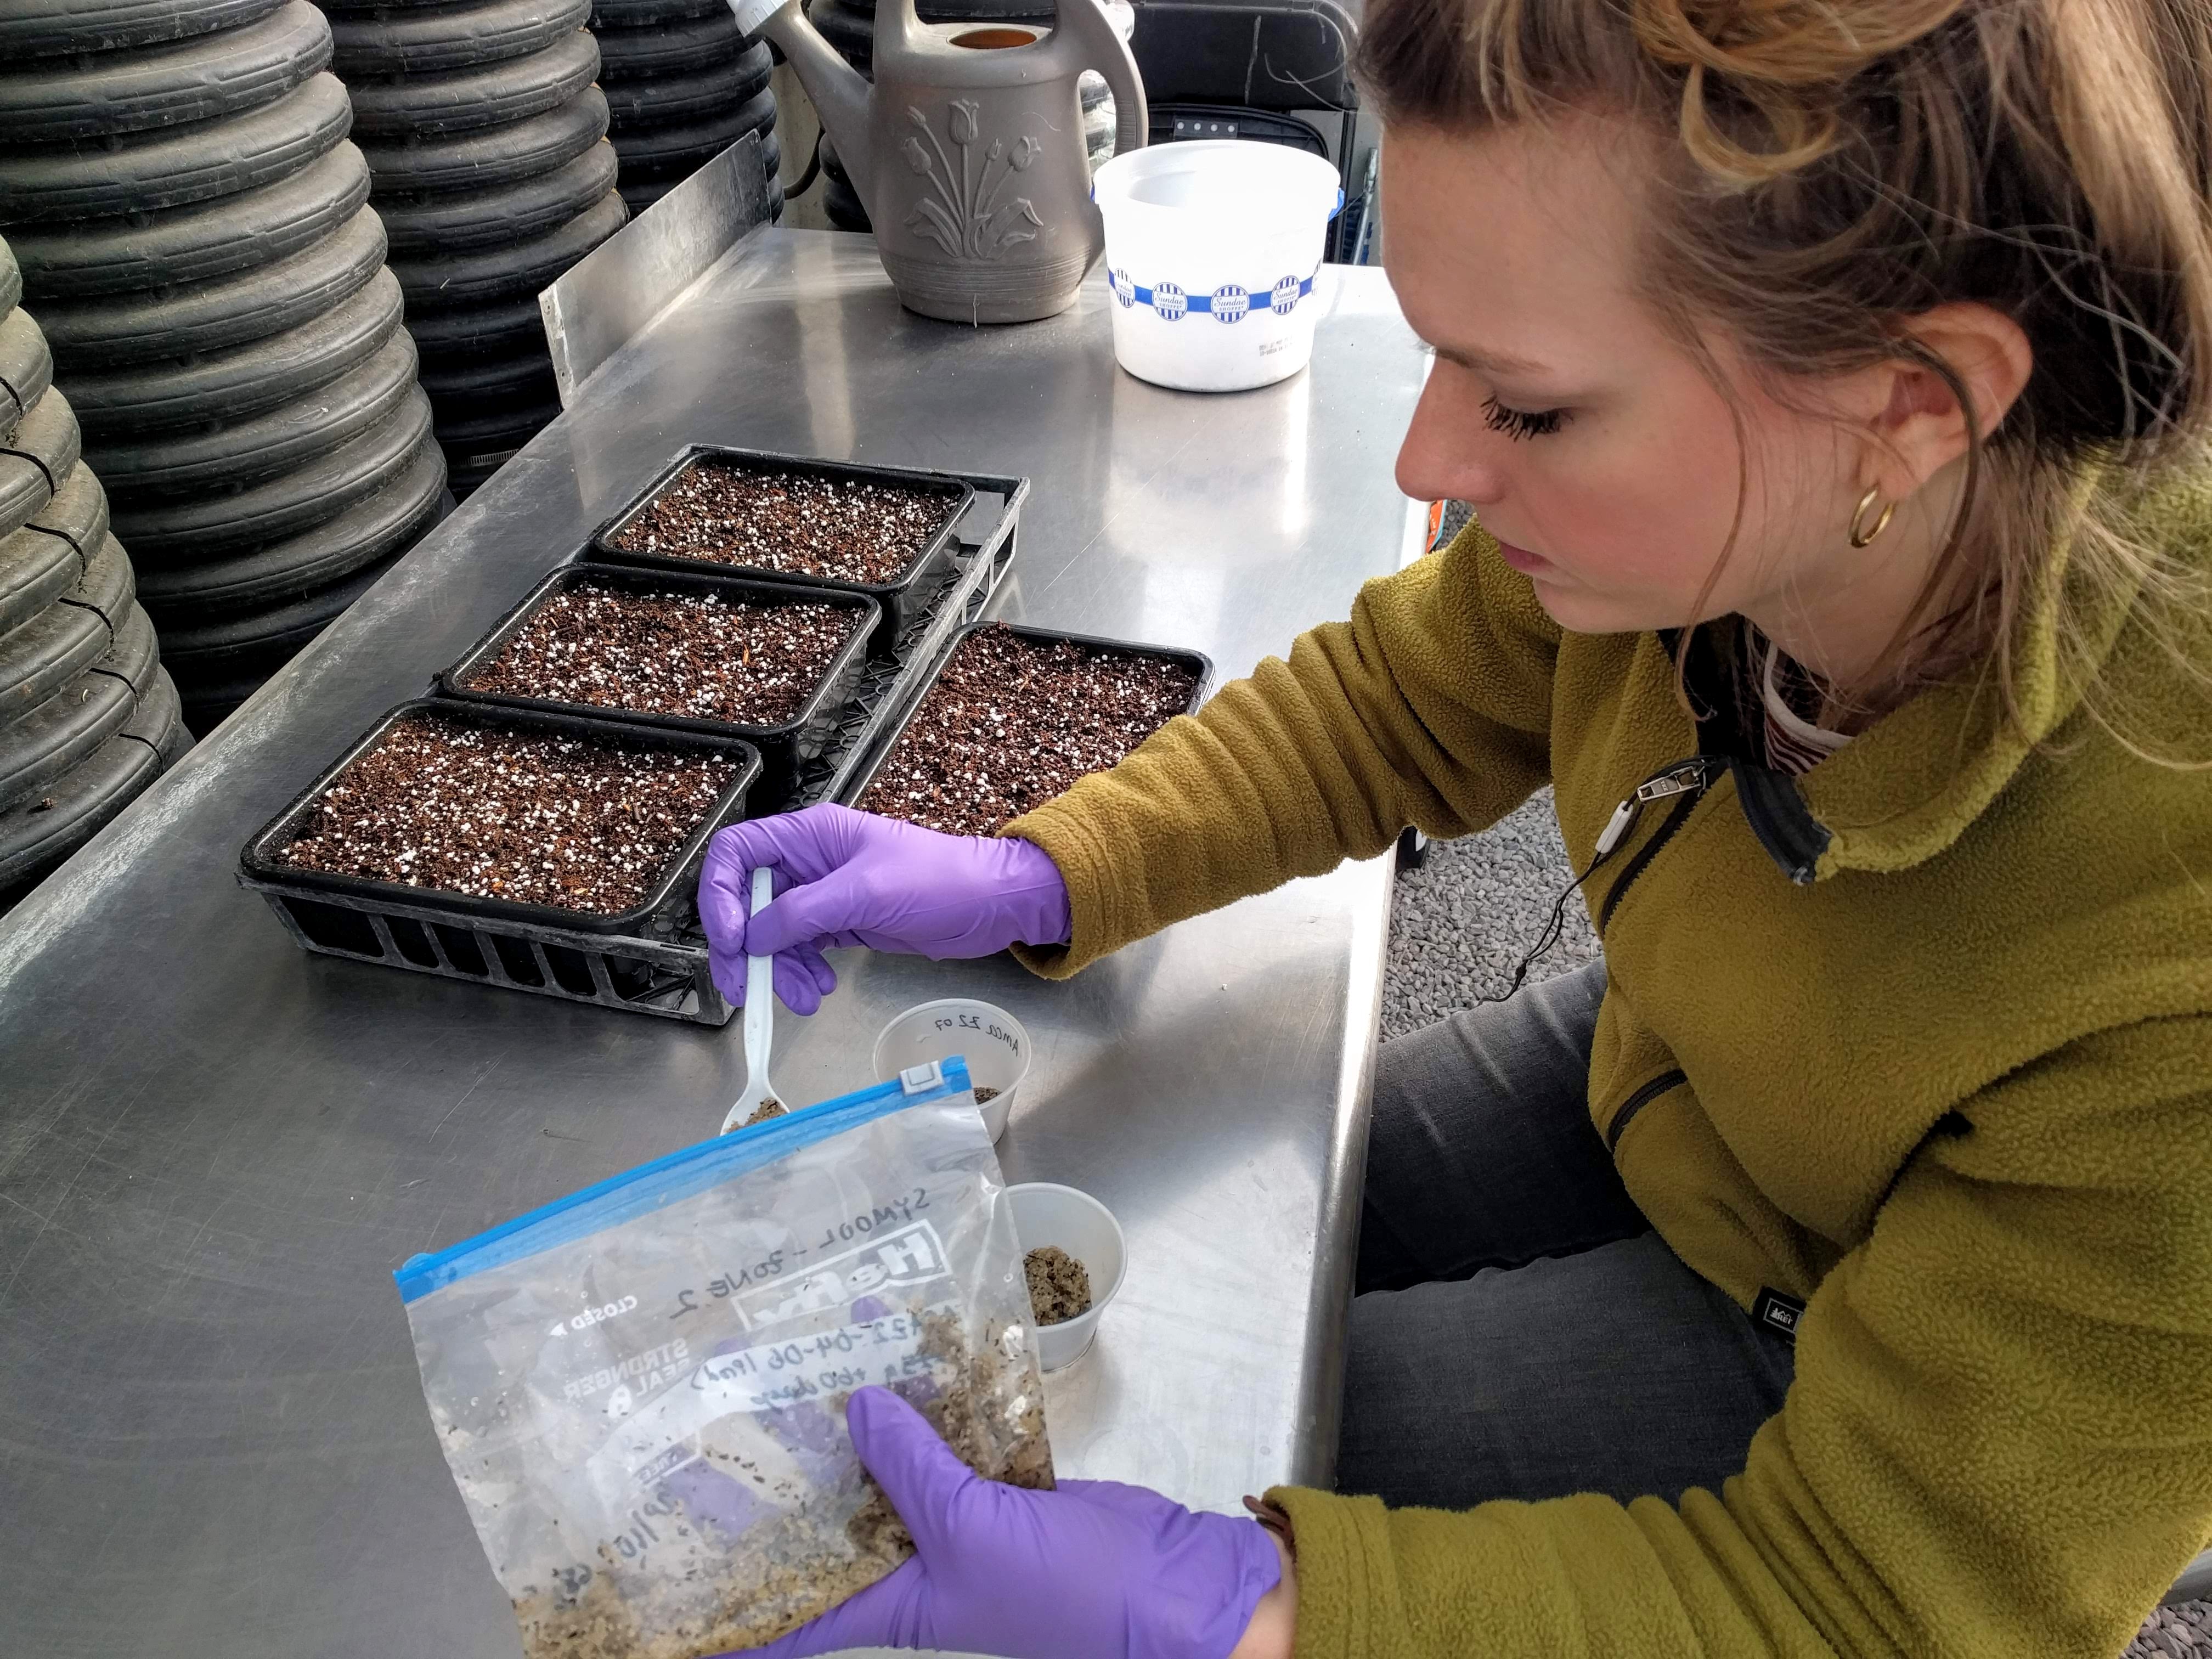

Image: Samples of stratified seed are spread evenly on the surface of prepared germination trays. Small seeds such as these skyblue aster achenes (Symphyotrichum oolentangiense) are very lightly covered with soil.
One strategy to ensure even planting of plug trays is to start seed in germination flats, then prick out seedlings with forceps (tweezers) and transplant them individually into plugs when ready, generally when the first set of true leaves has emerged. There is a risk that individuals with genetic traits that cause them to germinate later could be selected out of the population by this practice. To avoid selection against later germination, retain the germination flats and add later emerging seedlings to plugs when they are ready.
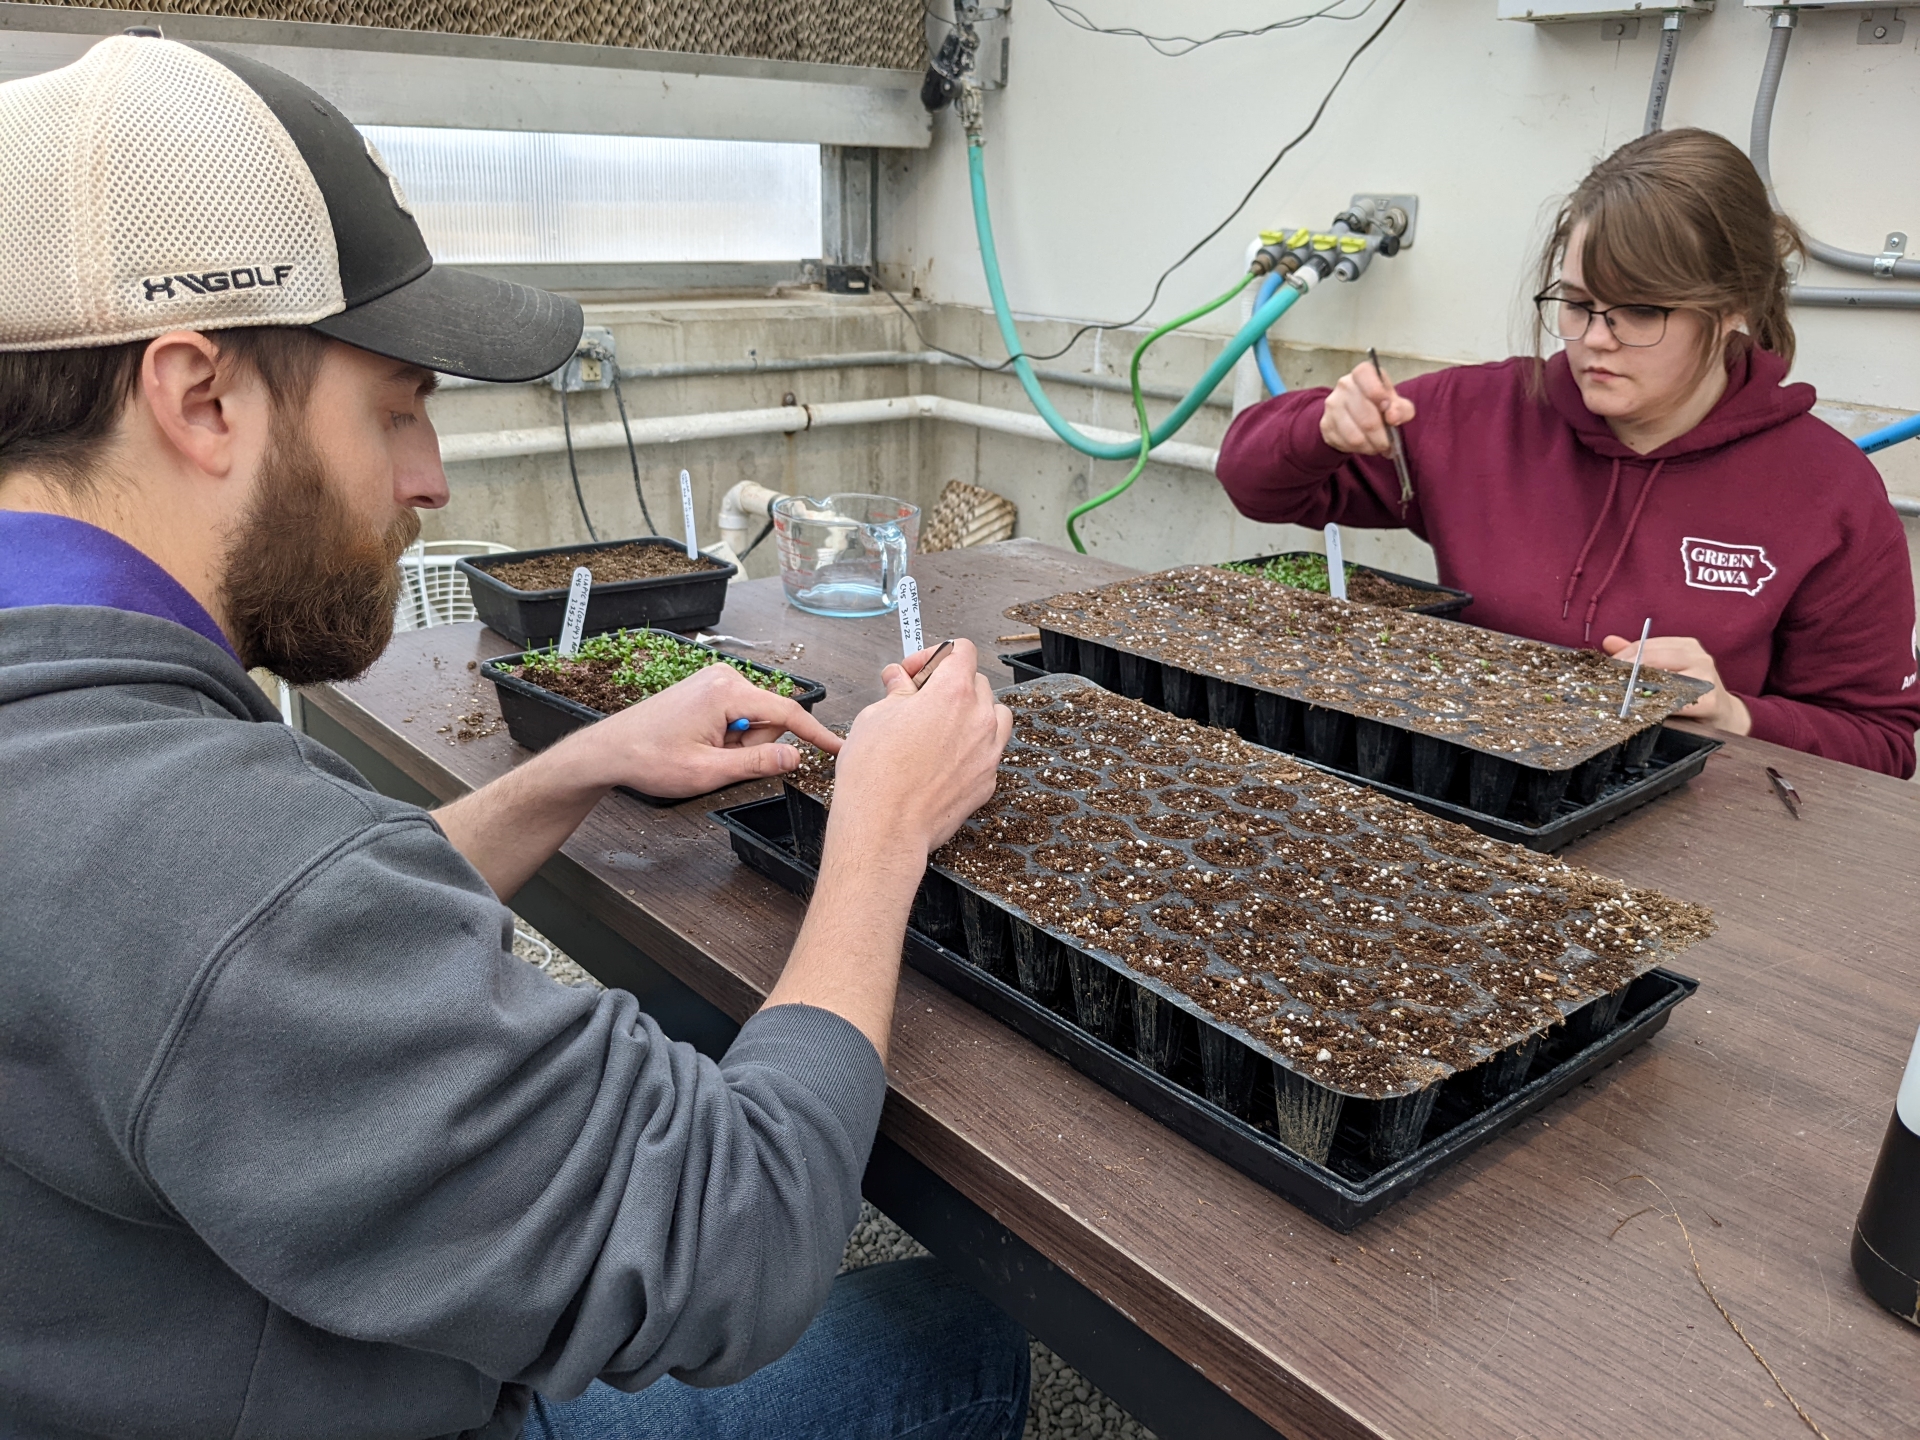
Image: Seedlings from germination trays are dibbled into plugs using forceps, ensuring that all plugs in a flat are filled. This practice is labor-intensive but makes efficient use of seed and greenhouse space. Light
See Appendix A, Table 2A for recommended planting depth and light requirements
Natural light should be sufficient for seedling establishment in the greenhouse from mid-March through mid-September. Sow seeds in early February and expect germination and emergence to occur over a two- to six-week period. Greenhouse-grown seedlings grow well with only natural light through March and April and into May, when transplanting into production plots begins. Some species require light for germination. These are typically small-seeded species, including Culver’s root (Veronicastrum virginicum), mountainmints (Pycnanthemum spp.), grass-leaved goldenrod (Euthamia graminifolia), bonesets and Joe Pye weeds (Eupatorium and Eutrochium spp.), great blue lobelia (Lobelia siphilitica), and prairie sage (Artemisia ludoviciana). These do best if sprinkled on top of the soil surface and kept continually moist until the seed leaves (cotyledons) are evident.
Temperature
Germination will occur throughout a range of temperatures but will be slower with less than optimal temperatures. The risk of fungal pathogens and rot increases if seed does not germinate and is non-dormant. Warm-season grasses and legumes germinate best in warm soils greater than 70°F (21°C ). Cool-season grasses and many forb species will germinate more readily in cool soil temperatures of 40 to 50°F (5 to 10°C) and may cease germination at temperatures above 77°F (25°C). Soil temperature in the planting trays fluctuates with greenhouse air temperature (72°F, 22.2°C daytime and 60°F, 15.5°C nighttime). Pulses of emergence occur on sunny days with some species, presumably because an optimum soil temperature has been reached from solar heating. Covering plug trays or cone-tainers with translucent plastic increases soil temperature and improves the germination of species that require warm soil temperatures. Use this technique with caution. Lethal temperatures can occur quickly under the plastic with full summer sun. Plastic should be removed as soon as the first seedlings emerge to avoid overheating new seedlings. Cooler soil temperatures can be achieved by setting trays on the floor. If sowing seed in germination flats, precise regulation of soil temperature can be achieved with propagation mats. Propagation mats are placed under the flats and are plugged into an electrical temperature control box. Soil temperature in the flats is regulated by a soil temperature probe from the control box inserted into the potting soil of one of the flats. These are commercially available at reasonable cost from nursery or greenhouse supply companies.
Watering
Proper watering is critical to greenhouse propagation. Watering methods must be adjusted depending on the growth stage of the plants. It is important to keep the soil surface moist until germination has occurred, especially for small seeds that require light and are sown directly on the soil surface. An automated mist system is helpful during this stage of propagation. If using a wand or watering can, use a sprinkler head that produces small gentle droplets and low pressure so that watering doesn’t dislodge seed, force it deeper into the soil, or splatter it out of the containers.
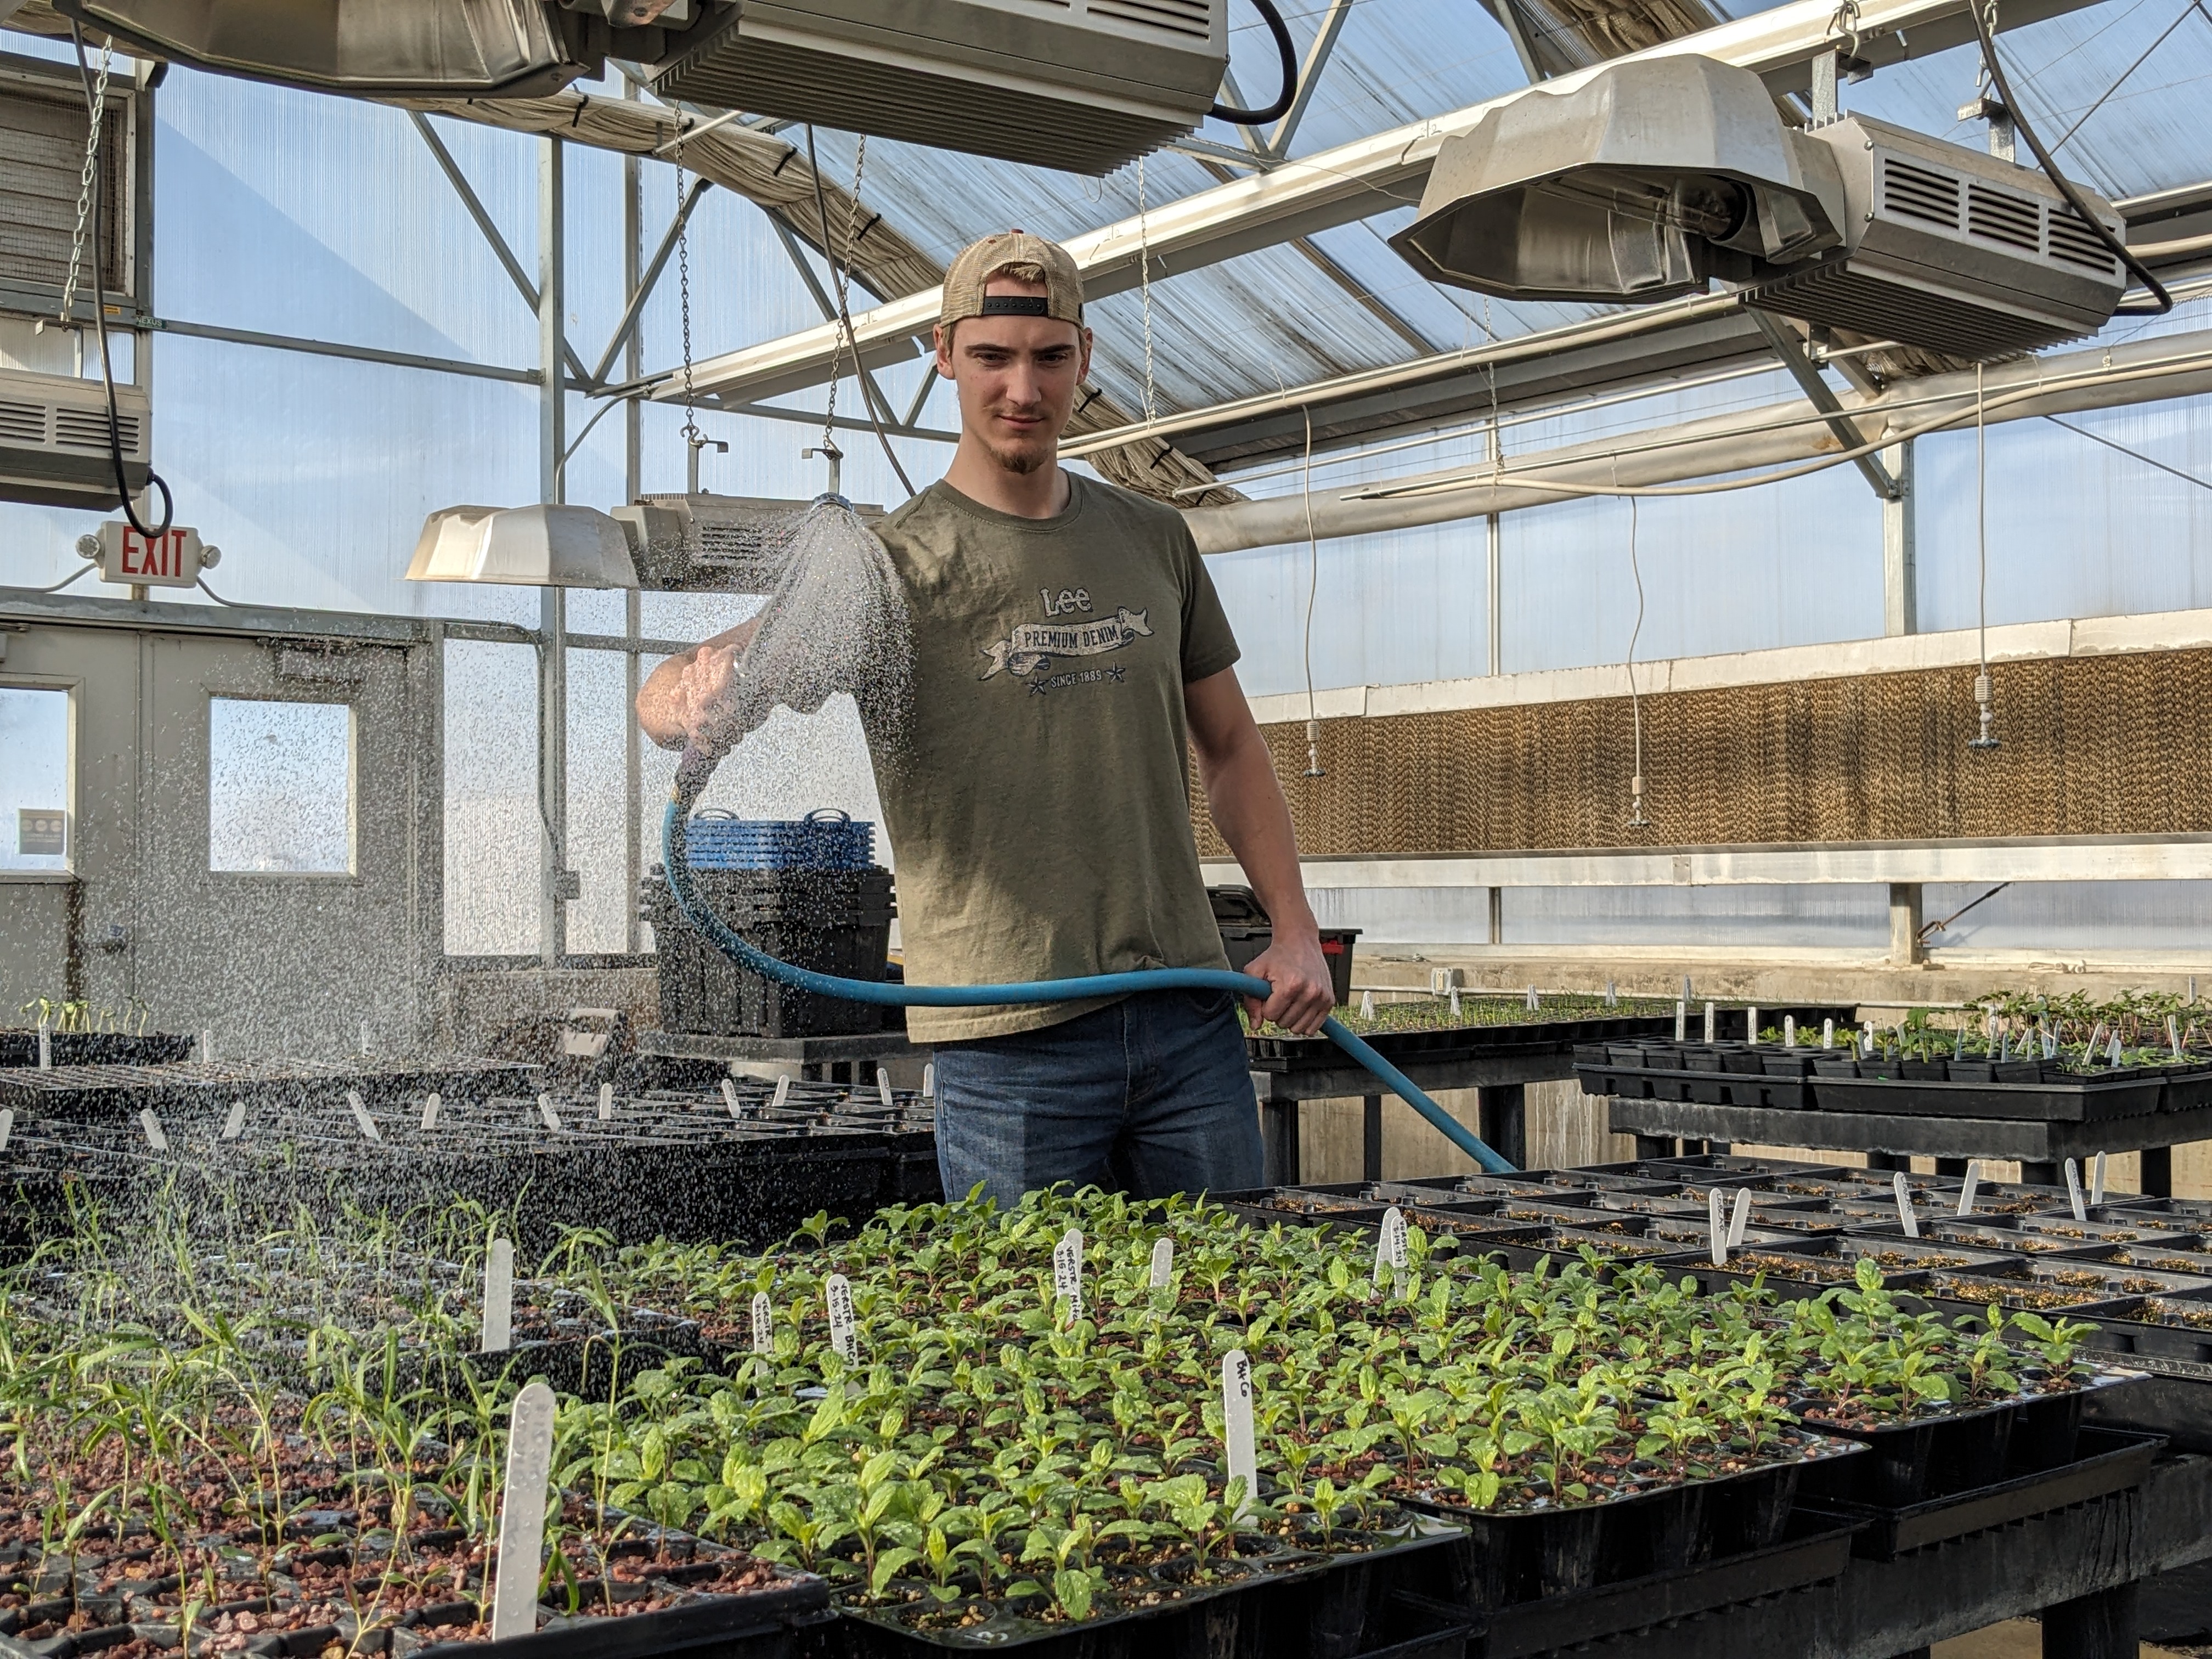
Image: A gentle shower from a watering wand soaks young seedlings without flooding or dislodging them. Established plants should be watered thoroughly about once a day, until water drains from the plugs, ensuring that the entire soil column is moistened. Allow the soil to drain and the surface soil to begin to dry slightly between waterings. Shallow, light watering will cause the lower portion of the soil to dry out and root growth to stall. Containers that are overfilled with soil are prone to underwatering since the water can’t pool on the surface and gradually soak in. Overwatering saturates the soil, depriving the root zone of air and creating conditions conducive to decay. Containers and potting medium that allow for proper drainage will help prevent over-watering. Cool, cloudy days reduce watering needs. More frequent watering (two to three times daily) is required on hot, sunny days and for larger plants with fibrous roots that fully occupy the container.
Excessive watering can also damage shoots. Healthy-looking plants will suddenly fall over, appearing to be cut off at the soil level. This is known as “damping off” and is caused by a fungus. Legumes are particularly susceptible to this condition, but it can affect other species as well, especially if they are planted too densely. Sprinkling a layer of fine chick grit (found in the feed section of farm supply stores) over the top of the soil surface after seeding or transplanting will help dry the soil surface and wick water away from the stems. Maintaining good air circulation will evaporate excess water from stems and the soil surface and minimize the risk of damping off. Place additional fans near benches with species known to be susceptible. Thinning may be necessary to improve air circulation. Watering pots/containers from below by setting them in a pan of water until the soil wicks up moisture may also help. Washing and sterilizing containers, benches, and equipment and using sterile potting media also help reduce the risk of damping off.
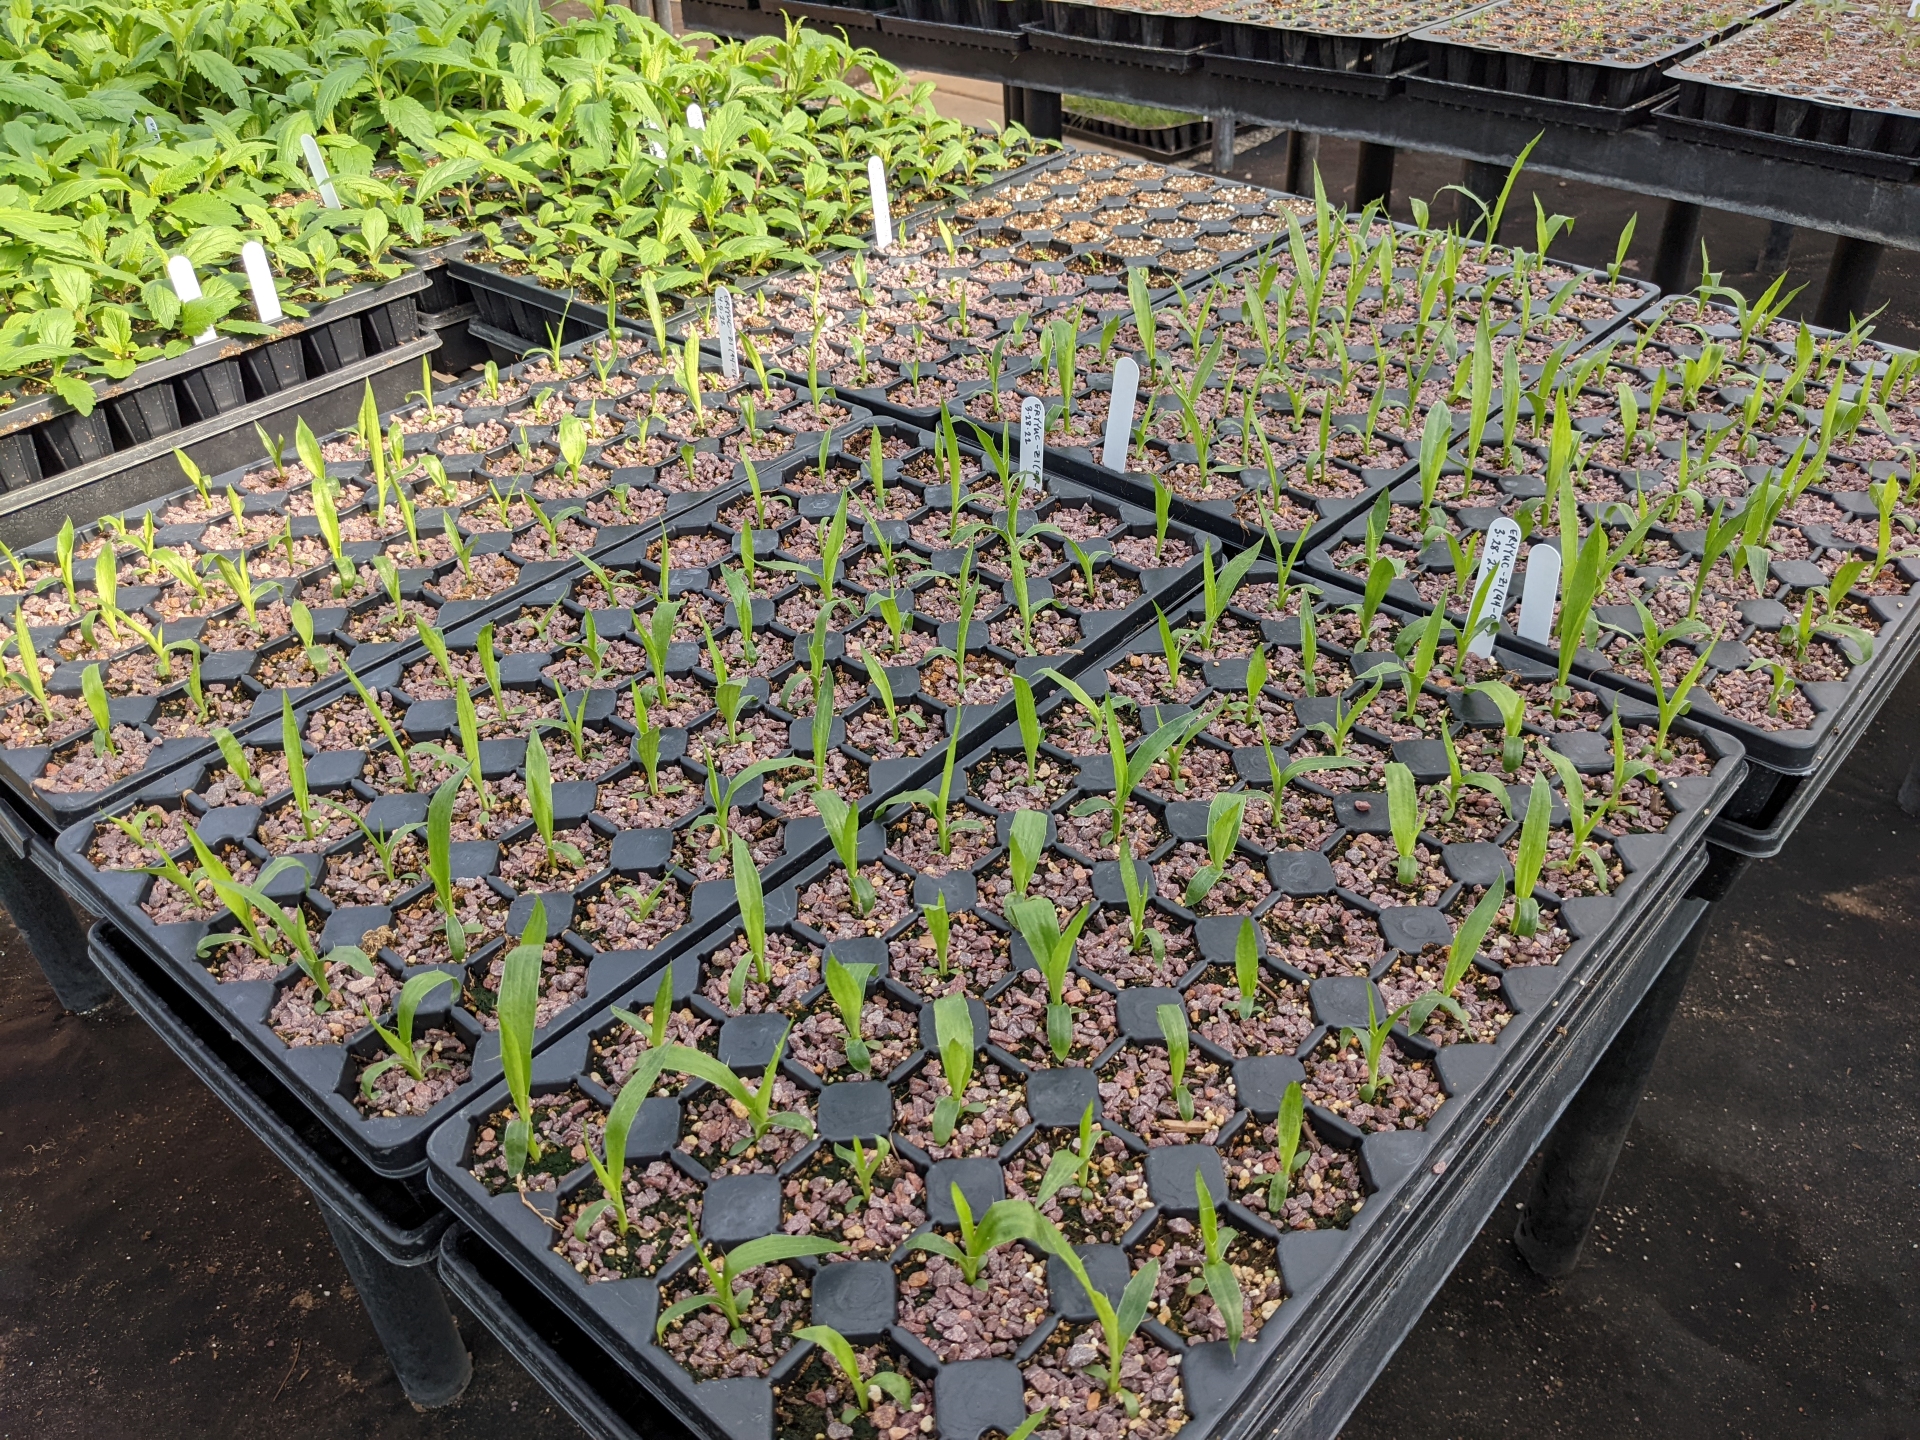
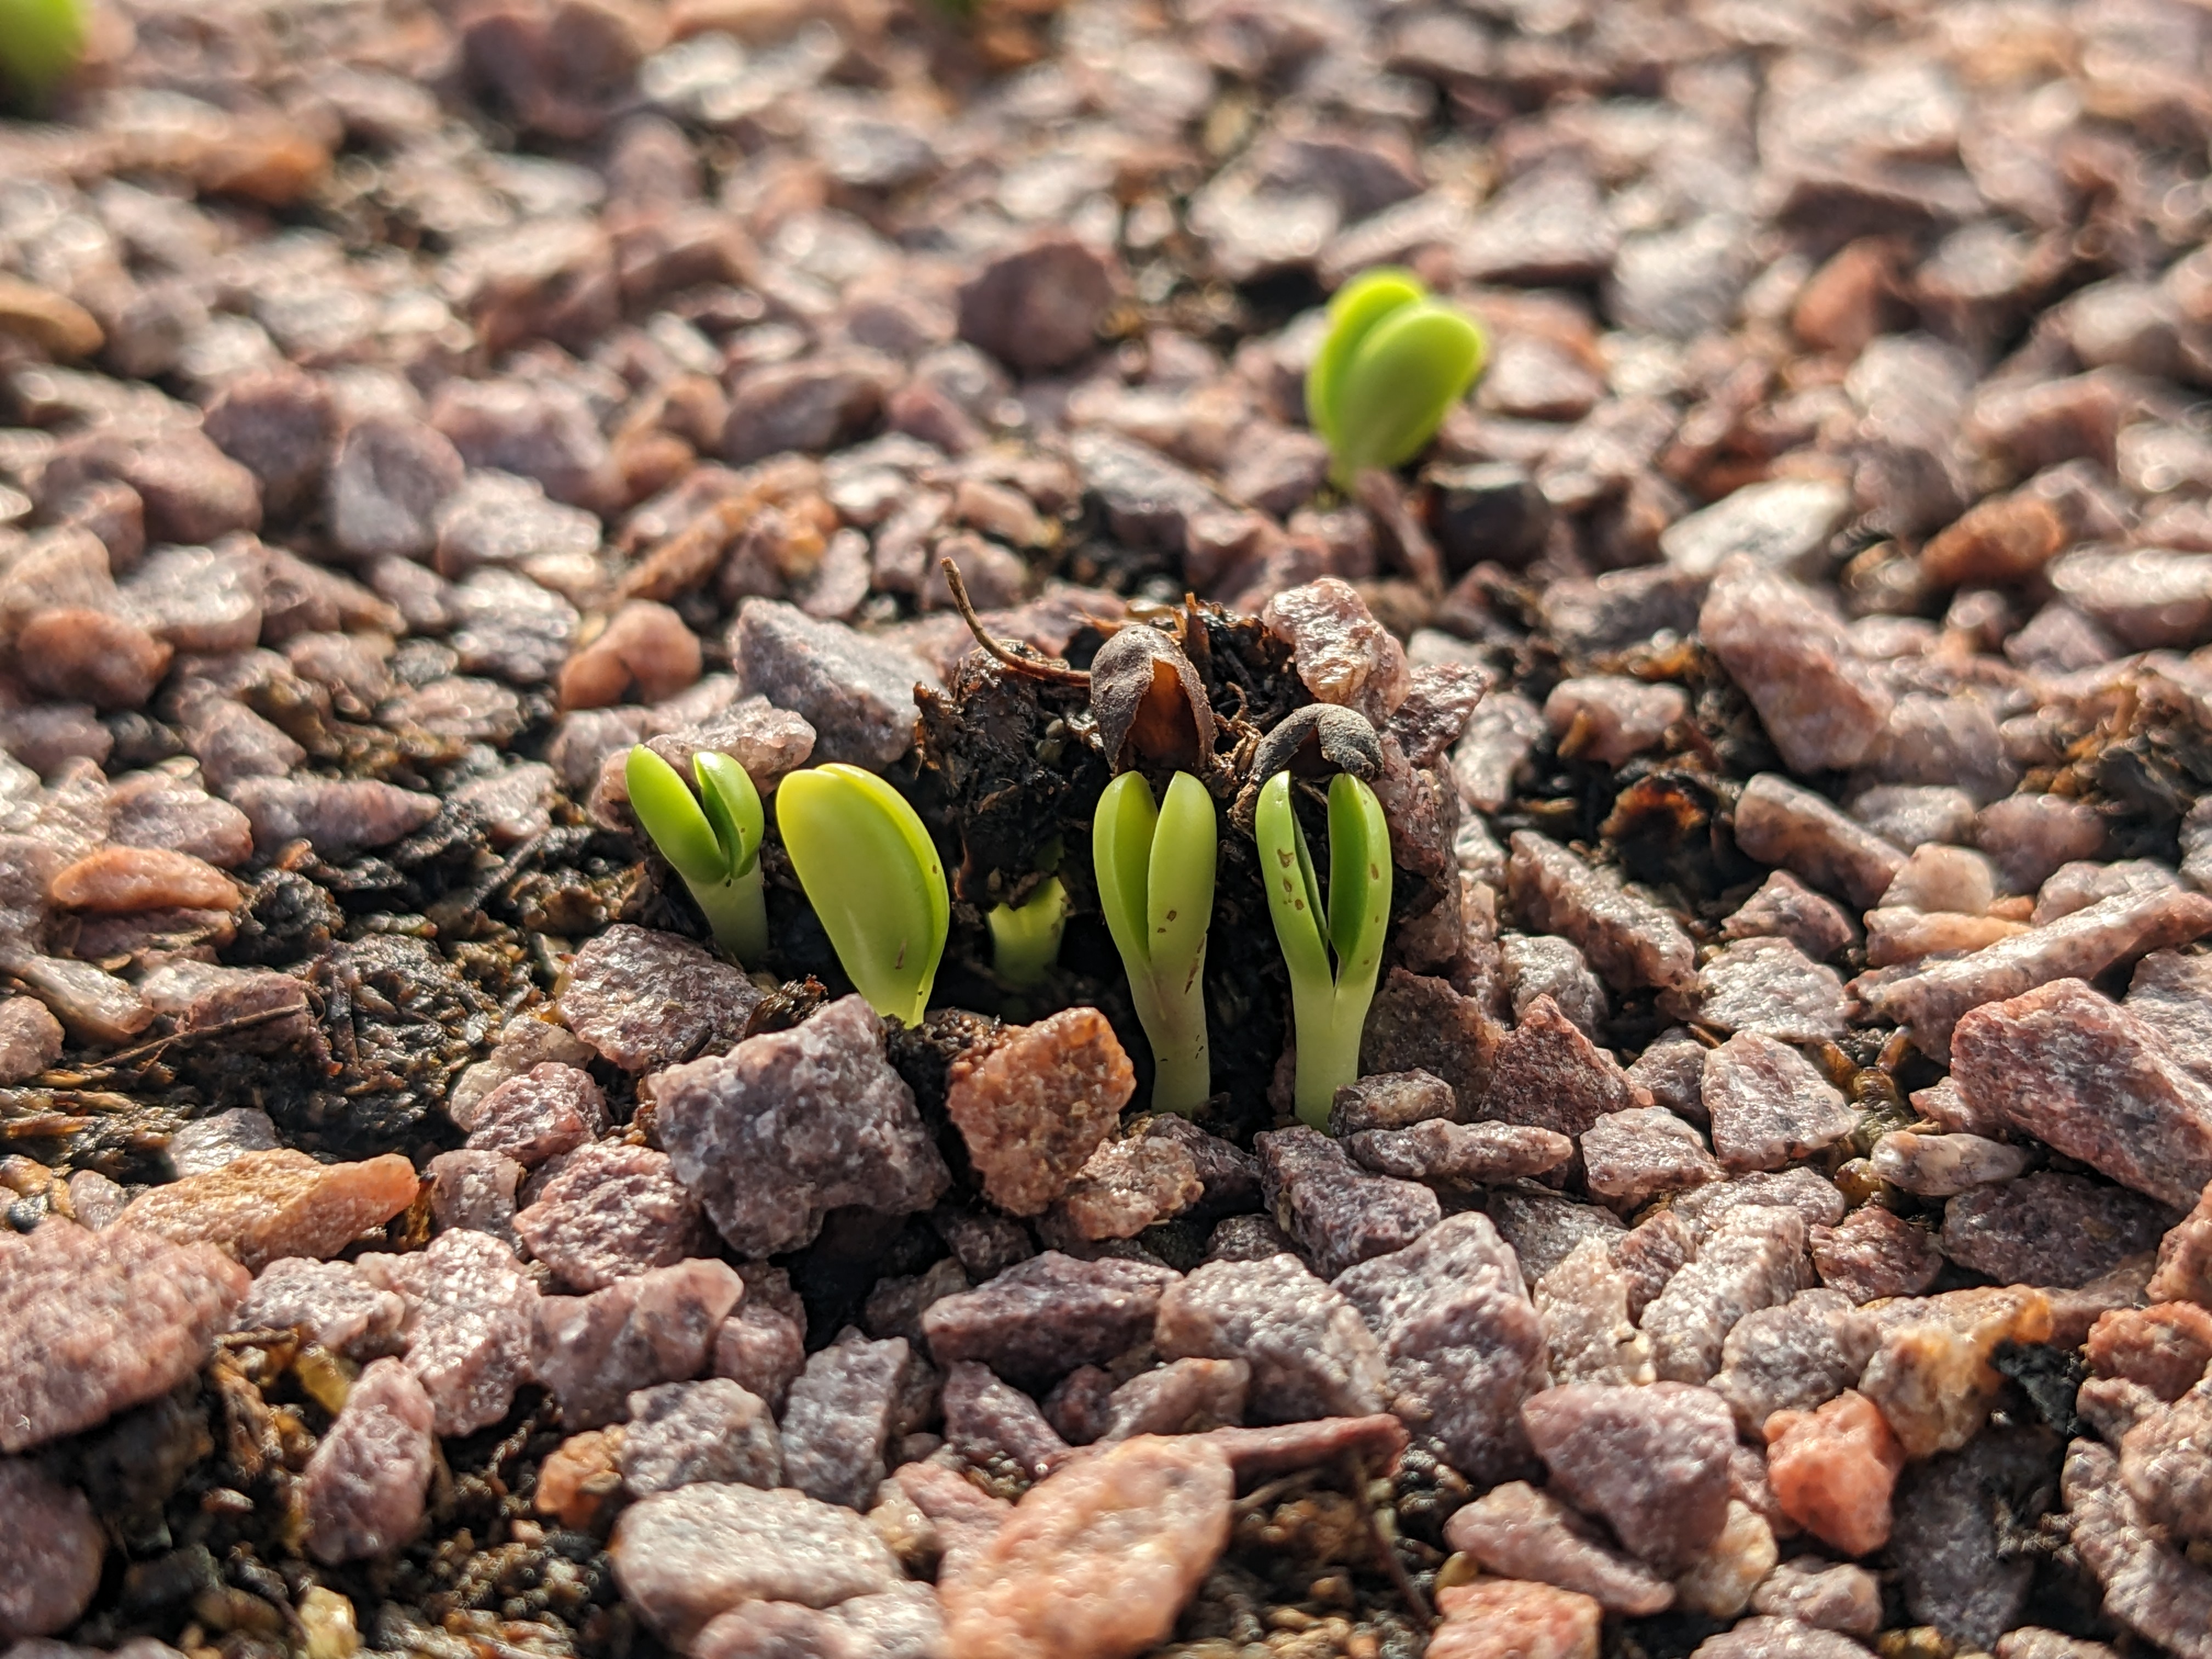
Image: A topping of chick grit keeps the surface around seedlings dry, helping to prevent outbreaks of damping off fungi.
- Transplanting Seedlings
Seedling Development/Timing
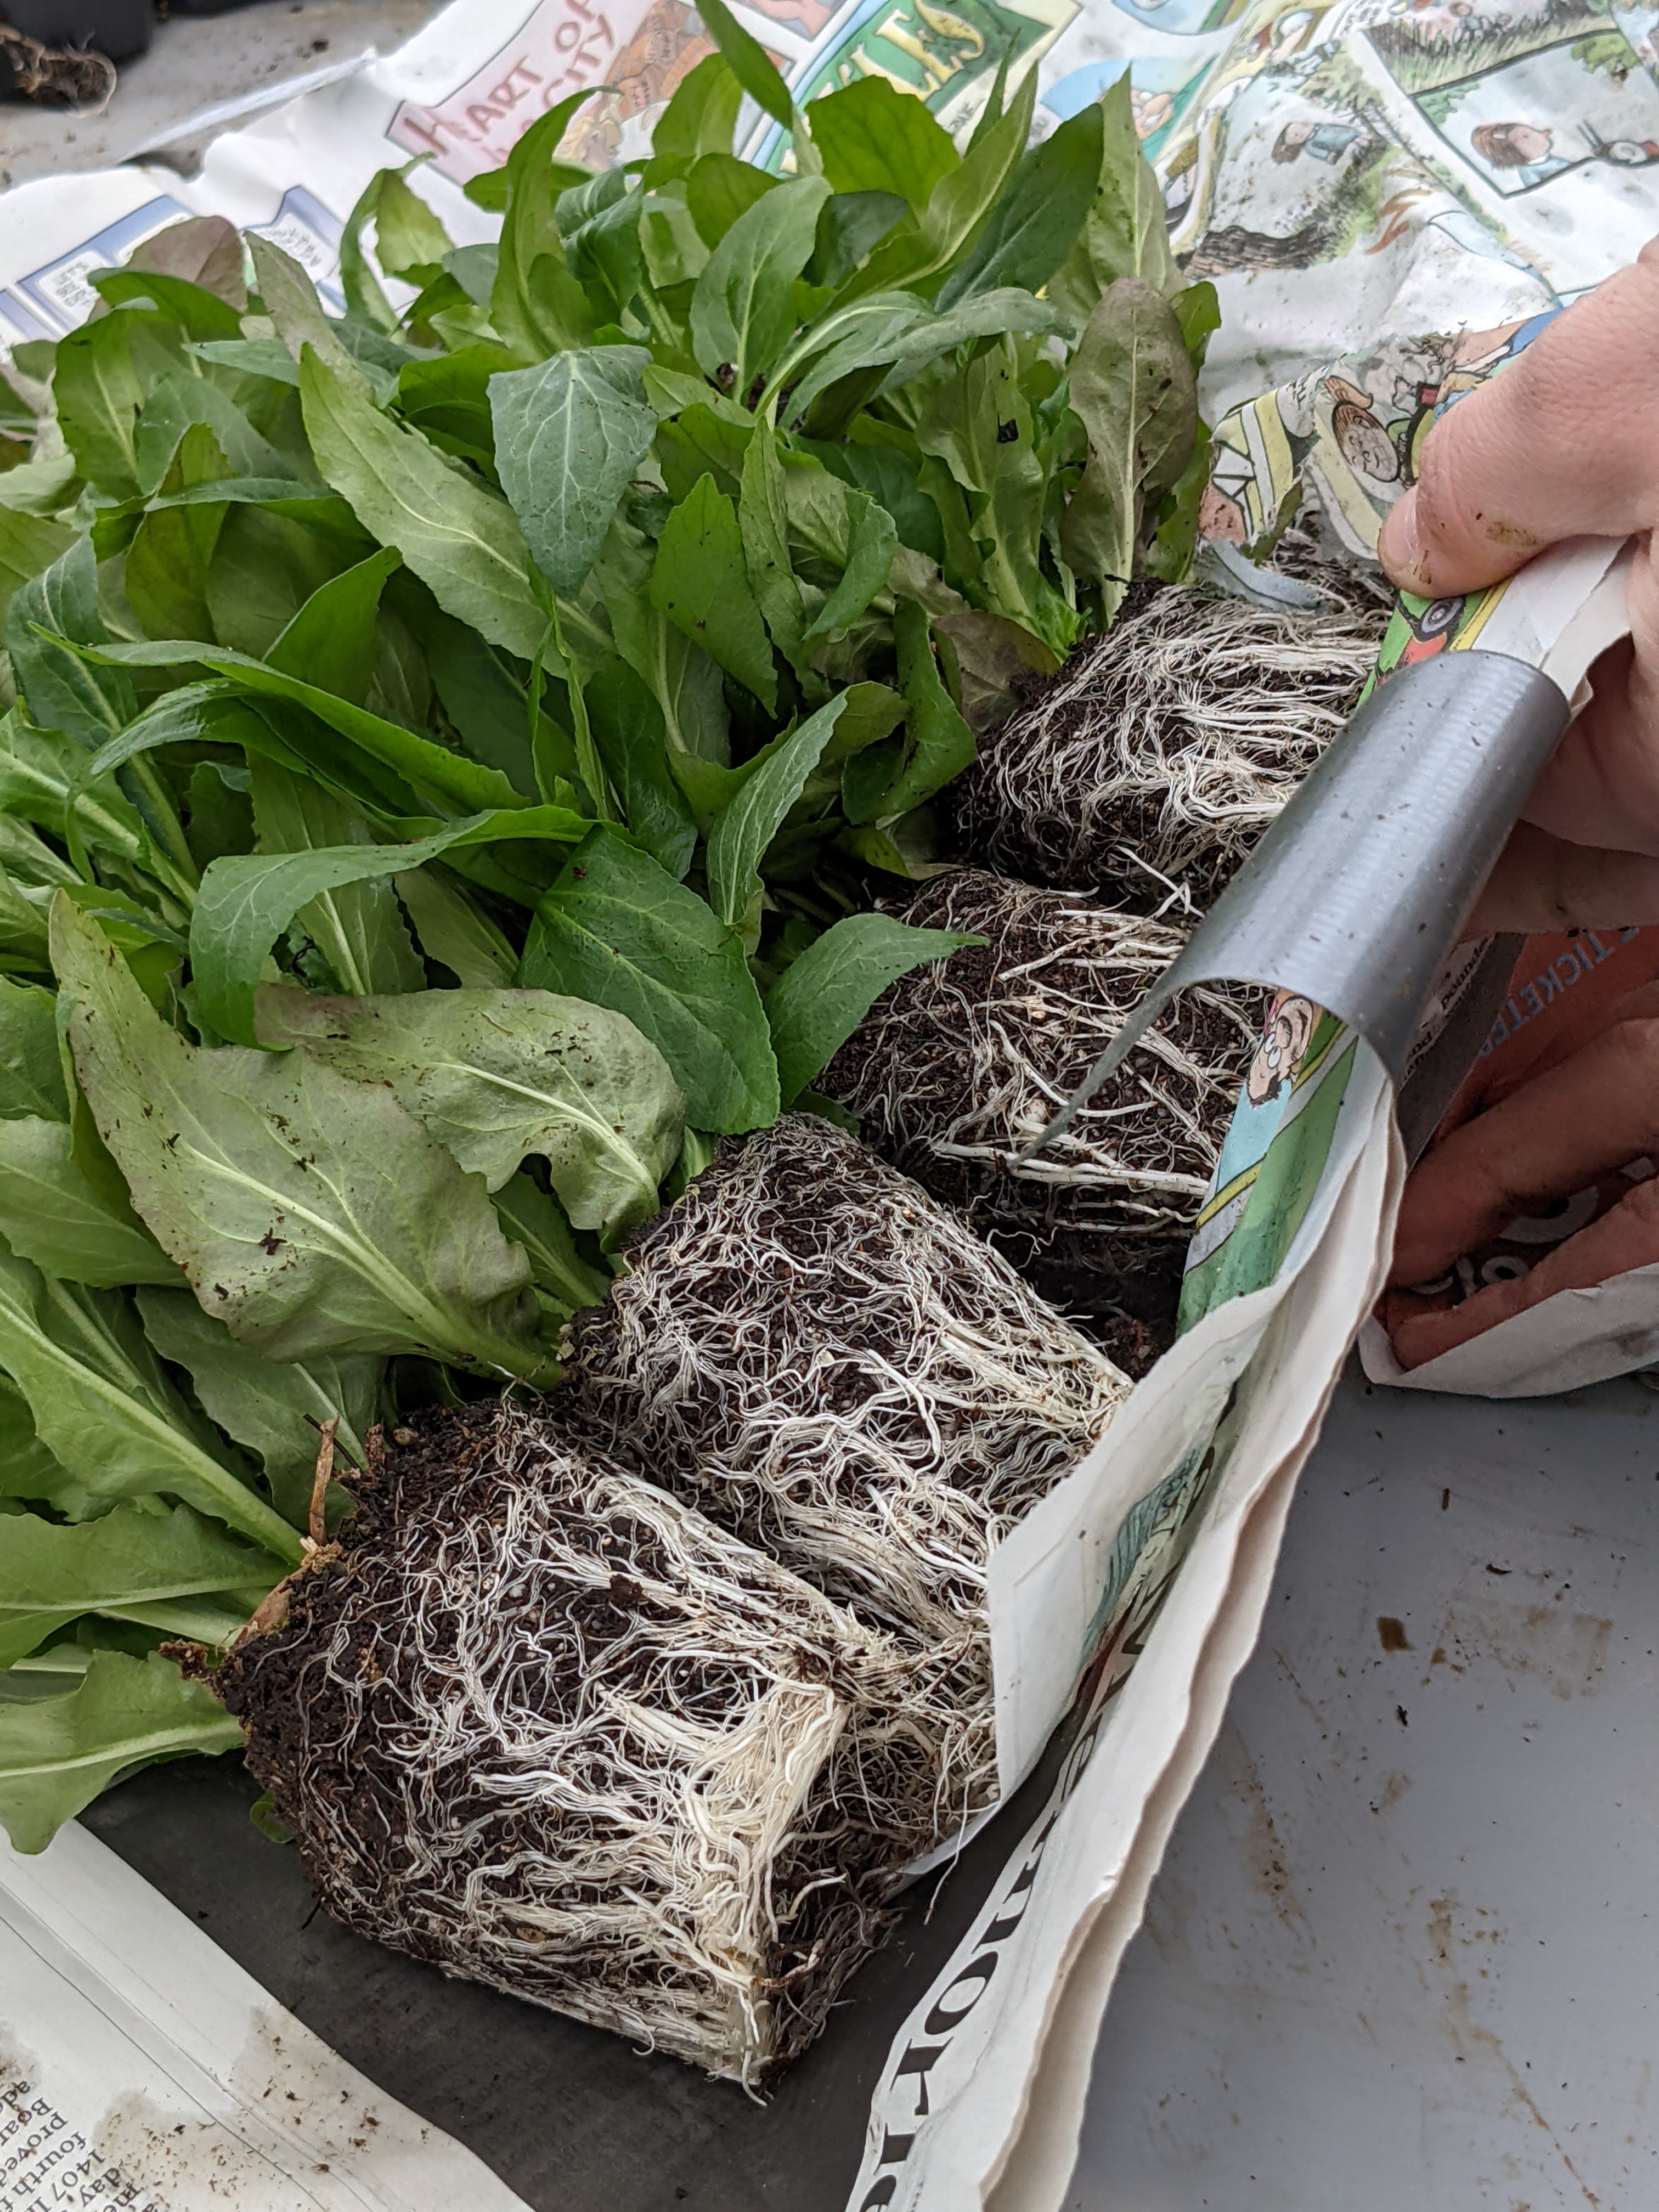
The key to successful transplanting of native perennial species is strong root development. Ideally roots should fully occupy the entire soil column so that when the plant is removed from the container, the soil and roots remain intact as a “plug” (i.e., they retain the shape of the container). Grasses and forbs with fibrous roots form beautiful plugs after a few weeks of growth and present little challenge in transplanting. Species with taproots (e.g., Baptisia spp., compassplant, Desmodium spp., butterfly milkweed) develop a thickened fleshy taproot within a few weeks after germination in a greenhouse, but the taproot itself may not be enough to hold the plug intact when transplanting. However, if growth is allowed to continue until the taproot reaches the opening at the bottom of the container, the taproot will air-prune, and fine lateral root growth will be stimulated. These fine lateral roots will help considerably in holding the plug intact when the seedling is removed from the container for transplanting. Slower growing forbs and shrubs require more time for roots to develop adequately for transplant. This process is accelerated by using the 2.5” deep plug trays with ridges and large bottom openings, as opposed to cone-tainers.
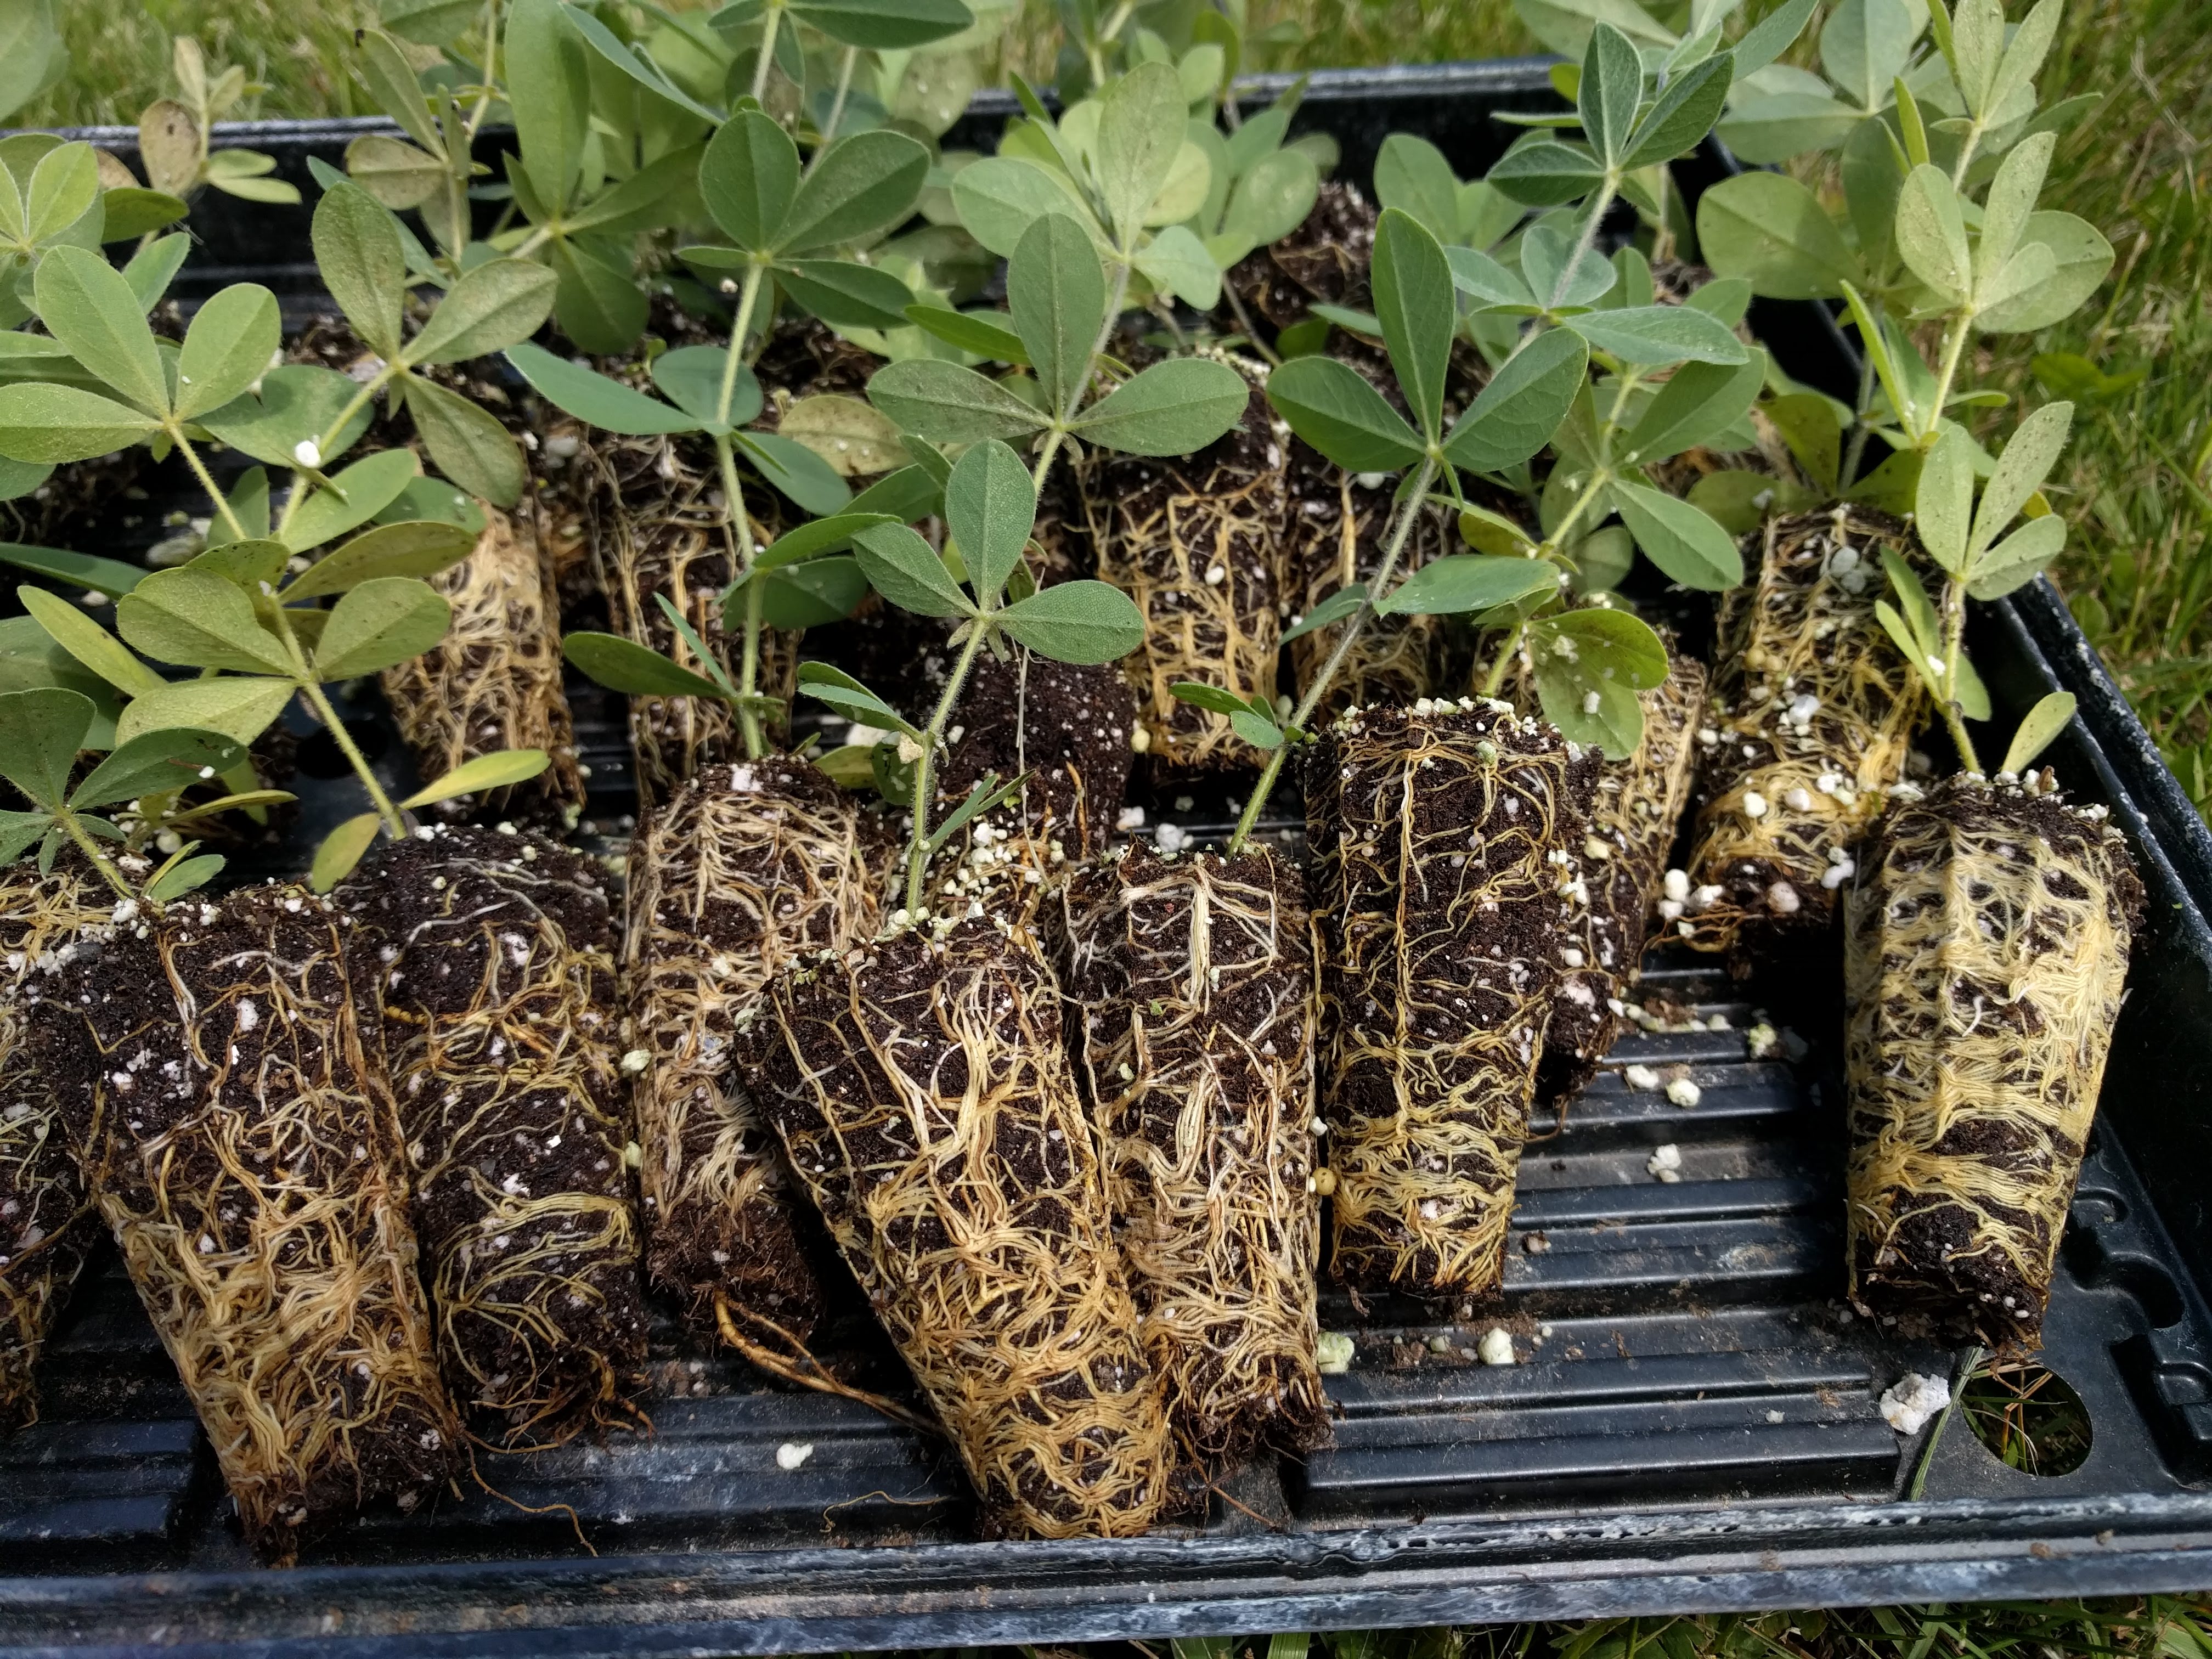
Image: Plugs of a taprooted species, longbract wild indigo (Baptisia bracteata, cream wild indigo). Firmly rooted plugs were produced by growing seedlings in air-pruning containers with grooves and large bottom openings. Seedlings are prone to top-kill when transplanted directly from the greenhouse into the field. Greenhouse-grown seedlings are pampered: they have been protected from drying wind, harsh sun, and herbivores. Robust greenhouse-grown seedlings of many native species can tolerate the stress and will regrow quickly if they have strong root development and adequate soil moisture. A better approach, however, is to acclimate seedlings gradually to outdoor conditions with a process called “hardening off.” A week or two before transplanting, set flats or trays outside for a few hours each day from mid-morning to mid-afternoon in a place sheltered from strong winds and full sun. The idea is to acclimate the plants gradually to outdoor conditions of wind and sun. Strong winds and heavy rains should be avoided. Another option is to move flats/trays into a cold frame (unheated greenhouse) and roll up the sides or open the side vents to allow natural airflow and some direct sun to the plants.
The ideal time for transplanting is in the spring just after the last frost-free date for your region. Rains are more reliable at this time of year, the sun less intense, and plants have the entire growing season to establish and flourish. If transplanting during the summer months, check for adequate soil moisture. Be prepared to water regularly and deeply until plants are established. Transplanting in the fall (early to mid-September) may be another option. Plants transplanted after mid-September may not have enough subsequent root growth to anchor them in the soil, making them vulnerable to frost-heaving.
Bare Soil vs. Weed Barrier
To establish seed production plots, seedlings can be transplanted into weed-free bare soil or a weed barrier. Transplanting into killed sod works well for natural landscaping with a mixed assemblage of prairie species but is not recommended for seed production plots. The dead sod interferes with cultivation and hoeing should weeds become a problem.
Aggressive clonal species like wild bergamot (Monarda fistulosa), prairie coreopsis (Coreopsis palmata), Culver’s root (Veronicastrum virginicum), and prairie cordgrass (Spartina pectinata) can be successfully established as seed production plots in bare soil. Good weed suppression, as always, is critical. Pre-emergent herbicide (Pendulum®, Prowl®) can be used on the site after transplanting to inhibit weed seed germination. Be sure to water in seedlings after transplanting to settle soil around the root zone before applying pre-emergent. Otherwise rain may concentrate run-off of herbicide into freshly dibbled holes containing the new transplants, damaging roots or killing the seedlings. Do a small test plot on species not listed as tolerant on the product label. Read, understand, and follow all precautions and directions on the product label. Planting 8 to 12 in. apart in well-spaced rows (32 to 36 in.) will permit cultivation later that season for weed control. Do not cultivate as long as pre-emergent herbicide remains effective in suppressing weed seed germination. These aggressive clonal species will spread and create solid rows in two to three years. Seed production begins to decline after the third year and may drop off sharply after the fourth year as plants become root-bound within the rows. Aerating the soil with a turf-type aerating implement in the fall or early spring may extend plot productivity.
Weed barrier comes in a variety of materials: plastic film, woven fabric, paper, and fiber mats. Plastic film is inexpensive but less durable than most other types of barriers. Plastic creates abnormally moist conditions that can increase disease problems in some species but may be suitable for short-term (one to two-year) applications. Biodegradable plastics are available which begin breaking down after the first growing season. Plastic film can be applied mechanically using an implement that creates a flat or raised bed while simultaneously rolling out and securing the plastic. Irrigation tubing can be laid at the same time for species needing additional moisture. Plugs can be transplanted into holes dibbled through the plastic film. When using 4-ft wide plastic, we typically plant four plugs per row in rows about a foot apart. We adjust this plant spacing to accommodate larger species such as compassplant.
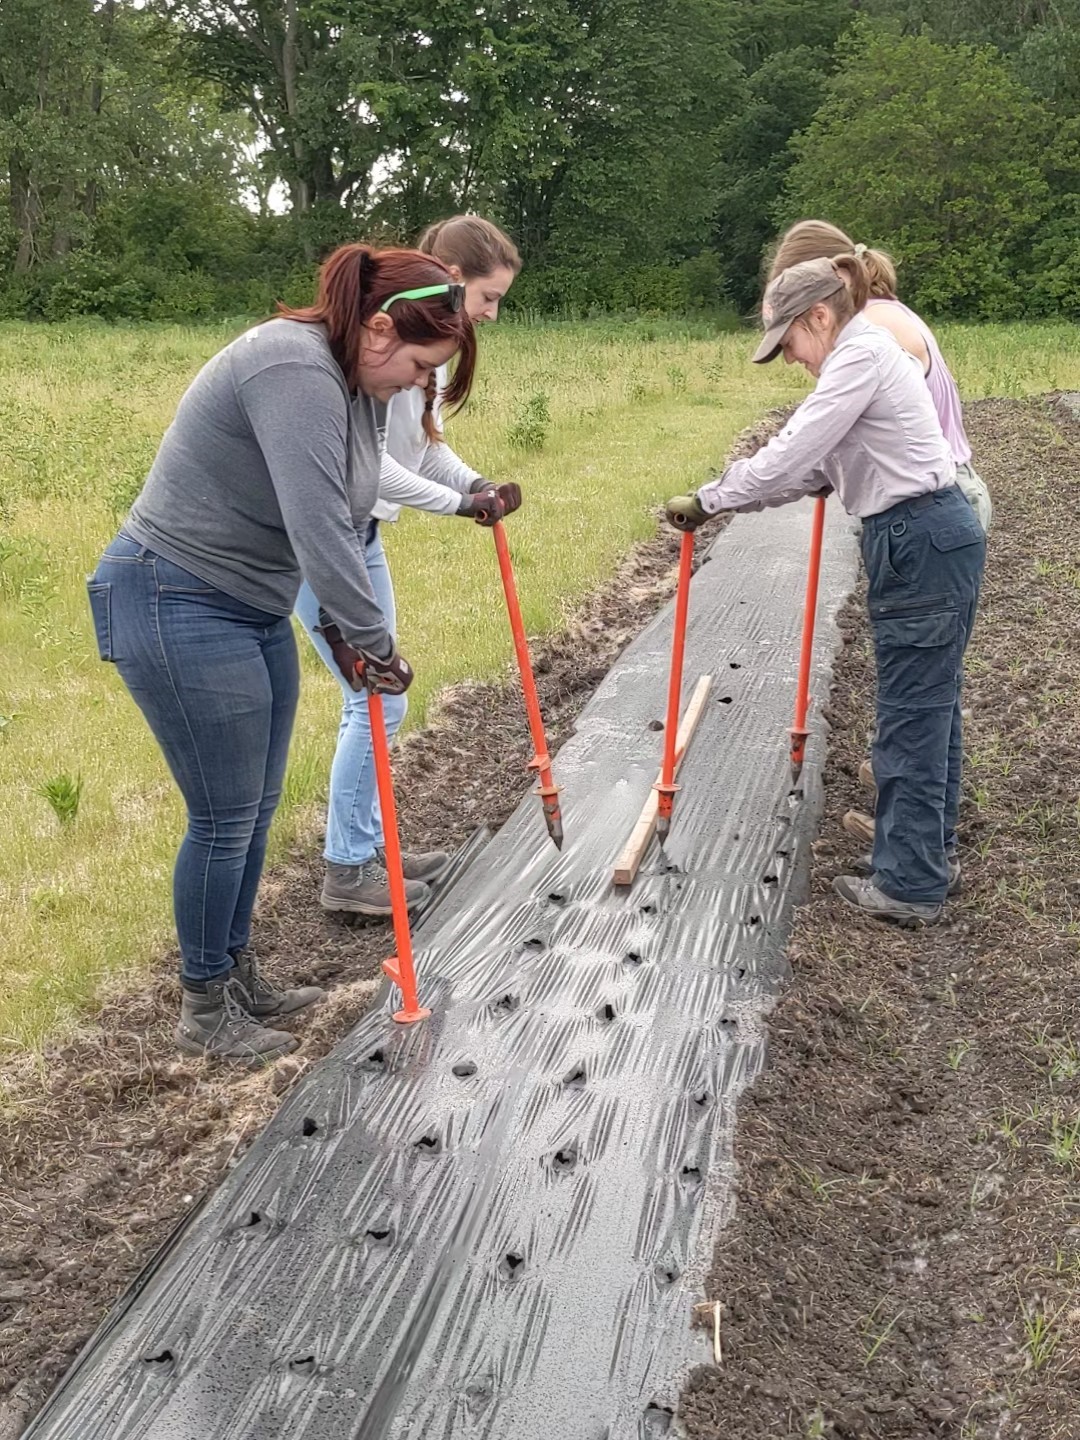
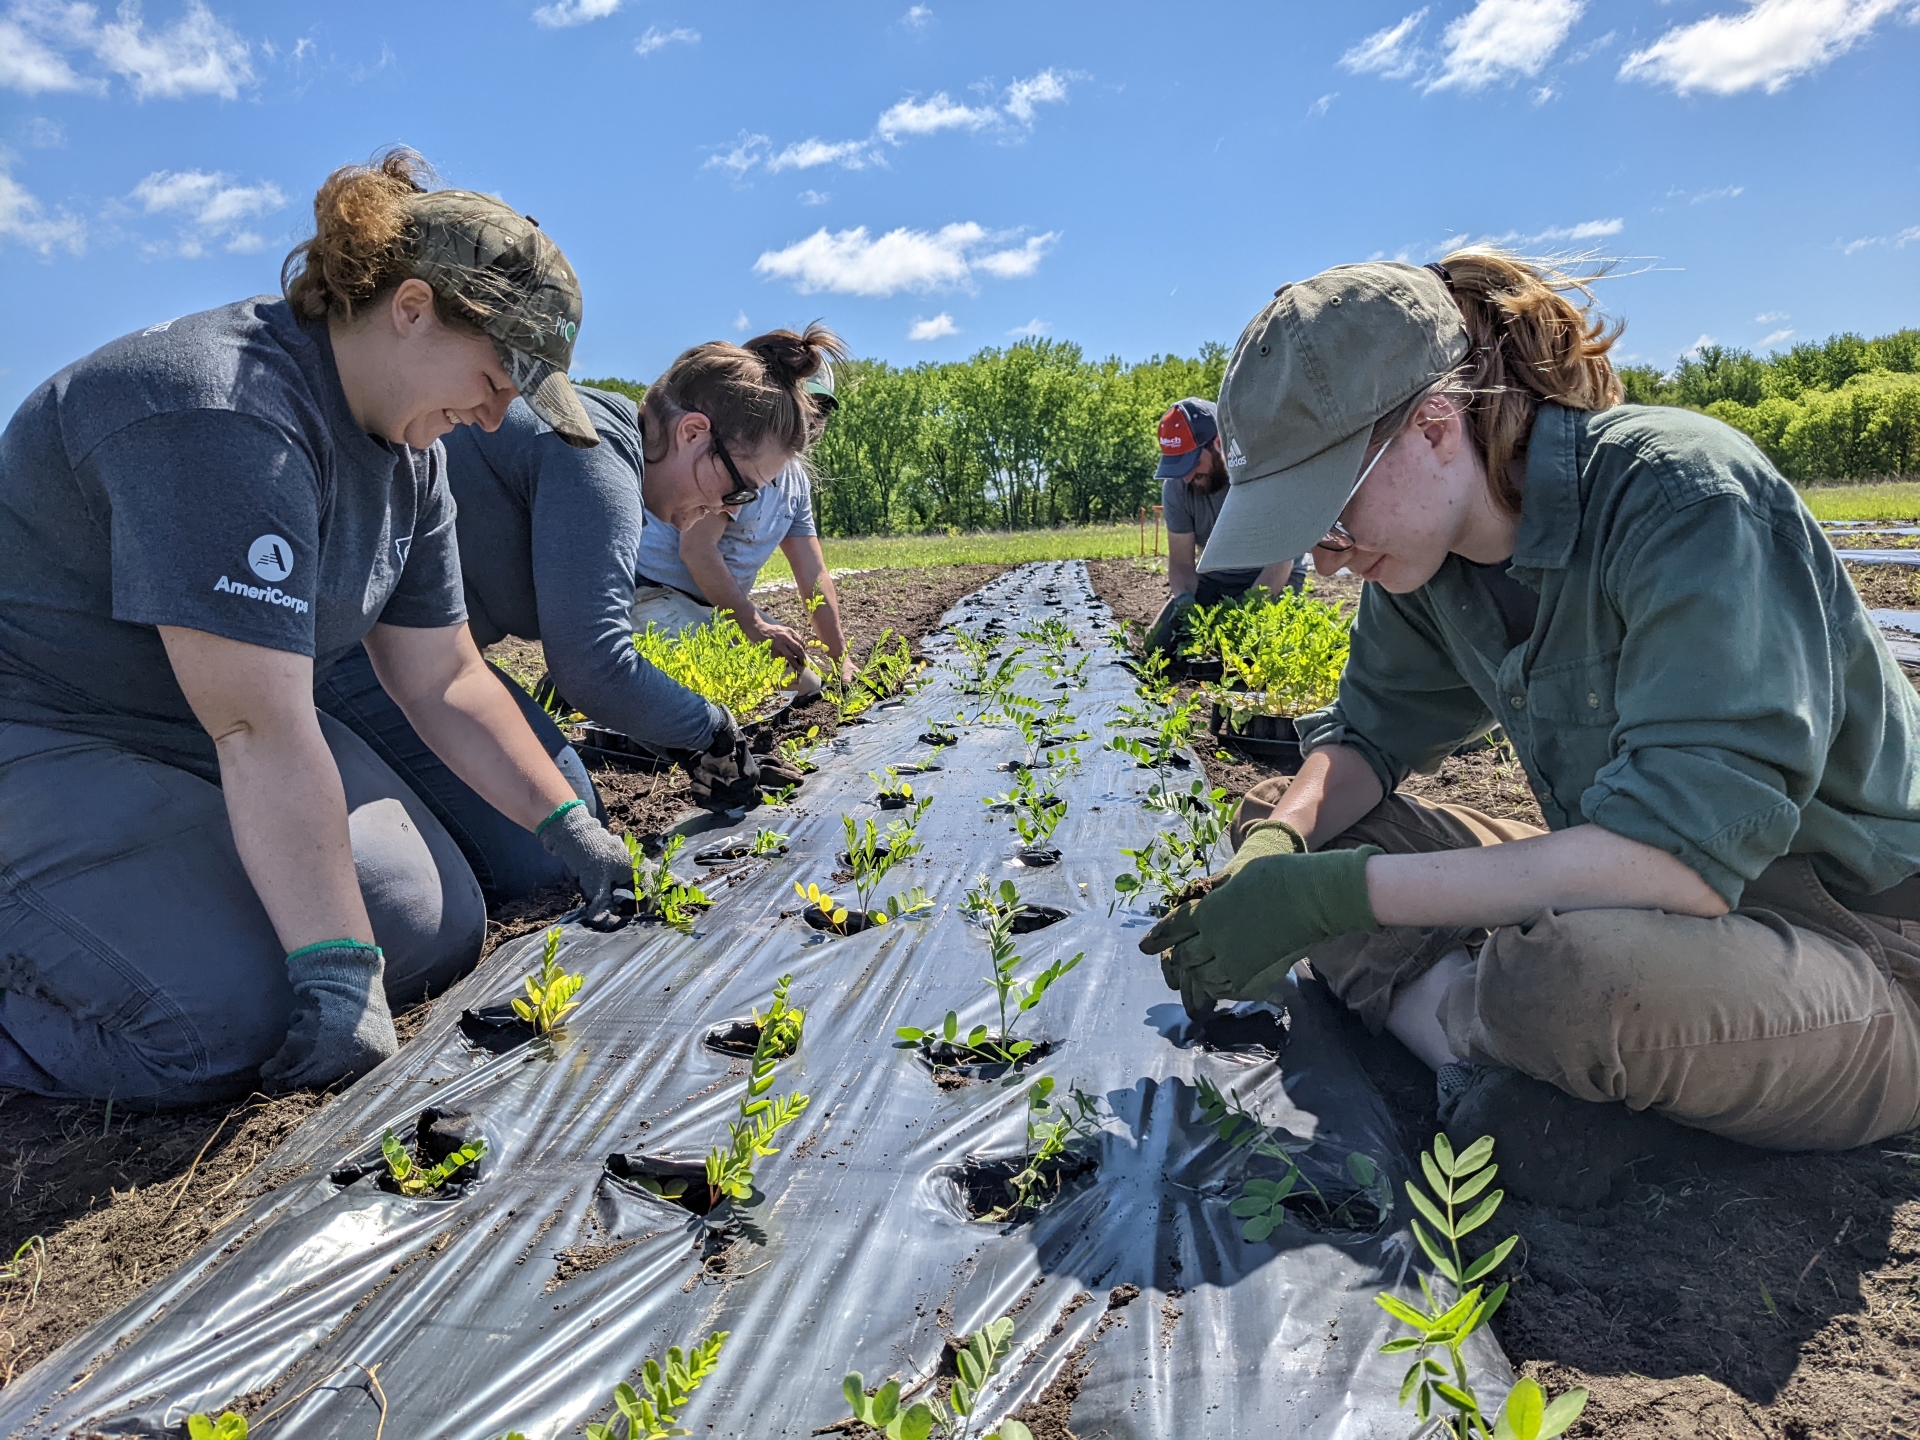
Image: Metal dibbles punch planting holes directly through plastic weed barrier. Most species are planted in rows of four spaced one foot apart.
As the name implies, a weed barrier suppresses weed growth by blocking light, physically obstructing shoot growth, and by solar heat sterilization of weed seeds in the soil. Weed barriers also conserve soil moisture, and plants grow more vigorously with a weed barrier than in bare soil. For these reasons, weed barriers aid establishment in the first year and increase seed production in the second year for most species. By the third year, aggressive clonal species will send rhizomes in all directions that the barrier would smother. For these species, plant in bare soil as described above, or use an inexpensive barrier that biodegrades or can be pulled up after the second season.
In the past, we used a durable, water- and gas-permeable weed barrier (DeWitt Pro woven landscape fabric) for long-term applications (up to ten years). This can be purchased in rolls 6’ x 250’ or 12’ x 300’ rolls. This type of weed barrier provides long-term benefits of weed suppression and moisture retention for less-competitive species that establish slowly. It’s also a good choice for species with taproots that remain where they are planted (non-clonal). However, removal and disposal of fabric weed barriers after many years in the field is very difficult, as perennial grasses and other weeds grow through the degrading barrier, uniting it with the soil.
Transplant seedlings of non-clonal species into weed barrier fabric 8 to 12 in. apart in blocks or rows to optimize the use of this costly product. Slits are cut in the fabric weed barrier using a tool made of modified sickle bar blades mounted on a wooden 2x4 with an attached handle. This device cuts four “x-shaped” 2-in. slits, 8 in. apart at one time. Cutting larger slits would allow more weeds to germinate and come up through the openings. Precise holes can also be burned into weed barrier fabric using a propane-fired hole cutter available from greenhouse and nursery supply companies.
Regardless of the type of barrier used, some hand weeding will be necessary, especially during the first growing season. Hand-pull weeds that emerge through the barrier openings while they are small, taking great care not to disturb new transplants. Pressing gently downward on the top of the newly transplanted plug while pulling adjacent weeds will protect it from being uprooted. A garden or dandelion knife can be used carefully to slice through the taproots of larger weeds. Slice into a taproot just below the soil surface, again taking care not to damage the roots of transplants. Hand weeding periodically throughout the first growing season will be required to give transplants the best chance of establishing the first year and producing a good seed crop in subsequent years.
How to Transplant Seedlings
Soil should be firm in all cases. If dibbling into bare soil, the soil should be rolled or packed to prevent dibbled holes from collapsing. Likewise, very dry soils resist dibbling. It may be necessary to sprinkle the area the day before or wait until a day or two after a soaking rain. Just before transplanting, liberally water seedlings to fully saturate the root plugs. This will make it much easier to remove the plugs from the trays or cone-tainers and provide extra moisture to the root zone after transplanting. To remove plants from a plug tray, use a stick or gloved finger to push up through the opening at the base of each plug. Hold the plant at its base and pull gently. If the plant does not release easily, try “massaging” to loosen the root plug from the sides of the cell. If the plants are in cone-tainers, hold a cone-tainer upside-down firmly in one hand, and rap the rim of the cone-tainer sharply on the palm of the other hand, using a flick of the wrist. The plug should slide out easily; repeat if necessary. (If plugs do not hold their shape upon removal, either the roots are not adequately developed or too much force is being used. Transplant success drops significantly if this happens!) Slide the intact plug into a dibbled hole – it should just fit, with the top of the root plug just at or slightly below the soil level. Pinch soil firmly around the top of the plug to seal in moisture, taking care not to bury the base of the shoot. The lighter soil-less mix can wick moisture away from the roots if left exposed. Be sure dibbled holes are deep enough to comfortably receive the full depth of the plug. Plugs forced into a too-small or shallow hole will often pop out of the ground after a good rain, exposing the root collar.

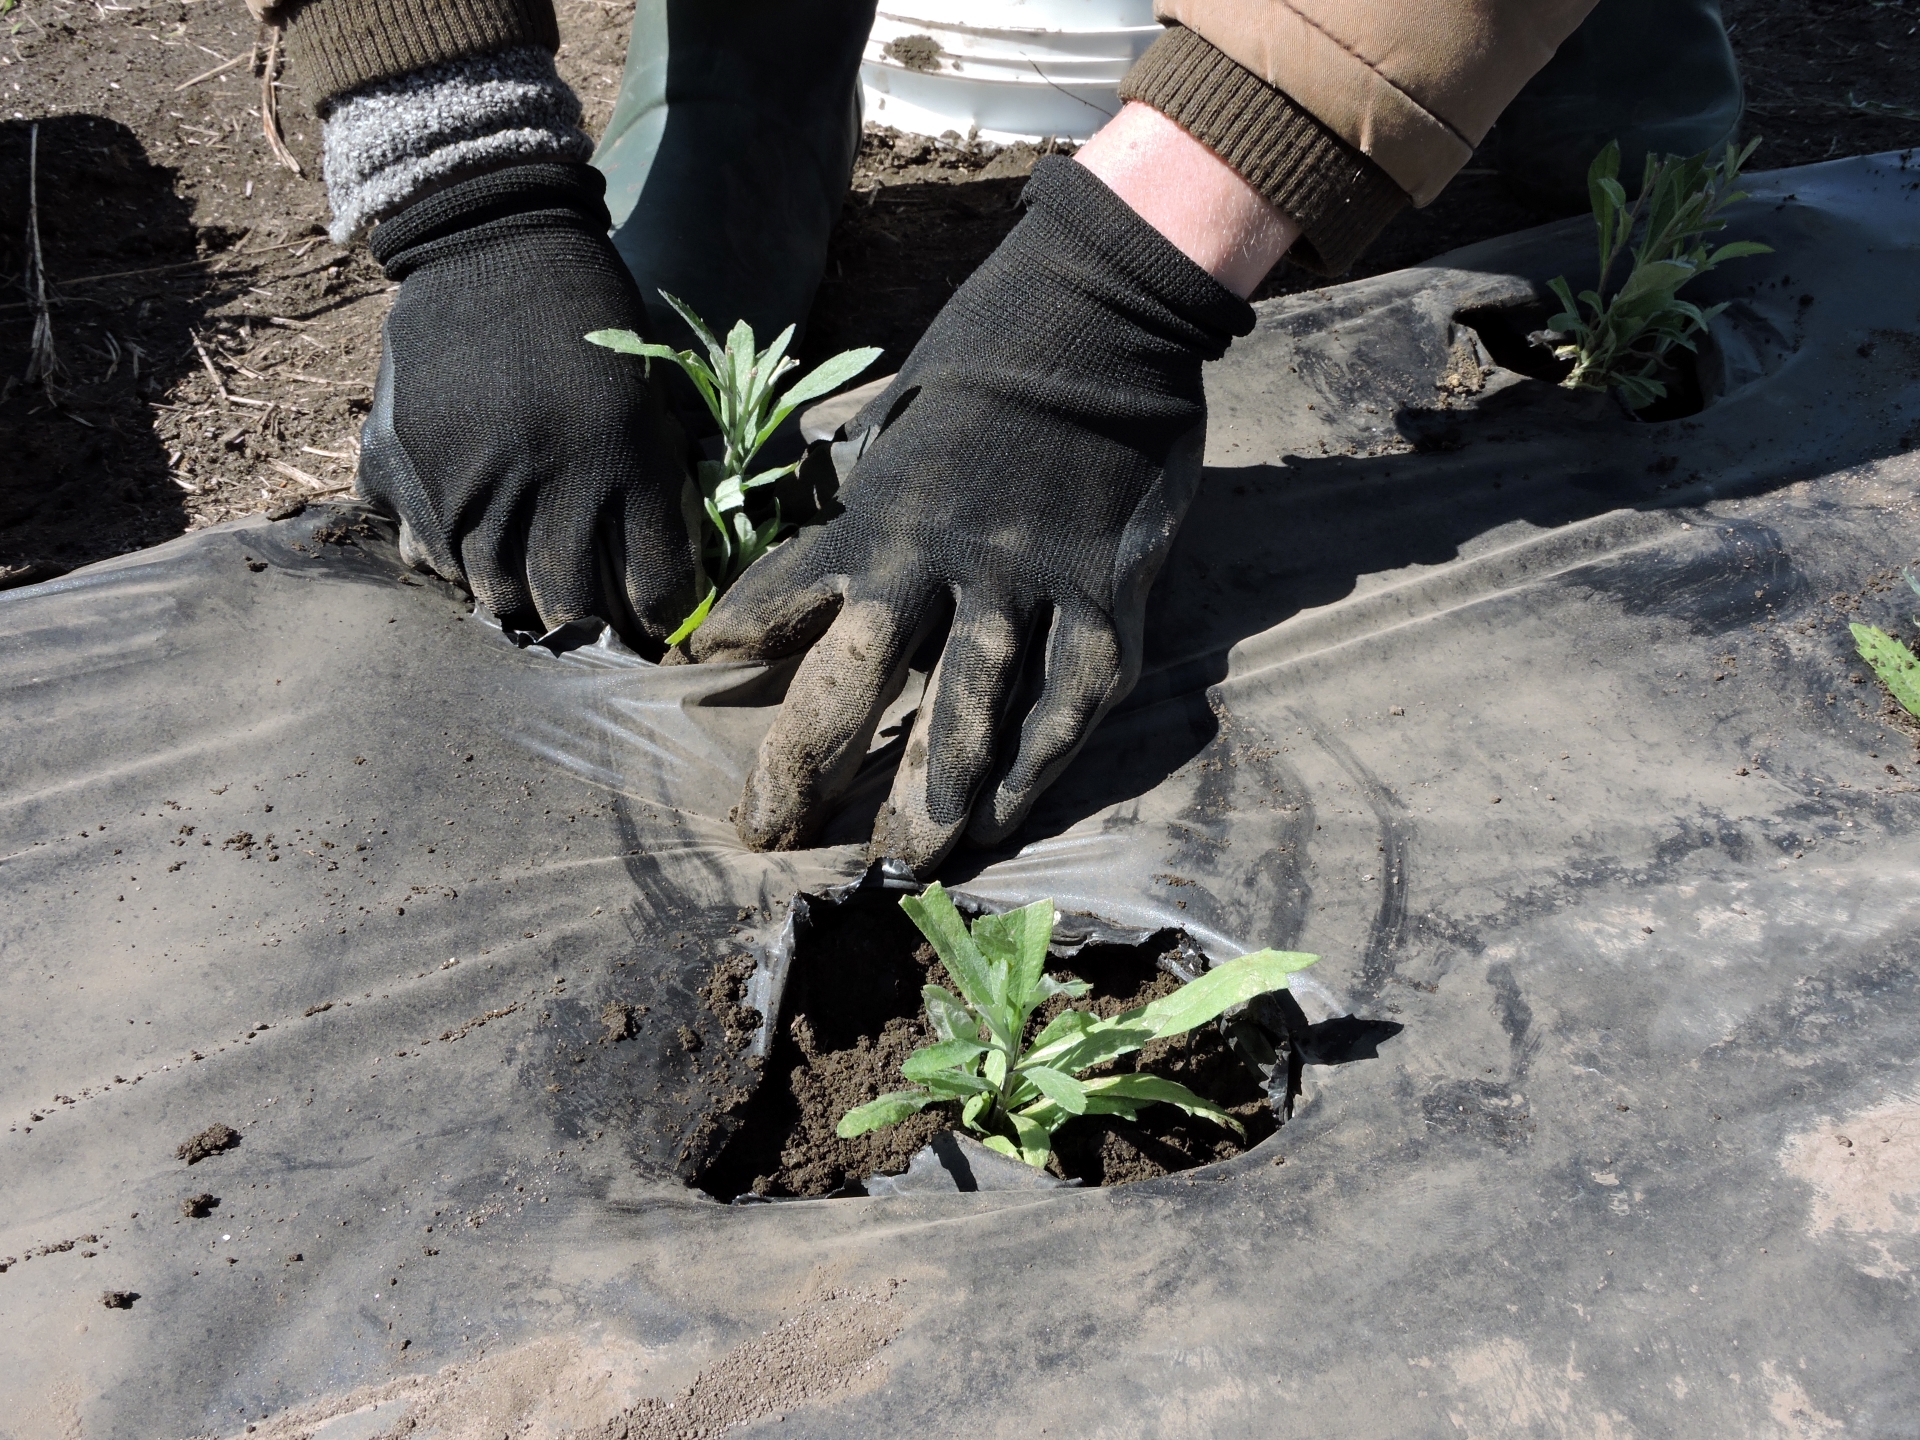
Image (left to right): Well-rooted plugs pop out of trays intact; plugs are "pinched in" to achieve good contact between roots and soil and topped with a thin layer of field soil to prevent moisture from wicking out of the potting mix.
- References
Baskin, C. C., & Baskin, J. M. (2003). When breaking seed dormancy is a problem: Try a move-along experiment. Native Plants Journal, 4(1), 17–21. https://doi.org/10.3368/npj.4.1.17
Baskin, Carol C., & Baskin, J. M. (2014). Seeds: Ecology, biogeography, and evolution of dormancy and germination. Elsevier / Academic Press.
Deno, N. C. (1993). Seed germination: Theory and practice. available for free download from the USDA National Agricultural Library at https://search.nal.usda.gov/permalink/01NAL_INST/27vehl/alma9916347016207426
Khadduri, N. Y., & Harrington, J. T. (2002). Shaken, not stirred - a percussion scarification technique. Native Plants Journal, 3(1), 65–66. https://doi.org/10.3368/npj.3.1.65
Native Plant Network, USDA Forest Service. (n.d.). Propagation protocols database. Reforestation, Nurseries, & Genetic Resources (RNGR). https://npn.rngr.net/propagation/protocols
Society for Ecological Restoration and Royal Botanic Gardens Kew. (n.d.). Seed information database. https://ser-sid.org/about
Harvesting Native Seed
Harvesting Native Seed sagemProper timing of seed harvest and use of effective harvest techniques increases the likelihood of producing a profitable yield of viable seed that will be effective for restoration of native vegetation. Harvest is clearly a critical step in seed production. It is also one of the steps that is most susceptible to unintended selection leading to adaptation of wild species to production systems. Wild populations have variation in inherited traits related to seed harvest such as the timing of maturation and the degree to which seed shatters or is retained on the plant at maturity. Variation in these traits provides wild populations with the ability to adapt to changing conditions and to disperse and establish without human intervention. Loss of these traits within production populations is possible when all seed in a field is harvested at peak maturity (eliminating the genetics of earlier and later maturing individuals from the harvest) or when most of the harvested seed comes from individuals that retain seed longer (i.e. are less prone to shattering). The risk of selection is compounded as harvested seed is used in expanding fields and/or planting new fields over several generations. Keeping the risk of selection in mind and utilizing strategies to avoid it is key to ensuring that commercially produced seeds retain genetic diversity and the ability to grow, survive, and reproduce as wild plants in restoration sites.
- Gauging Seed Maturity
Factors Affecting Seed Maturity and Dispersal
Gauging seed maturity is key to harvesting quality seed. Immature seed stores poorly, losing viability more quickly than mature seed. Determining the ideal time to harvest can be difficult. Within a population of native plants, there is genetic variation among individuals in the timing of seed ripening, and repeated harvests may be called for as seeds mature on different plants. In addition, seeds in different parts of an individual seedhead or inflorescence are often at different stages of ripeness. Seed maturity usually progresses from top to bottom of the seedhead in grasses and many prairie forbs. In forb species with flattened flower clusters, seed often matures first at the center of the inflorescence. Mature seeds may be quickly dispersed by gravity, wind, water, or animals, so it’s important not to delay harvesting. Some species forcefully eject seed at maturity (e.g., spiderworts, phlox, wild petunia, and violets) and require special harvesting strategies.
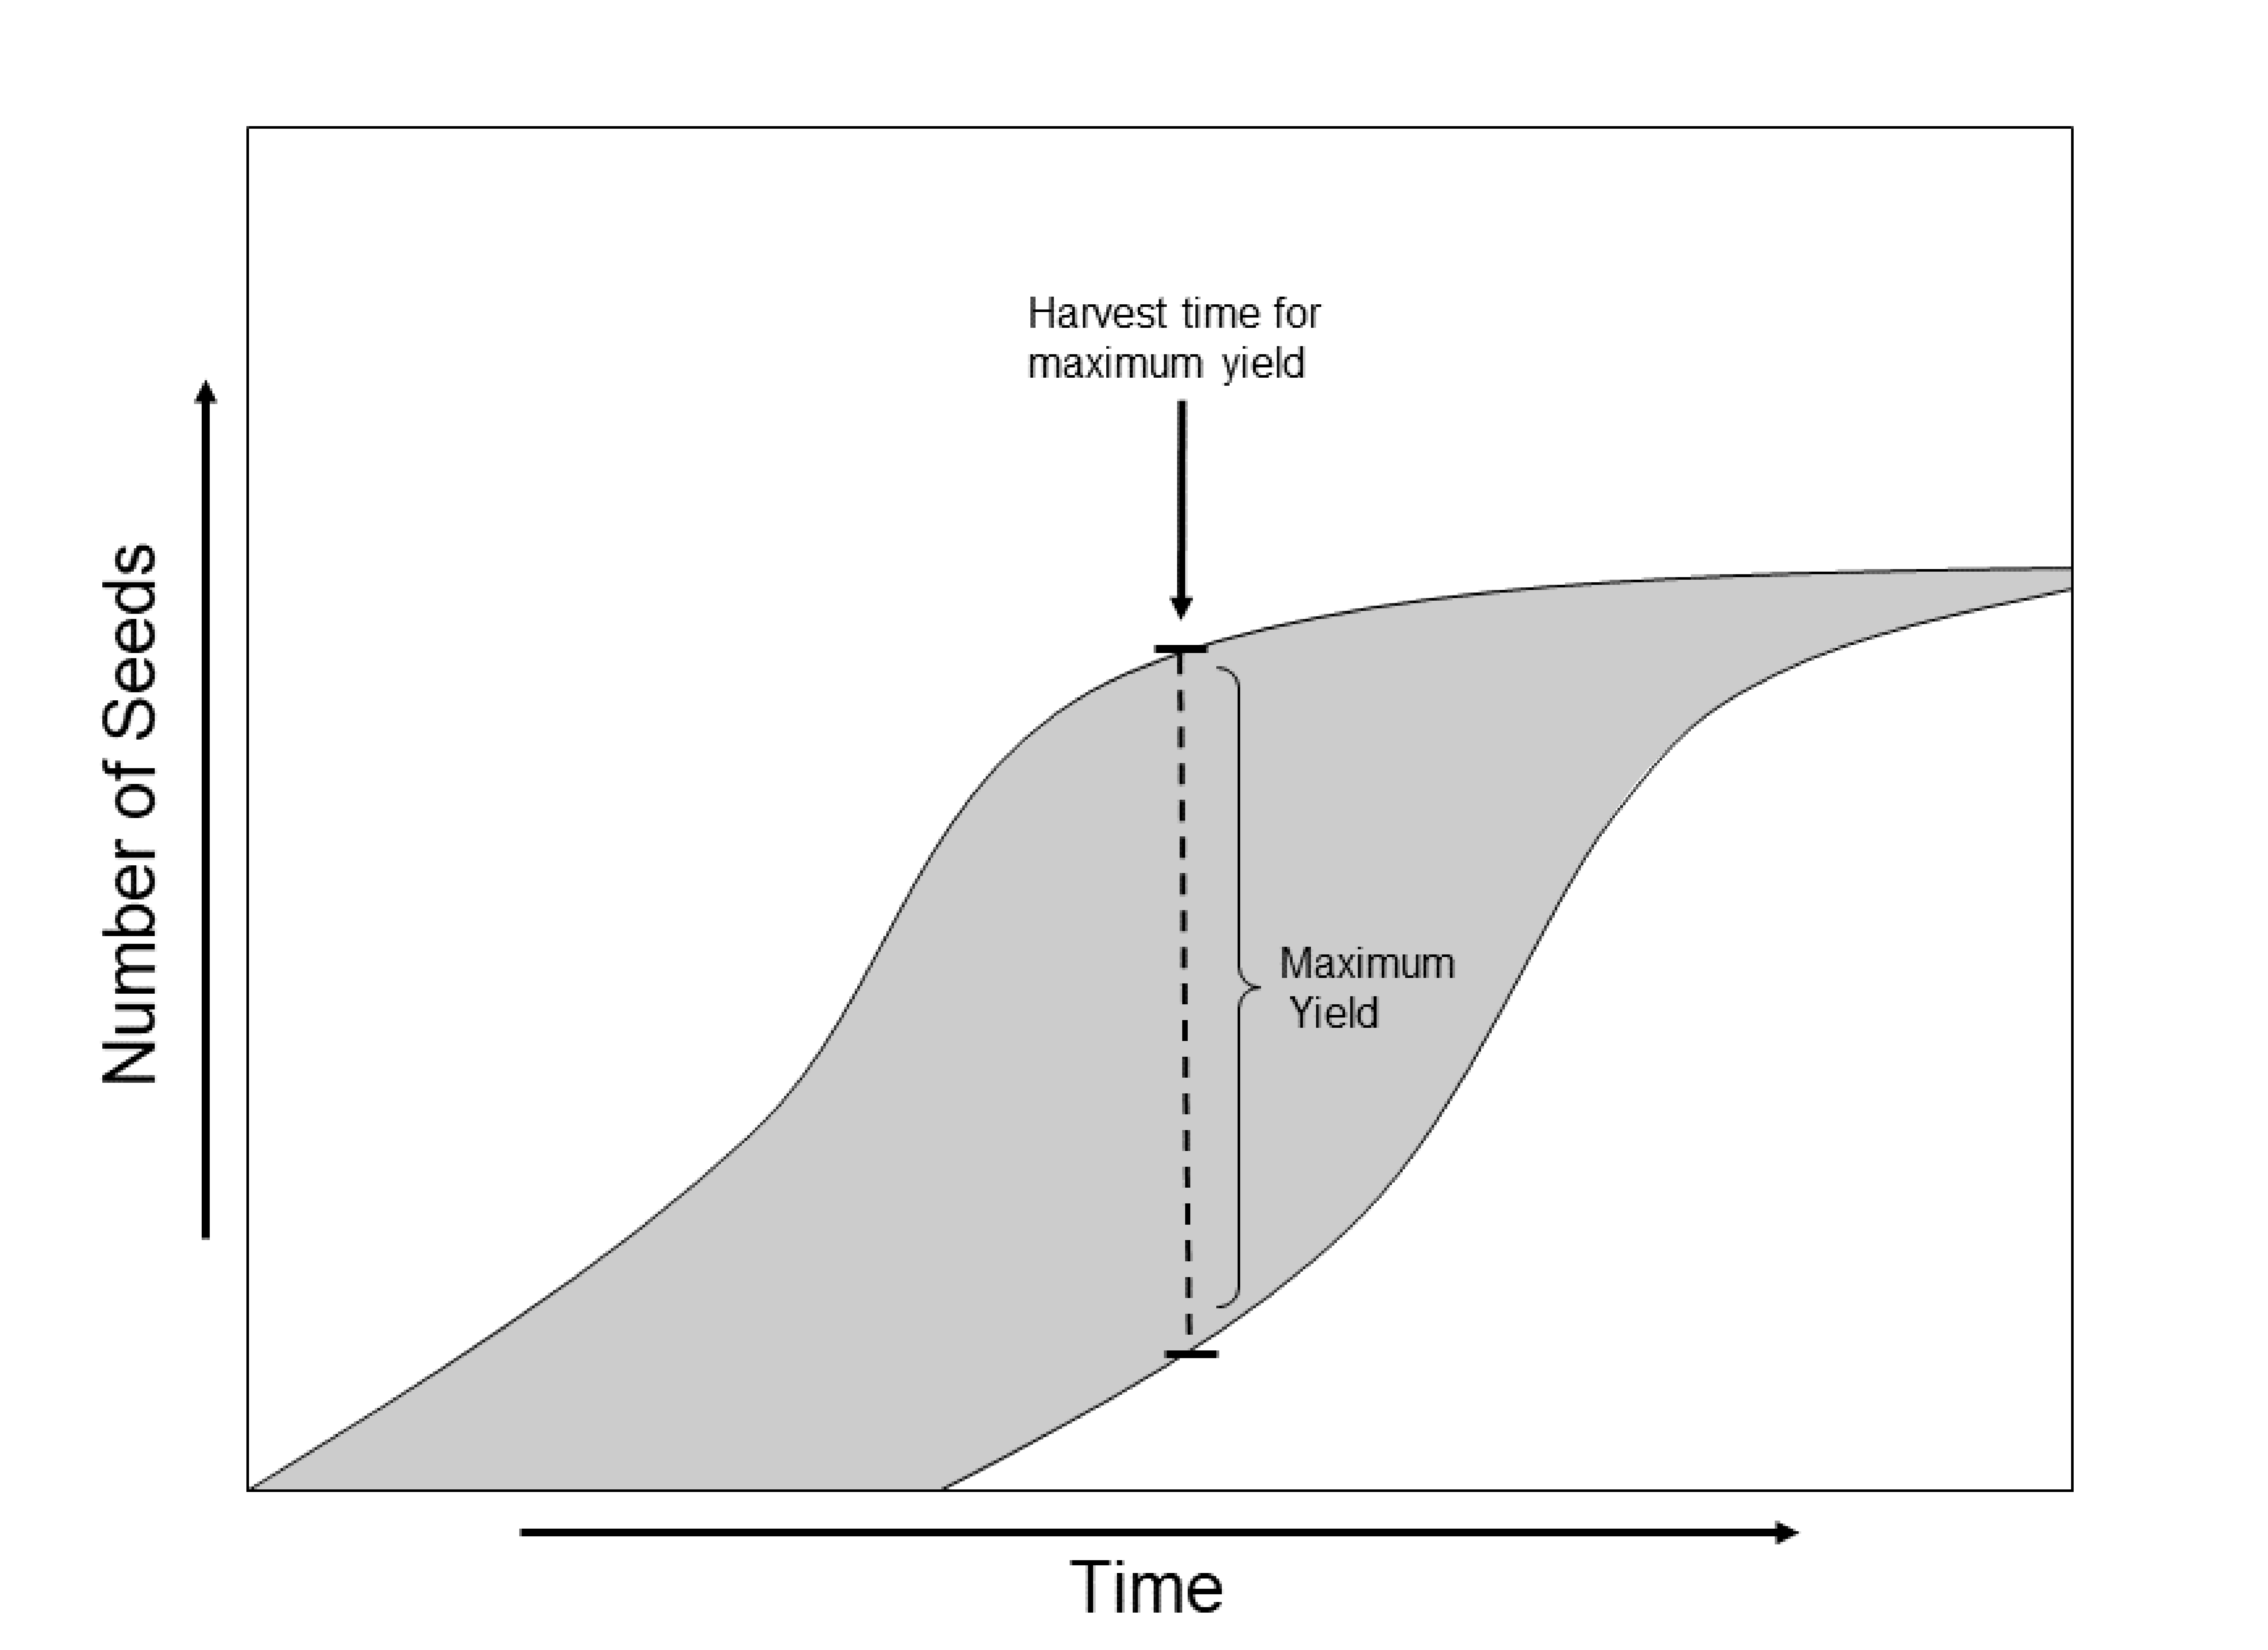
Conceptual diagram illustrating the optimal harvest time for capturing maximum mature seed yield, assuming the field is harvested mechanically on a single day. As seed ripens, seed shattering follows, and the rate of both processes increases over time. Timing the harvest carefully maximizes seed yield and quality. Environmental factors also influence seed maturation. Cold, moist conditions tend to delay seed maturity while hot, dry conditions may hasten it. Latitude also affects ripening since many plants flower and set seed in response to photoperiod. Flowering and seed set may be delayed if plants are grown northward from their origin, or hastened if moved southward. If moved a great enough distance north or south of their origin (greater than 300 miles) they may fail to set mature seed.
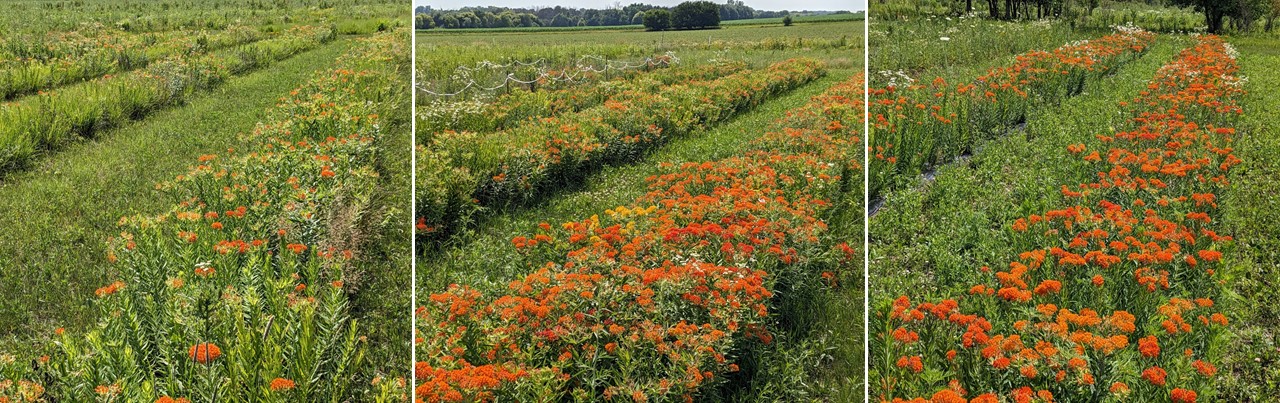
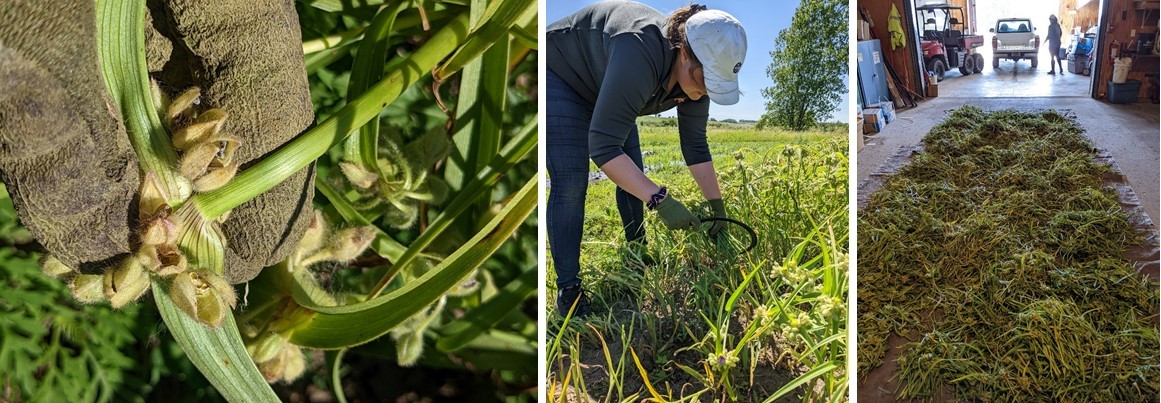
Three fields of butterfly milkweed (Asclepias tuberosus) showing differences in flowering phenology, photographed on July 3, 2023 at the Tallgrass Prairie Center, UNI. The northern Iowa zone (left) is nearly finished flowering, central Iowa zone (center) is just past peak flowering, and southern Iowa zone (right) is approaching peak flowering. Gauging Seed Ripening in Grasses
Seed ripening and timing of harvest varies by species, source of parent material, and environmental conditions. For example, cool-season grasses begin growth early in the growing season and consequently ripen earlier as compared to warm-season grasses. In grasses, there are roughly four stages of seed maturity: milk, soft dough, medium dough, and hard dough. Firm thumbnail pressure on the caryopsis, or grain, will help determine maturity. Grasses should be harvested at the hard dough stage, when firm thumbnail pressure slightly dents the caryopsis. Many grasses ripen about a month after flowering, and some do not hold seed long after maturity. Test ripeness by firmly striking the seed head against your palm; if some shattering occurs, the seed is ready to harvest. If it shatters with only gentle striking, harvest immediately. In some species, such as sideoats grama, visual assessment of the stand provides an indicator of maturity: the stand is ready to harvest when about 10% of the plants have started to shed seed.
Gauging Seed Maturity in Forbs
Generally, the seedhead itself or the stalk immediately below the seed head will begin to appear dry or discolored as the seed ripens. The leaves may also change color as the plant approaches dormancy. If the seed is easy to strip off or shatters out when the seed head is gently struck against the palm, seed ripening has begun. Some species have seed capsules that dry and split open when ripe, allowing seed to be released by wind, passing animals, or gravity. The spiderworts (Tradescantia), members of the day-flower family (Commelinaceae), are a special case: they drop seed from individual seed capsules as they ripen even while the bracts remain green and other flowers in the same cluster are in bud or blooming. Species with dispersal apparatus such as awns or hairs will appear dry and fluffy at maturity. It can be tricky to time the harvest of fluffy-seeded species that release their seed soon after maturity (many species in the aster family). Picking a few heads and examining the developing “seeds” (technically a type of fruit called cypselae or achenes) can help gauge approaching maturity. Seed that is nearly ripe will develop the mature color and separate easily from the receptacle.
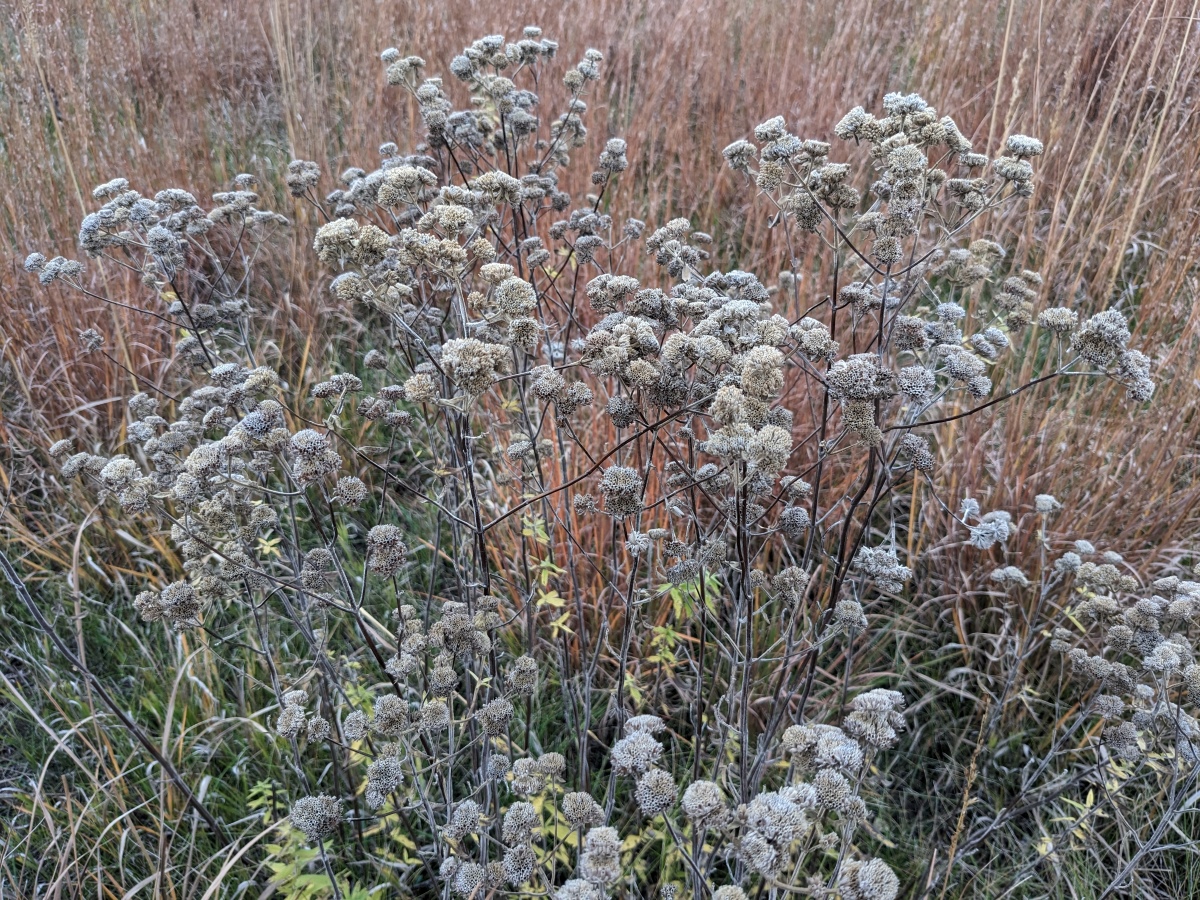
A hairy mountainmint plant (Pycnanthemum pilosum) showing signs that it is ready to harvest: leaves are changing color and dropping and stalks beneath the seedheads are dry and brown. 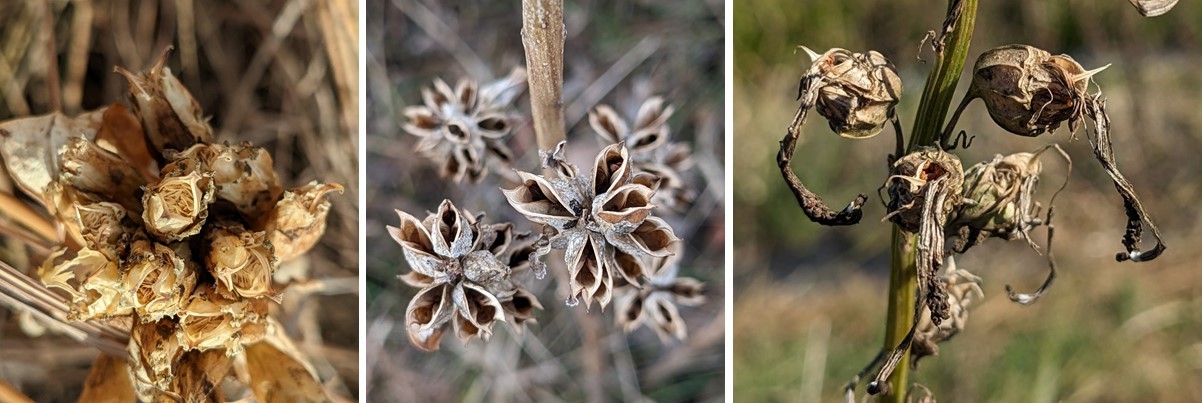
Three species of forbs showing capsules that have opened and begun releasing seed; they should be harvested immediately to avoid losing the crop. Left to right: bottle gentian (Gentiana andrewsii), swamp lousewort (Pedicularis lanceolata), and cardinalflower (Lobelia cardinalis). 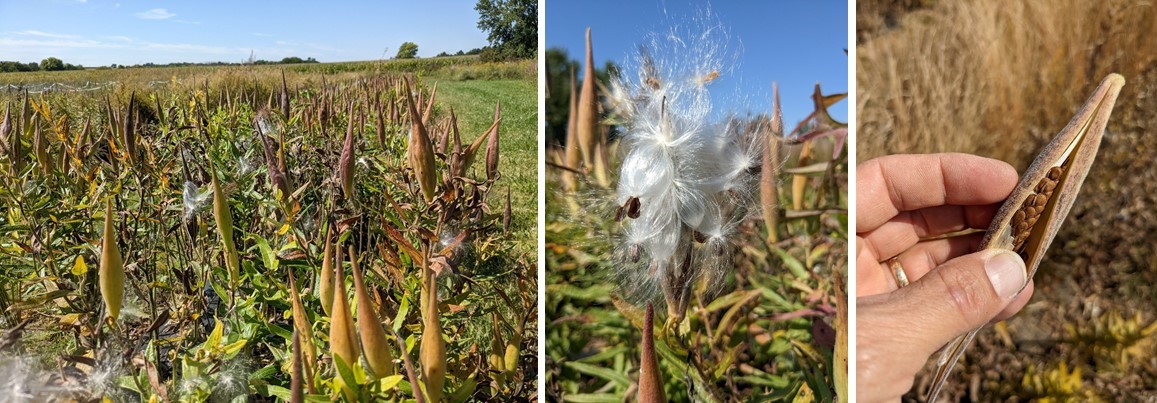
Fruit and seed ripeness varies within a seed production plot. Left: a field of butterfly milkweed with "pods" (follicles) at varying stages of ripeness. Center: Once pods split naturally, the seed rapidly blows away. Right: A pod that bursts in response to gentle pressure on the seam reveals chocolate-brown, mature seeds; this is the ideal time to harvest. 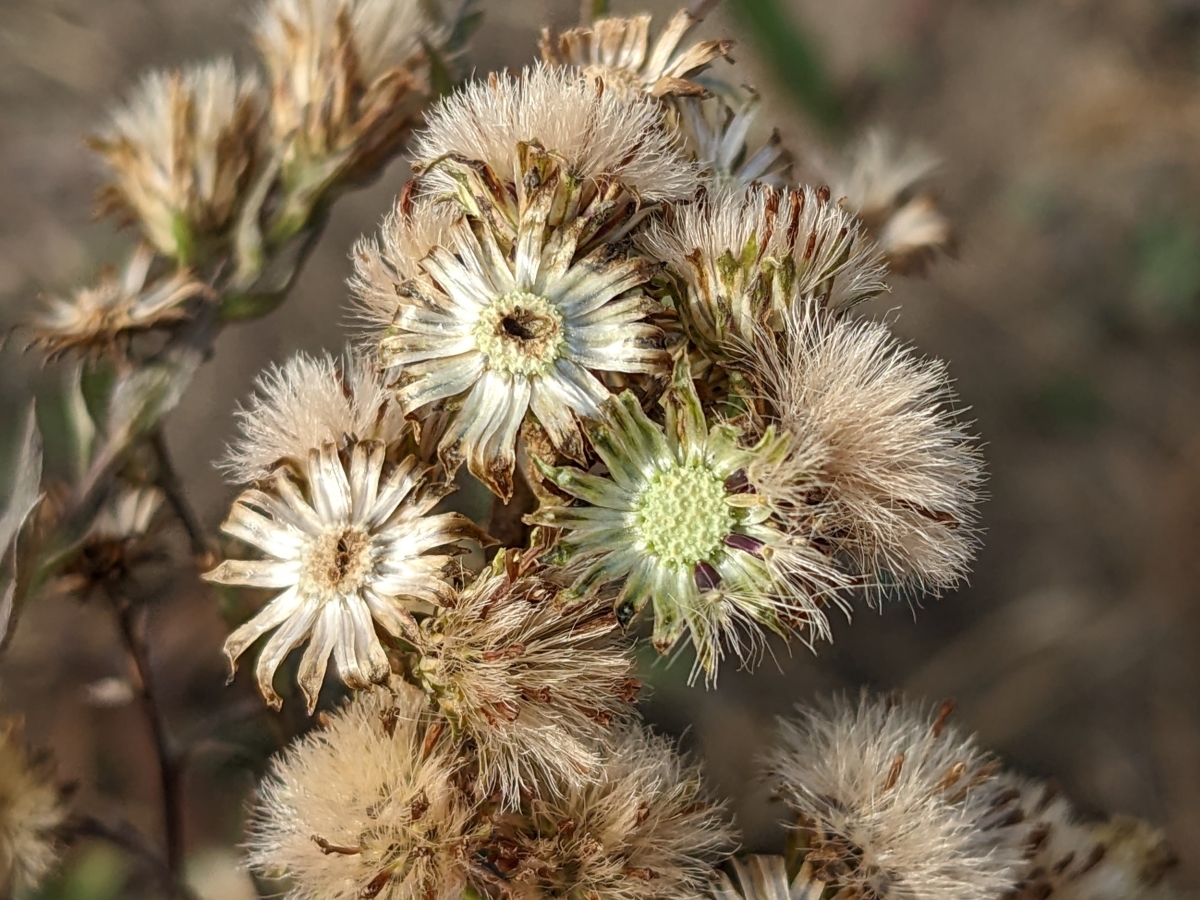
Maturing seedheads on a sky blue aster plant (Symphyotrichum oolentangiense). The greenish receptacle near the center shows three indicators of approaching seed maturity in many members of the aster family: fluffy pappus, mature color of achenes, and easy separation from the receptacle. - Hand Harvesting Techniques
Hand harvesting is time- and labor-intensive and not practical for most large projects, but it is an important way to collect the seed of native species that are commercially unavailable and/or impractical to harvest mechanically. Such species may be low or high growing species, early or late ripening species, species with explosive seed capsules, or uncommon or patchy species in native prairie. There are also situations in a seed production system when hand harvesting may be needed, for instance, when collecting seed from early maturing individuals to ensure conservation of genetic diversity. Efficiency can be improved by keeping both hands free to harvest by simply fastening collection bags and containers around the waist with a bungee cord. Hand harvesting aprons are also available from some native seed businesses and garden suppliers. A plastic comb can be used to strip seed from grass stems. Scissors, clippers, or a hand sickle are useful for cutting tough stalks beneath seed heads.
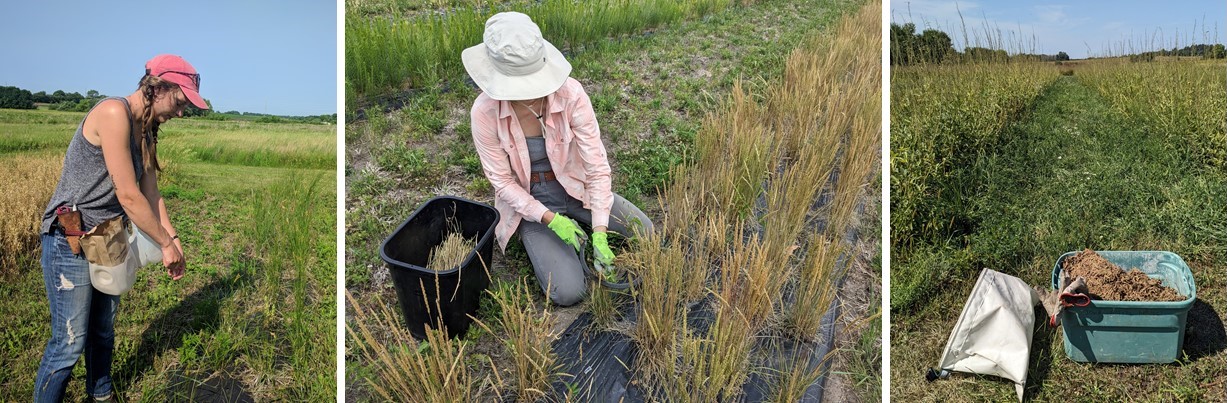
Three situations in which hand harvesting was warranted: Left - stripping seed from sedge plants in a plot that was partially invaded by another sedge species (note hands free technique); Center - using a sickle to cut early maturing individuals in a prairie Junegrass plot (the plot was later combined); Right - hand stripping sticky Illinois ticktrefoil pods which tend to ball up in the combine (gloves and picking apron are shown; raincoat and rainpants, not shown, help to protect clothing). Hand harvesting or combinations of mechanical and hand harvest approaches may be needed for species with explosive seed capsules or capsules that shed seed immediately upon ripening. Strategies for collecting explosive seeds include: checking and harvesting daily (Viola), bagging seedheads loosely with a tightly woven mesh or cloth bag (Phlox), vacuuming seed from landscape fabric (Phlox), or clipping heads when some capsules have opened and drying cut material on tarps or cloth bags indoors (Ruellia). For the spiderworts (Tradescantia), check seedheads regularly near the typical harvest date. They begin shedding seed from the bottom of a flower cluster even when most of the plant is still green and there are still a few buds opening at the top of the cluster. When some seed is being shed from most plants, plots can be swathed and the cut material collected and laid on a tarp in a building. Capsules will continue to mature and release seed as the cut material dries.
Longbract spiderwort (Tradescantia bracteata) seed capsules mature and release seed even while other buds in a cluster are still flowering. Left: examining the underside of a seed cluster for open capsules. Center: hand cutting spiderwort stalks (the plot could also be swathed mechanically). Right: cut stalks drying in a building. The tarp catches the seed as the capsules mature and break open. Hand harvesting is also useful for collecting seed from wild populations for use as foundation material for seed increase and seed production plots. A seed collection is only a sample of the seed available in a population. How and when the seed is collected and propagated influences the genetic potential of the resulting population. Annual variation in rainfall and temperature can affect total seed production, quality, maturity, and dormancy. To optimize the capture of genetic diversity present in a population, approximately equal amounts of seed should be collected from many widely spaced individuals (minimum of 30, preferably 50 or more) throughout a site and over multiple years. In larger, evenly distributed populations, walk a linear transect through the population, sampling seed at intervals (e.g., every ten steps), then sample along additional transects parallel to the first. When collections from multiple sites are used to create a pooled population in a production plot, attempt to equalize the contribution of seed from each site.
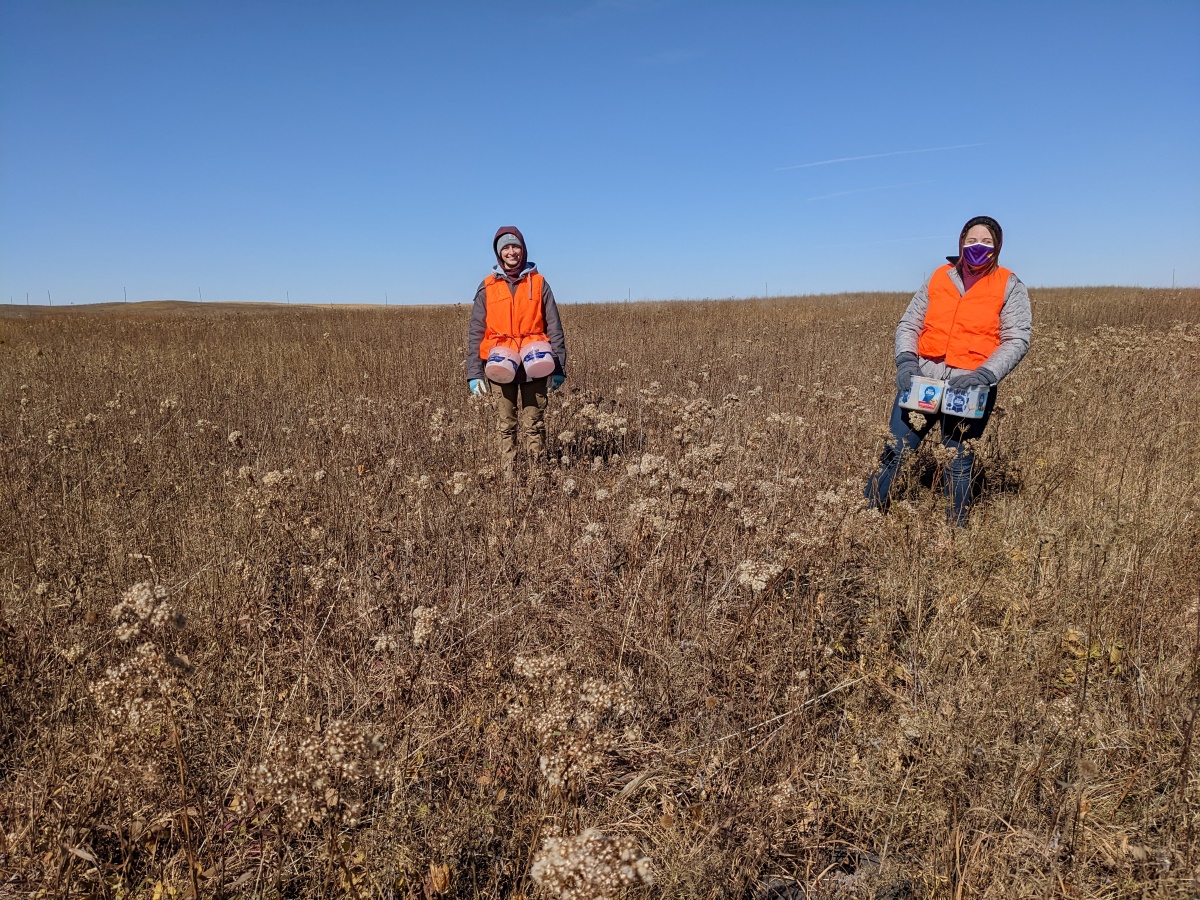
Individual team members can collect along parallel transects to capture as much diversity as possible from a large plant population in a remnant prairie. Populations grown and re-grown in a production field can become adapted to site conditions and nursery management practices. Even though most prairie plants are perennial, seed production in plots tends to decline after 3-5 years for most species, and plots need to be replanted. Therefore, it is important to save seed from the original collections and/or the first production generation for replanting production fields. Hand harvesting of early maturing individuals in a production plot is a way to retain important genetic diversity within the production population. The rest of the plants in the production plot can then be mechanically harvested at peak maturity. Later maturing genotypes can be retained by leaving a portion of the plot uncut and harvesting it later (either mechanically or by hand).
- Mechanical Harvesting Techniques
Combine harvest
As stated above, not all seeds ripen at the same time; with any species, a determination has to be made as to when most seeds present are at or nearing maturity. Grasses are generally harvested at the hard dough stage with some exceptions. Test ripeness by firmly striking the seed head against your palm; if shattering occurs with only gentle striking, the stand should be combined immediately. Since most grasses ripen from the top down, some shattering of the tops of the seed heads may have already occurred. If a species’ seed shatters very easily, harvest in the early morning when humidity is high and wind speeds are less, as a strong wind can reduce the harvest significantly in a single afternoon. In grasses that shatter easily at maturity, windrowing or swathing during the medium- to hard-dough stage can be effective, since seed will after-ripen for several days after cutting. It is important to be sure no rains are in the forecast for the next few days after cutting. Swaths can then be picked up with a combine after the material has dried at the site for a few days.
Combines may require significant modifications to make them suitable for harvest of native grasses and forbs. Reducing or shutting off airflow in a combine is a must for native species with lightweight seeds. Species with fluffy pappus (e.g., asters and goldenrods) should be harvested when seed is mature but just prior to the dry-fluff stage. If the seed is dry-fluffy, the combine will become a super seed dispersal machine. Plugging of shaker sieves and augers is a constant issue, particularly with fluffy seed or seed with long awns. The long twisty awns of Canada wildrye can be a combine’s bane. De-awner bars can be installed into the cylinder surrounding the concaves to increase the threshing action of the concaves. Seed of tick trefoils (Desmodium species) is dispersed inside pods with sticky hairs. Some of the pods ball up in the combine, fail to pass through the sieves, and are ejected from the straw-walker. To prevent significant loss of seed, attach a bin or tarp to catch the seed balls. Alternatively, cut or swath the plot and collect the seed stalks, then pass them through a stationary combine, where the ejected material can be more easily captured.
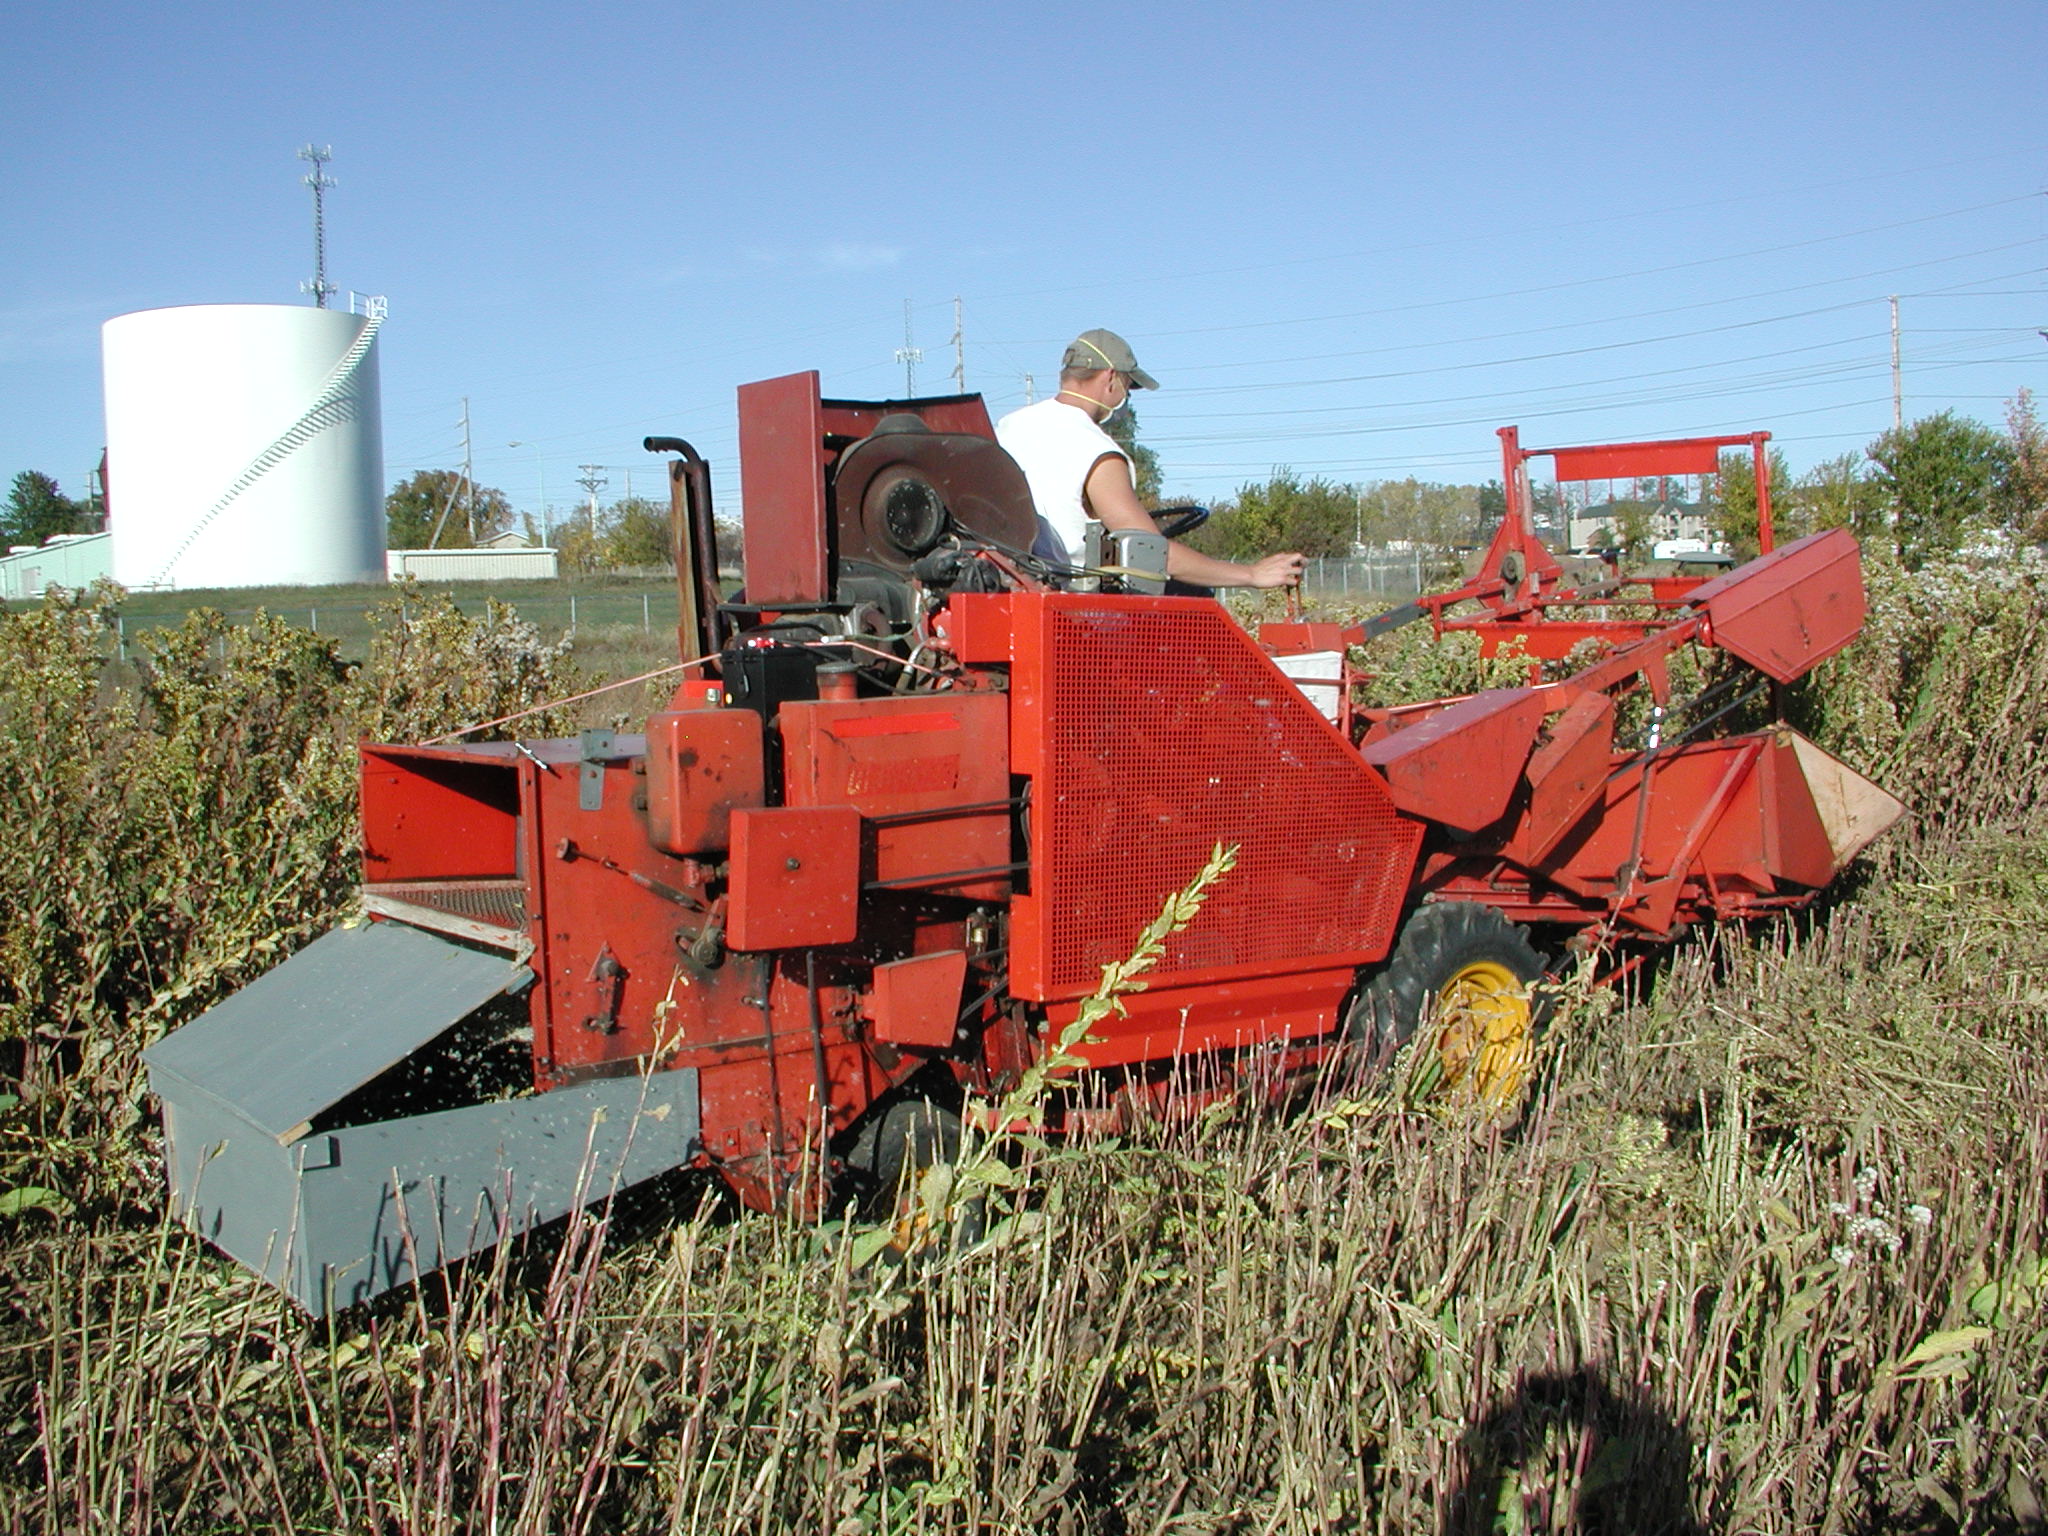
Combining a plot of stiff goldenrod (Solidago rigida). For this and other fluffy seeded species, the airflow must be reduced or shut off. Seed strippers
Commercial seed strippers are available as handheld, implement pull-type, or tractor-mounted equipment. They all use a rotating brush or bristles to strip the seed from stems and stalks of plants. While perhaps not as efficient as combines, strippers can be used for the successive harvest of species that ripen gradually or at different times. Handheld strippers and pull-types light enough to be pulled with an ATV allow harvest of otherwise inaccessible native sites.
Leaf blower vacuum units
A leaf blower-vac unit on the vacuum setting can be used to harvest fluffy seed such as species in the aster family that have a pappus (“parachute”). Some suggest that the impeller blades of the machine need to be removed to avoid damaging the seed. However, we carried out a trial using an unmodified blower/shredder vacuum to harvest seed of prairie groundsel (Packera plattensis) and observed no visible damage to the seeds (cypselae) under a dissecting microscope. Because vacuuming removes seeds at the dry-fluff stage, immature seed can remain on the plants to ripen for later harvest. This should increase the yield of viable seed from each plant and reduce the risk of unintentionally selecting for a narrower seed ripening window. An additional benefit of this harvest method is that it removes much of the pappus from the seed at the harvest step, reducing the time needed in the seed cleaning lab. It would be interesting to try scaling up this technique using a modified pull-behind leaf vacuum.
- Ethics of Harvesting from Remnant Sites
Repeated, annual harvest of seed from remnant prairies for the commercial market is not encouraged. First, seed production and quality from wild populations are not as high as from production plots, and second, it provides an incentive to manage remnants for maximal seed production. Manipulation of a remnant prairie to maximize seed production – such as whole-site, repeated annual burns, herbicide treatments, or fertilizing – is inappropriate and unethical. A remnant prairie is a diverse, biotic community (both above and below ground) of microbes, fungi, plants, and vertebrate and invertebrate animals interacting in complex relationships. Management applied indiscriminately and repeatedly is detrimental to some of these associations. Burning should be limited to a portion of a remnant any given year, and each portion should be burned on rotation and at different times of year, at varying intervals of time. Bulk harvest from remnants may be appropriate when the seed is intended for planting on adjacent or nearby land to buffer and expand the native prairie. Finally, mechanical harvest in remnant sites should include a careful inspection and cleaning of equipment (including vehicles) to avoid introducing exotic/invasive species that may lead to the degradation of the remnant.
Be mindful of other ethical considerations when collecting seed from prairie remnants. Federal and state endangered and threatened species cannot be collected without proper permits. Removal of any plant or plant part from preserves, natural areas, and parks may be restricted. Check with the proper agency before harvesting seed in these areas. Harvesting from roadsides may also be restricted in some states and counties. Contact the county engineer’s office or state department of transportation before harvesting from county and state roadsides. Obtain permission from the landowner before collecting seed on private property. Some seed producers lease native prairies to compensate landowners for excluding grazing over the summer so that seed can be harvested from the site.
Obtain proper permits and permissions before making collections on private or public lands. Determining which entity owns or manages a site can be challenging. In the case of Clay Prairie, the land is owned by UNI, but the county helps manage the site, and the prairie is part of the State Preserves system.
Seed Processing
Seed Processing sagemThis section is under construction and new material will be added as soon as it is complete.
Post-harvest processes include drying, pre-cleaning, cleaning, and proper seed storage. The extent of processing required after drying depends on the species, storage conditions, and intended seeding method. Knowledge, skill, and access to specialized equipment are necessary for some of the cleaning steps described, and these factors will determine the quality of the finished product. Most commercial producers of native seed clean seed to a very high quality of purity and germination.
As in other steps in native seed production, care must be taken to avoid selection and loss of genetic diversity in production populations. In seed processing, there is a risk of selecting against genes that influence seed traits. For example, if only average-sized seeds are kept and used for expanding or re-growing fields, genes for seeds that are smaller or larger than average can decline in the population within a few generations.
- Drying
Drying is a necessary step for proper seed cleaning and storage for nearly all prairie species. Seed should be dried immediately after harvesting to prevent fungal growth and decomposition. Plastic bags or airtight containers can be used for storage ONLY after the seed is properly dried and cleaned. Larger quantities of material require specially constructed bins with screened bottoms and a source of airflow up through the material. Smaller quantities can be collected in large 100% cotton muslin bags made to fit inside a 30-gal plastic trash bin. Large cotton laundry bags with drawstrings work well. Fill bags loosely with seedheads, tie closed, label, and place in drying bins. If the material associated with the seed is very green, as is the case with spiderwort (Tradescantia spp.), or is damp from a recent rain shower, spread the material out on tarps and position several box fans overhead, turning the seed frequently with pitchforks, rakes, or shovels. Drying may take several days to a few weeks, depending on quantity of material and drying conditions (ambient humidity).
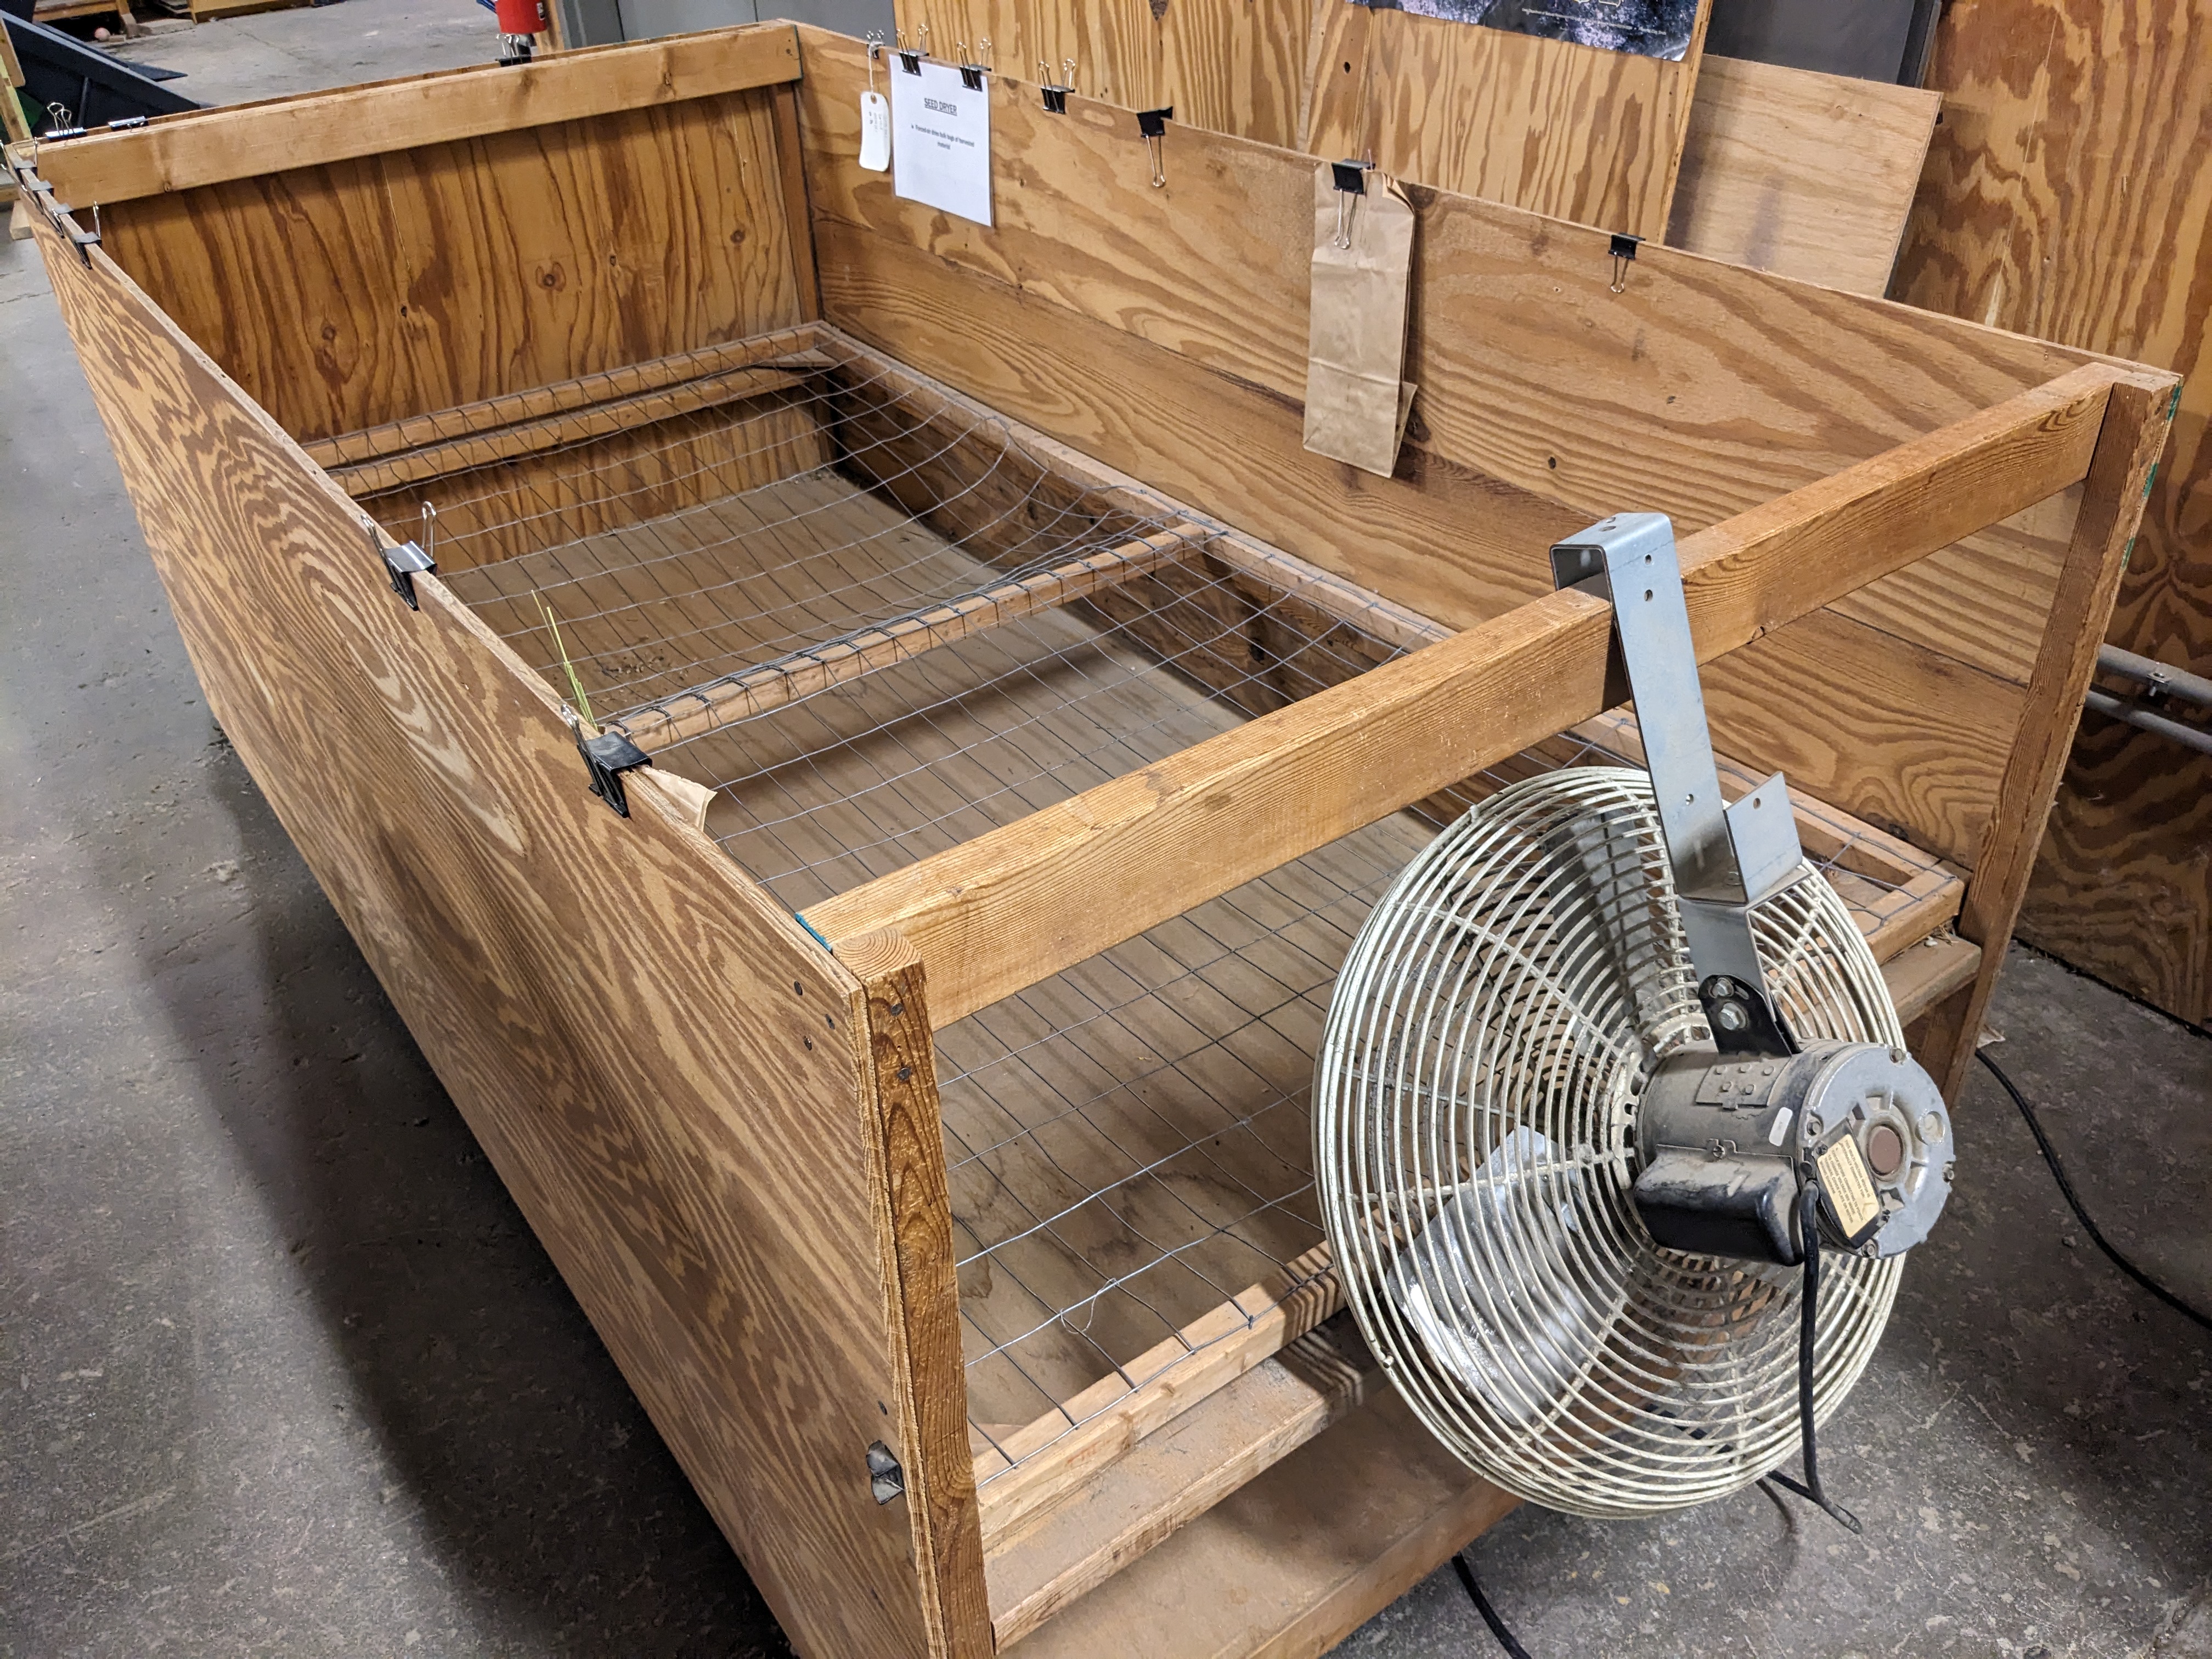
Image 1: Bin suitable for drying seed in cloth bags. 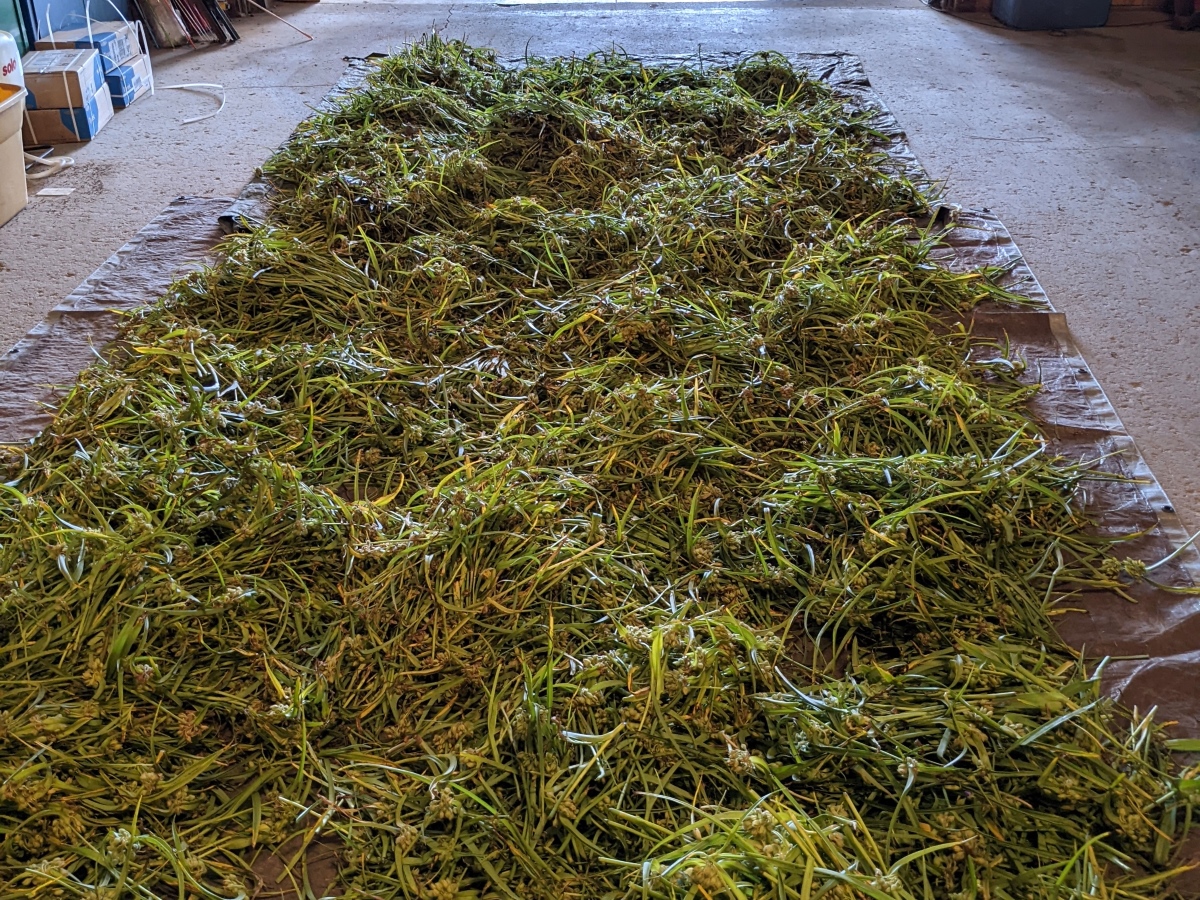
Image 2: Cut stalks of Tradescantia bracteata laid to dry on a tarp. - Pre-cleaning
Harvested material requires some degree of pre-cleaning to reduce bulk. The extent of pre-cleaning required depends on the method of seed harvest, intended storage period, and method of planting. Threshing, debearding/deawning, and brushing are considered pre-cleaning steps, because they are designed to prepare the seed for later cleaning processes by removing unnecessary appendages and improving seed flow.
Threshing
Threshing removes the seed from seedheads, one of the primary functions of a combine harvester. Hand-collected material can be threshed with a variety of machines, including hammer mills, huller/scarifiers, and brush machines. Some growers have adapted older combines (with cutter bars and reel removed for safety) for use as a stationary thresher of hand-collected material. A debearder (see below) is effective for removing the awns of grass seeds and threshing the dried seedheads of compassplant and dried milkweed pods.
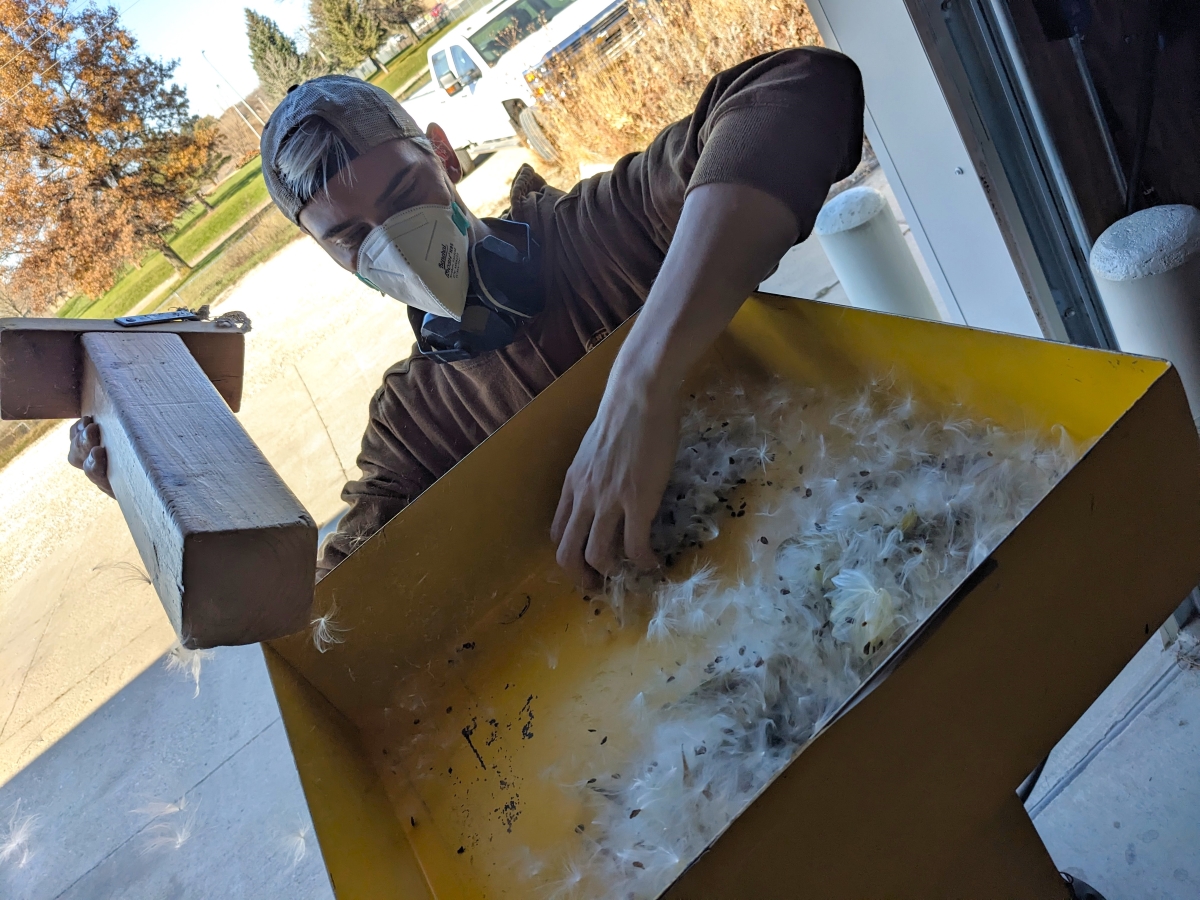
Image 3: Adding dried milkweed pods to the hopper of the Westrup debearder. 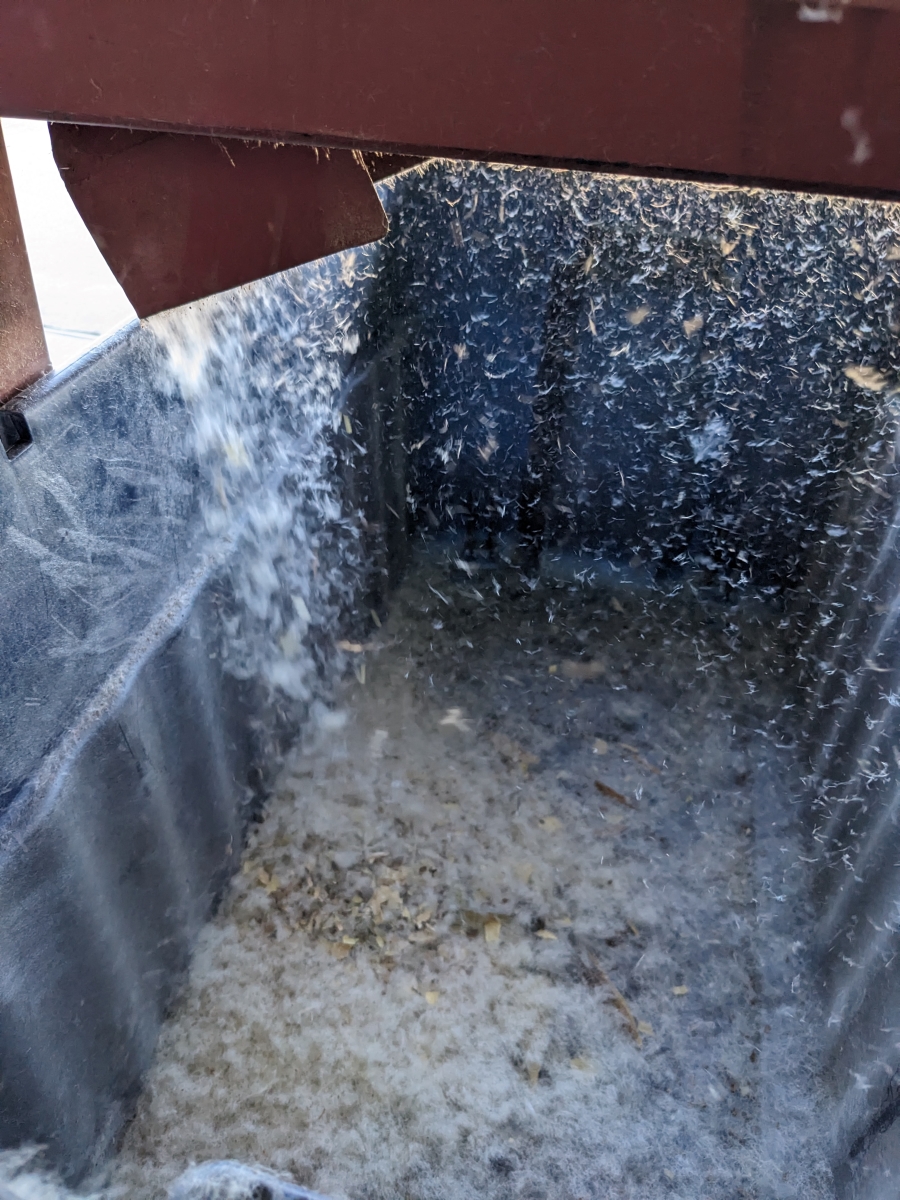
Image 4: Seed falls into a tub positioned below the debearder, mixed with chopped pods and fluff. Non-mechanized threshing can be accomplished by stomping on seedheads. Using large plastic tubs, place about a 2-in. layer of bulk material in the bottom and stomp on it with waffle-sole boots. Toe kicks to the corners of the tub help break up any stubborn seedheads. Stomped material is then screened through a coarse ½-in. or ¼-in. screen into a second tub. Continue in batches, returning any intact seedheads remaining to the stomping tub. This method is very effective on species of Baptisia, Silphium, Helianthus, Veronicastrum, and Rudbeckia. Echinacea tends to be stubborn and requires machine threshing, unless it is collected late in the season after the seedheads naturally begin to shed their seed.
Deawning/Debearding
Many species have seed appendages such as the awns or “beards” on grasses and pappus “parachutes” on seeds of asters, goldenrods, and other composites. Removing or minimizing these appendages reduces bulk and improves seed flow for further cleaning. This step requires specialized and costly equipment. Debearding machines consist of a rotating shaft with projecting metal bars housed in a chamber. As the chamber fills with seed, the bars work the seed against itself, breaking or rubbing off the awns. It is important to fill the chamber with the proper amount of seed: too little and it’s ineffective, too much and the seed can heat up and be damaged. A continuous flow debearder works well for larger quantities of seed, but batch debearders are available for smaller quantities. A small gallon-size huller/scarifier is useful for deawning small individual accessions of seed. This type of machine is very aggressive, and only a few seconds of treatment are typically needed.
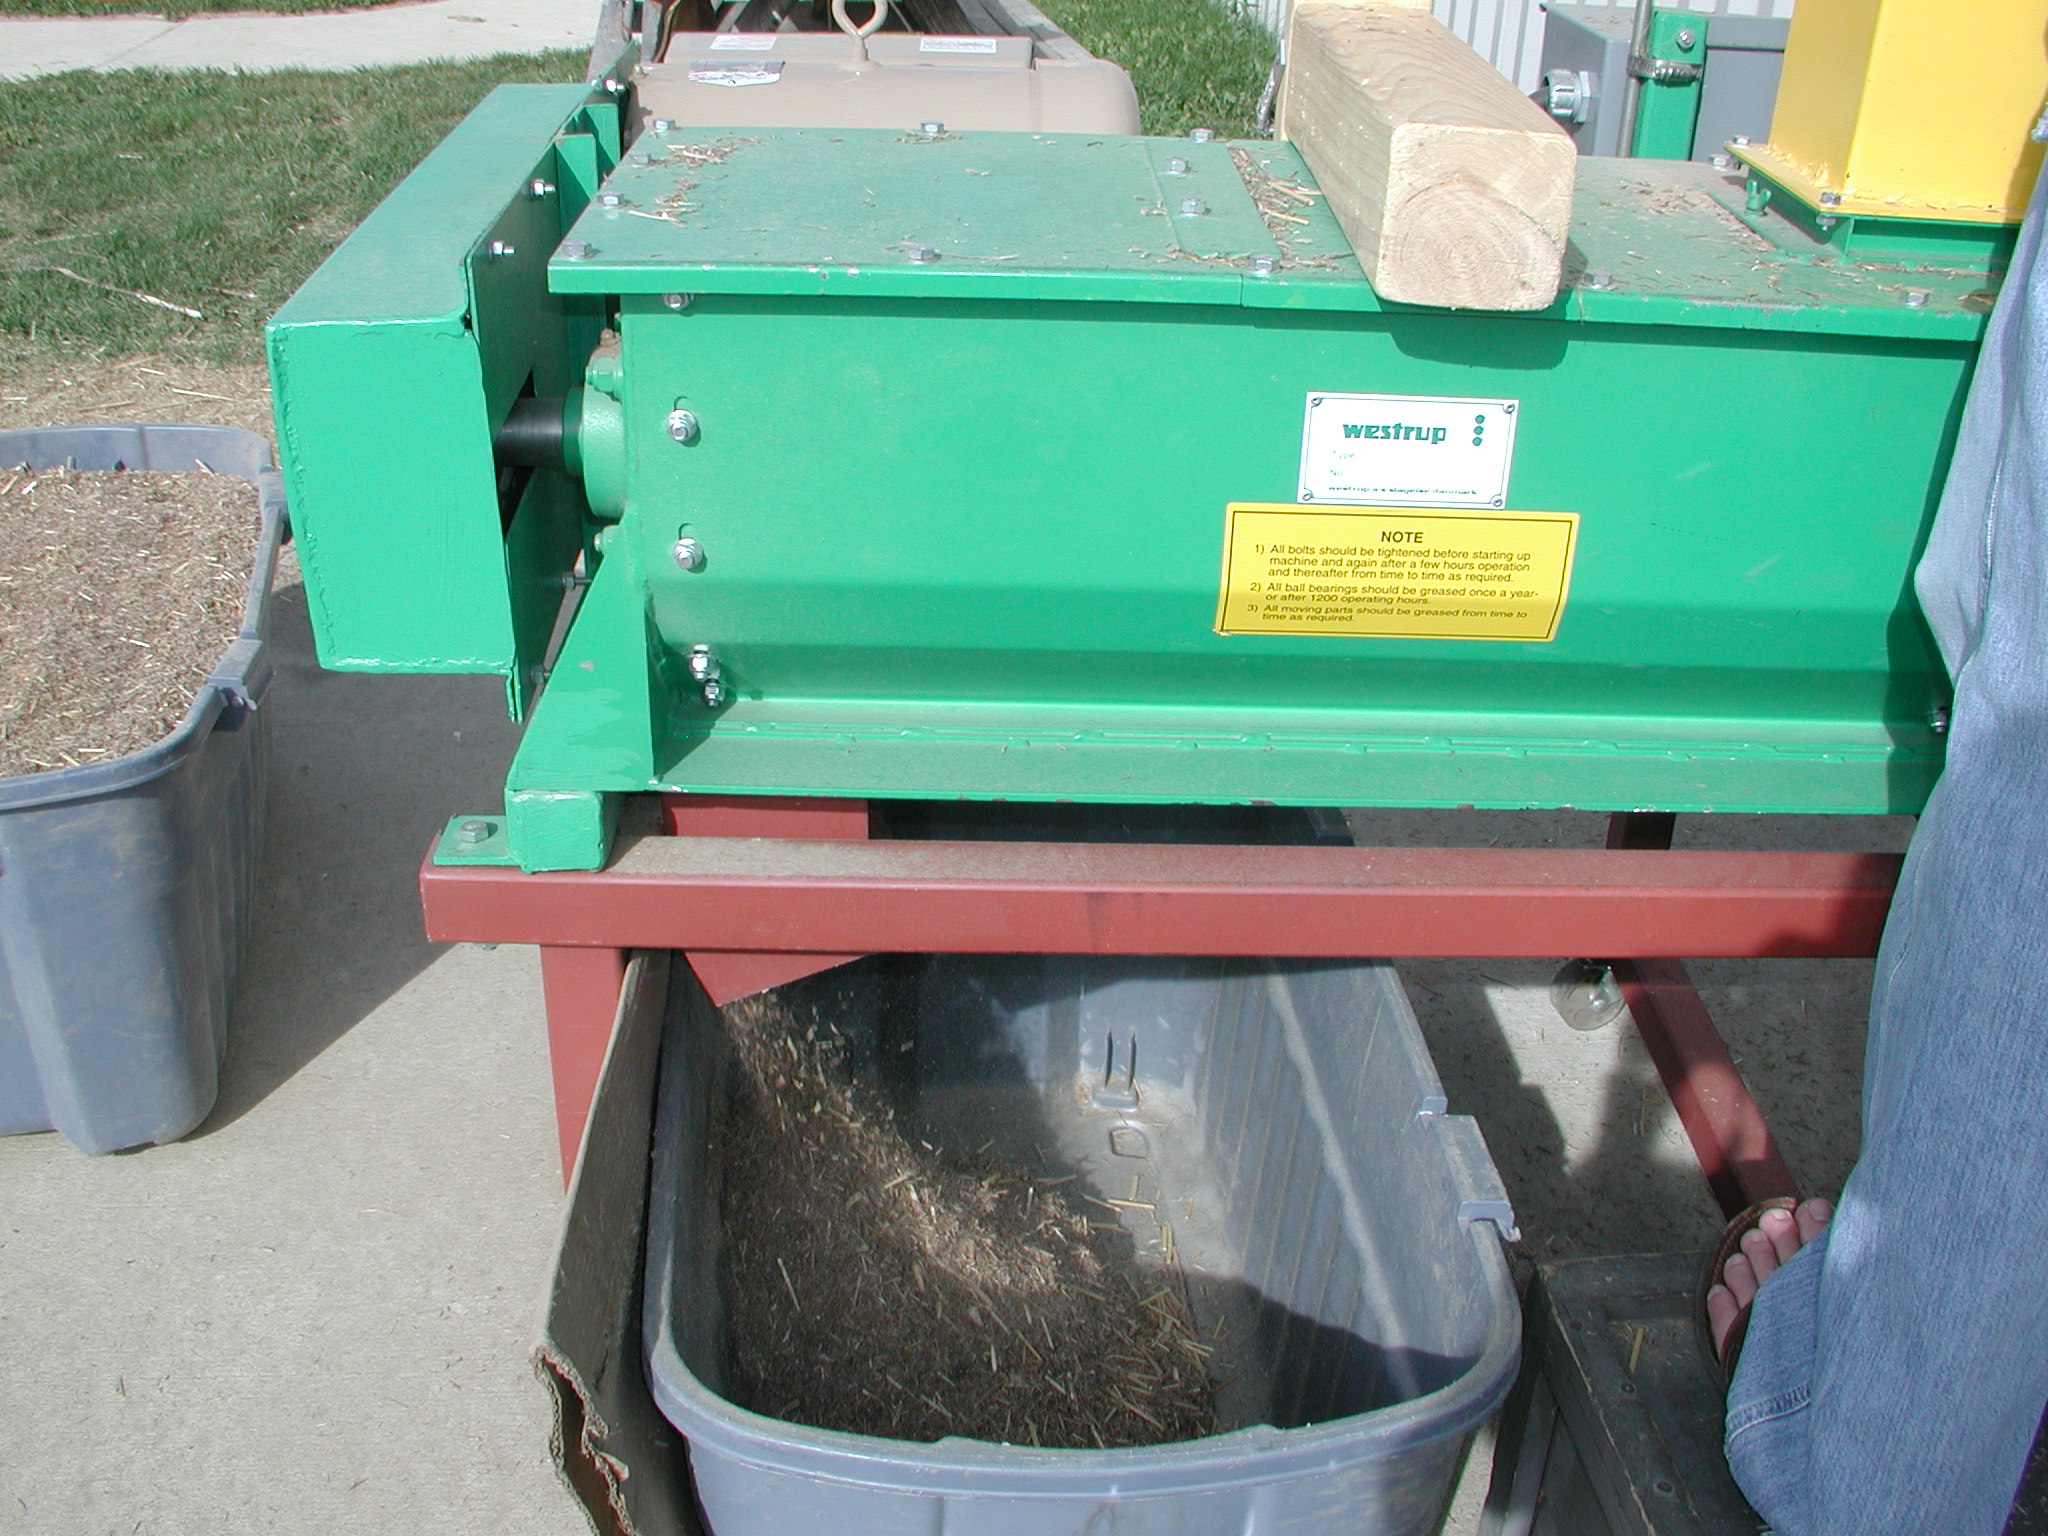
Image 5: A debearder being used to improve the flowability of combine harvested big bluestem (Andropogon gerardii) before cleaning the seed. A brush machine is useful for removing the pappus from asters, goldenrods, and blazing stars, but this versatile machine has many uses. Its basic action is to use rotating brushes to rub seeds or seedheads over a cylindrical drum screen, or mantle. Mantles come in various screen sizes, and a variety of brush textures is available. The machine can also be used as a deawner or scarifier. It is effective in removing the “cotton” from thimbleweed (Anemone virginiana and A. cylindrica), threshing seed from hand-collected mint seedheads, removing pods from purple prairie clover and leadplant, and deawning smaller quantities of grasses. Heavy canvas beater bars can be installed in place of brushes for a hammer-mill-like effect for removing seed from tough legume pods (e.g., Amorpha spp., Dalea spp., and Astragalus spp.) and dried rosehips (Rosa spp.). Beater bars are constructed from rubber/canvas multi-ply conveyer belting which can be purchased from industrial supply companies and cut to fit. When setting up the machine, position the beaters so that the canvas is barely touching the edge of the screen.
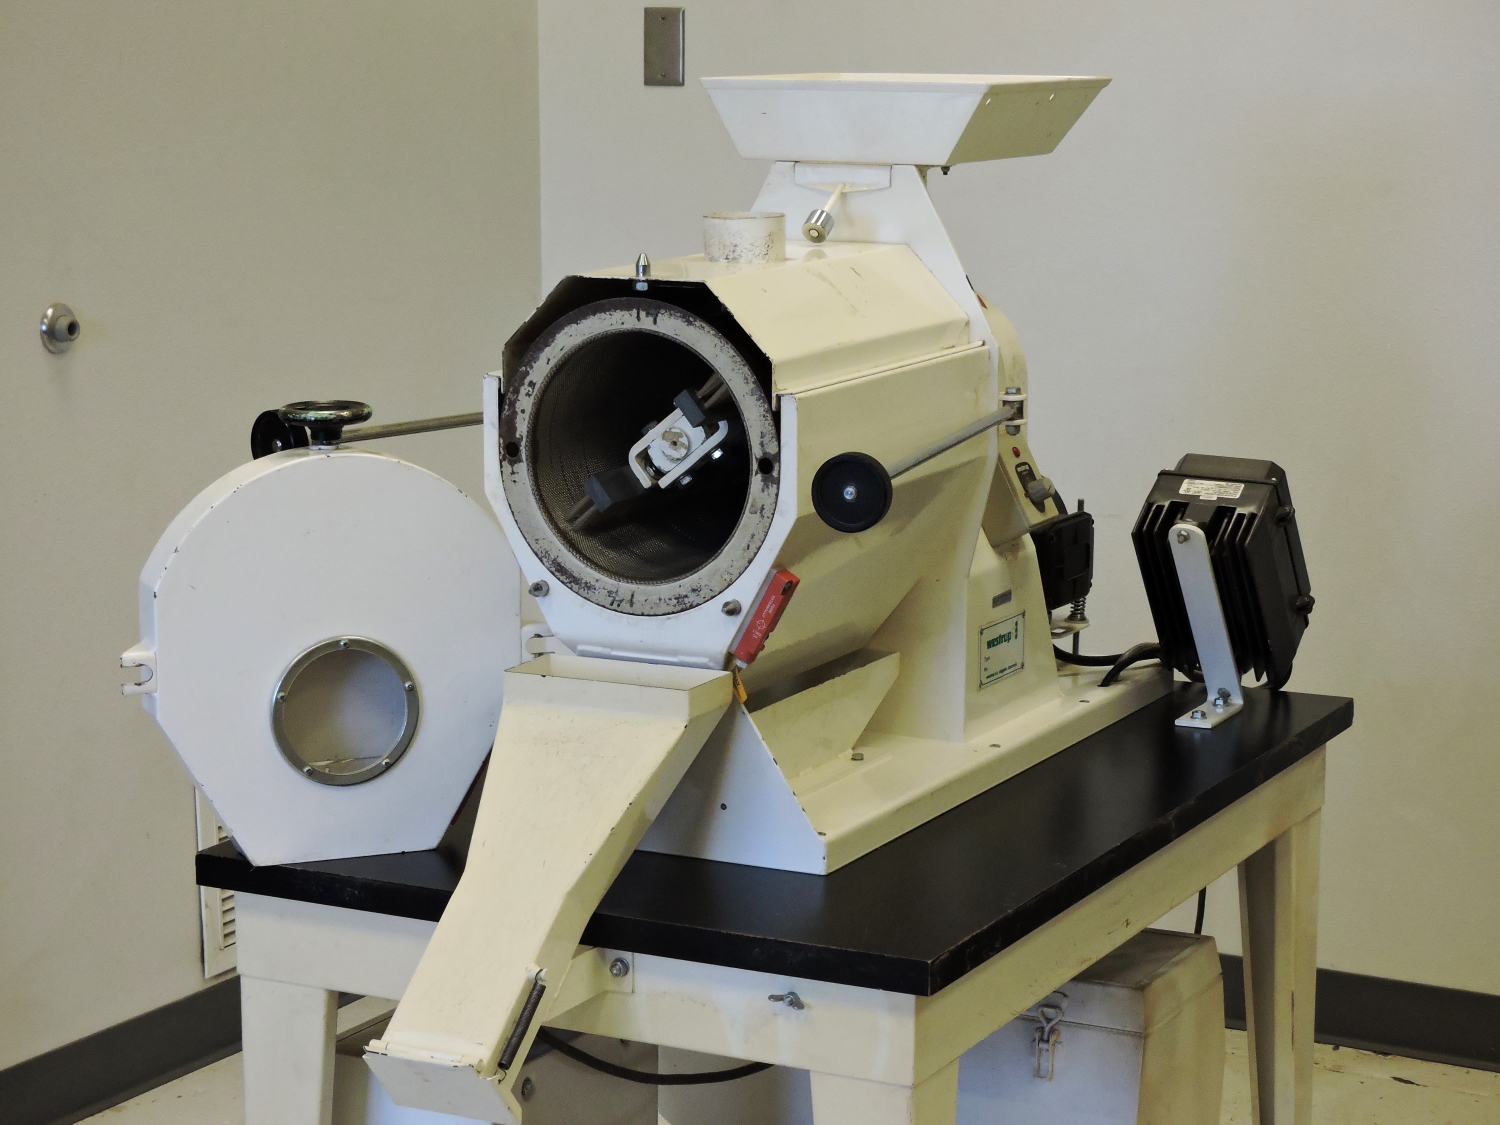
Image 6: A laboratory scale debearder with the front cover removed to show the screen mantle and rotating brushes. 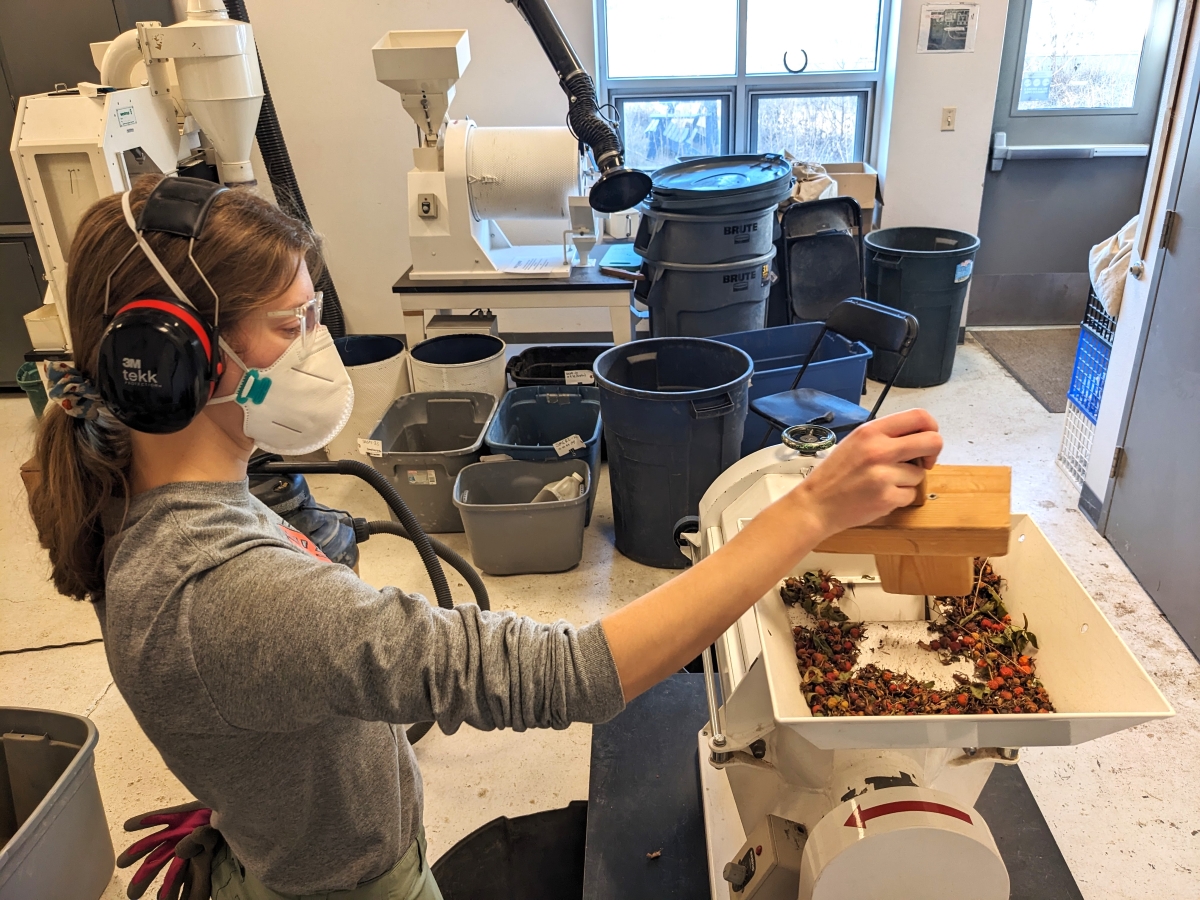
Image 7: A student worker feeding dried rosehips into the brush machine which has been set up with canvas beater bars. 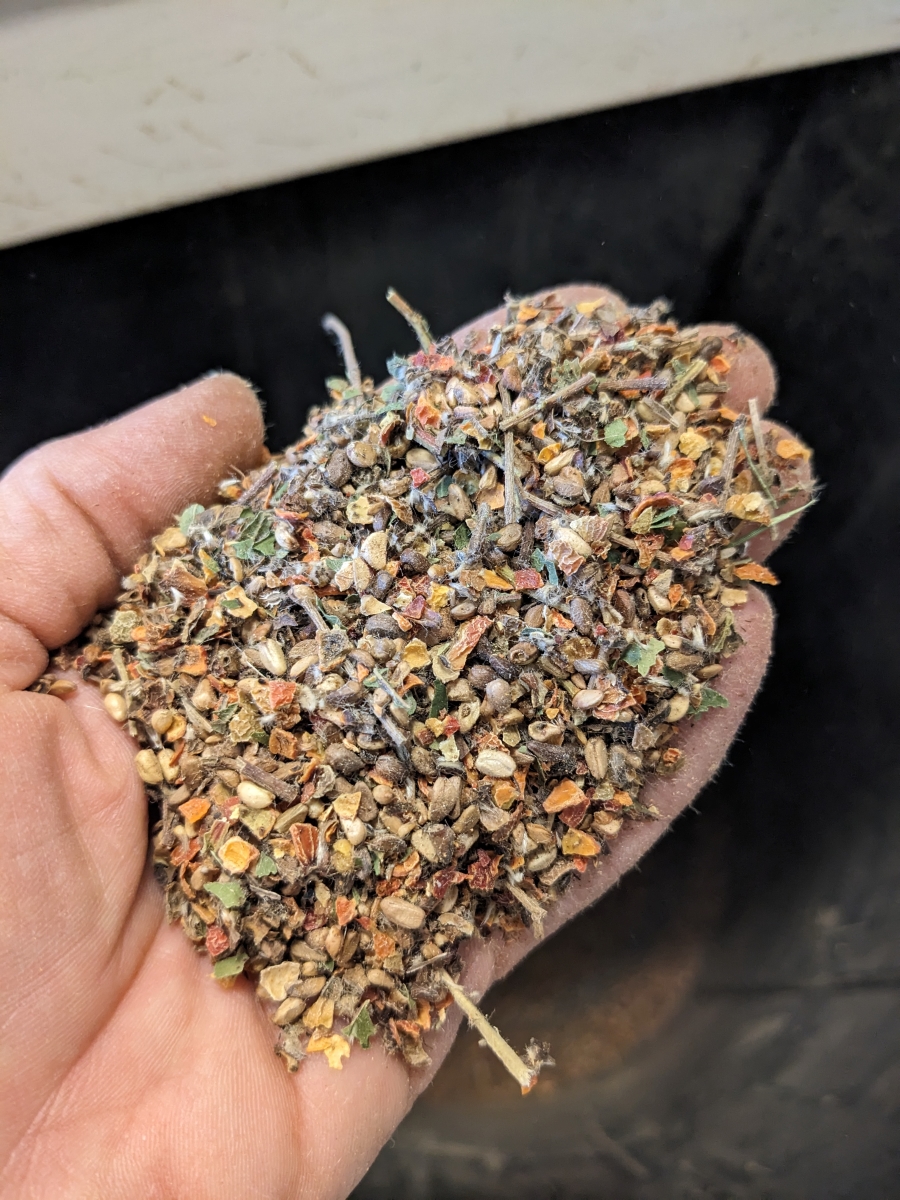
Image 8: The brush machine with beaters installed crushes the rosehips and releases the seeds. - Cleaning
- Storage
Seed Source and Quality
Seed Source and Quality sagemThis section is under construction and new material will be added as soon as it is complete.
- Importance of Seed Source
- Local Ecotype vs. Regional Sources
- Source-Identified Seed
- Cultivated Varieties of Native Species
- Seed Quality
- Calculating Pure Live Seed
Species Production Guides
Species Production Guides sagemThis section consists of specific information on seed production for selected species in the following functional groups: forbs (wildflowers), legumes, warm season grasses, cool season grasses, sedges, and woody species (prairie shrubs). Each species production guide includes a description of the species (with photos), its habitat, range map, and conservation status.
Recommendations for stand establishment, management, seed harvest, and seed cleaning are provided. These are based primarily on direct experience at the Tallgrass Prairie Center, together with published information from the NRCS Plant Materials Program, scientific publications, personal communication with other native seed growers, and publicly available databases such as the Seed Information Database and the Propagation Protocols Database of the Native Plant Network. A graph of potential seed yields is provided in each guide, based on harvest records from seed production plots at the Tallgrass Prairie Center.
Each species guide is provided as both a webpage and a printable file (pdf). If you prefer to work with a print version, we encourage you to print pdfs of the species you need and organize them in a binder.
This section is a work in progress. We will continue to add new species guides as they are completed. If you have comments, questions or would like to share propagation information for potential inclusion in these guides, please email laura.walter@uni.edu.
Forbs
Forbs sagemThe Species Production Guides for forbs (wildflowers) provide specific information about growing each of these species for seed production.
Scroll the list (alphabetized by scientific name) or press ctrl-f (or command-f) to search for any name in this page.
A printable file (pdf) is also provided on each species page for those needing a print version.
This section is a work in progress. We will continue to add new species guides as they are completed.
Anemone canadensis / Canadian anemone
Anemone cylindrica / candle anemone
Anemone virginiana / tall thimbleweed
Asclepias syriaca / common milkweed
Asclepias tuberosa / butterfly milkweed
Asclepias verticillata / whorled milkweed
Chelone glabra / white turtlehead
Coreopsis palmata / stiff tickseed
Coreopsis tripteris / tall tickseed
Potentilla arguta / tall cinquefoil
Echinacea pallida / pale purple coneflower
Eryngium yuccifolium / button eryngo
Euthamia graminifolia / flat-top goldentop
Fragaria virginiana / Virginia strawberry
Gentiana alba / plain gentian
Gentiana andrewsii / closed bottle gentian
Heliopsis helianthoides / smooth oxeye
Helianthus pauciflorus / stiff sunflower
Hypericum ascyron / great St. Johnswort
Liatris aspera / tall blazing star
Liatris ligulistylis / Rocky Mountain blazing star
Liatris pycnostachya / prairie blazing star
Lobelia cardinalis / cardinalflower
Lobelia siphilitica / great blue lobelia
Lythrum alatum / winged lythrum
Monarda fistulosa / wild bergamot
Monarda punctata / spotted beebalm
Oligoneuron riddellii / Riddell's goldenrod
Oligoneuron rigidum / stiff goldenrod
Parthenium integrifolium / wild quinine
Pedicularis lanceolata / swamp lousewort
Prunella vulgaris ssp. lanceolata / lance selfheal
Pycnanthemum verticillatum var. pilosum / whorled mountainmint
Pycnanthemum tenuifolium / narrowleaf mountainmint
Pycnanthemum virginianum / Virginia mountainmint
Ratibida pinnata / pinnate prairie coneflower
Rudbeckia subtomentosa / sweet coneflower
Ruellia humilis / hairy wild petunia
Silphium integrifolium / wholeleaf rosinweed
Silphium laciniatum / compassplant
Solidago missouriensis / Missouri goldenrod
Solidago speciosa / showy goldenrod
Symphyotrichum laeve / smooth blue aster
Symphyotrichum novae-angliae / New England aster
Symphyotrichum oolentangiense / skyblue aster
Symphyotrichum praealtum / willowleaf aster
Tradescantia bracteata / longbract spiderwort
Tradescantia ohiensis / bluejacket
Vernonia baldwinii / Baldwin's ironweed
Vernonia fasciculata / prairie ironweed
Veronicastrum virginicum / Culver's root
Zizia aptera / meadow zizia
Zizia aurea / golden zizia
Template to Clone / common name
Template to Clone / common name sagem[Image for header, must be 2500px X 898px or 1920px X 689px]
Latin name, Scientific Authority
Alternate Common Name(s): text
Scientific Synonym(s): text
Family: Text
Functional Group: text
Description
- Life cycle and growth form
Xxxxxxx
Height: X - X ft
[Image]
- Leaves and stem
[Image]
Xxxxx
- Flower, fruit and seedhead
Flower: xxx
Fruit/seedhead: xxxx
[Image]
- Seed
[Image]
Seed characteristics
Seed weight: [seeds per ounce, 1000 seed weight]
Description: [shape, length, color, attached structures]
Typical seed test
PLS: %
Purity: %
Germination: %
Dormancy: %
(average of XX tests of purchased seed lots)
- Habitat and range
Habitat: [soils, sun exposure, preferred conditions for seed production]
Conservation status: xxx
[BONAP Map]
General Comments
[Important ecological, ethnobotanical, economic characteristics, or other, not covered in botanical description above]
Recommendations for Seed Production
- Establishment for seed production
Direct seeding
*We do not have experience with direct seeding this species for seed production.
Seeding rate: xxx
Row spacing: xxx
Seeding time: xxx
Weed control: xxx
Greenhouse
Seed pre-treatment: xxx
Sowing: xxx
Transplanting: xxx
Note: xxx
- Stand management
Weeds: xxx
Pests: xxx
Diseases: xxx
Soil moisture: xxx
- Seed production
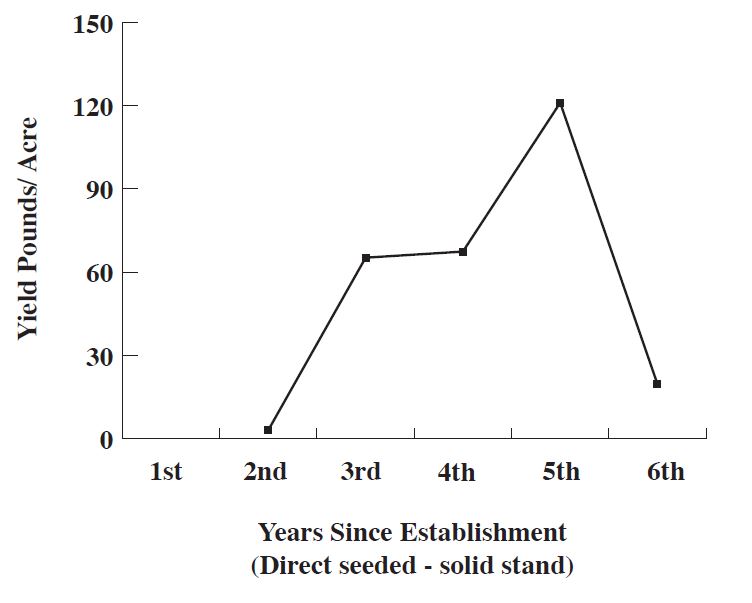 First harvest: xxx
Yield: xxx
Stand life: xxx
Flowering date: xxx
Seed maturity: xxx
Harvest date range at TPC (20xx-20xx): xxx
Recommended harvest method: xxx
DELETE: Please place the yield graph in by placing your cursor in front of First harvest then inserting the image. Use left aligned wrap text setting. Scale the image to be 500px like the example shown above.
- Seed cleaning and storage
Cleaning process: xxx
Seed storage: xxx
Released Germplasm
Source Identified material: Text, delete if none.
[Accession map if available, 700px middle aligned]
NRCS release(s): Text, delete if none.
Cultivated varietie(s): Text, delete if none.
- References
Species Guide Updated 0/0/2024
common boneset
common boneset sagem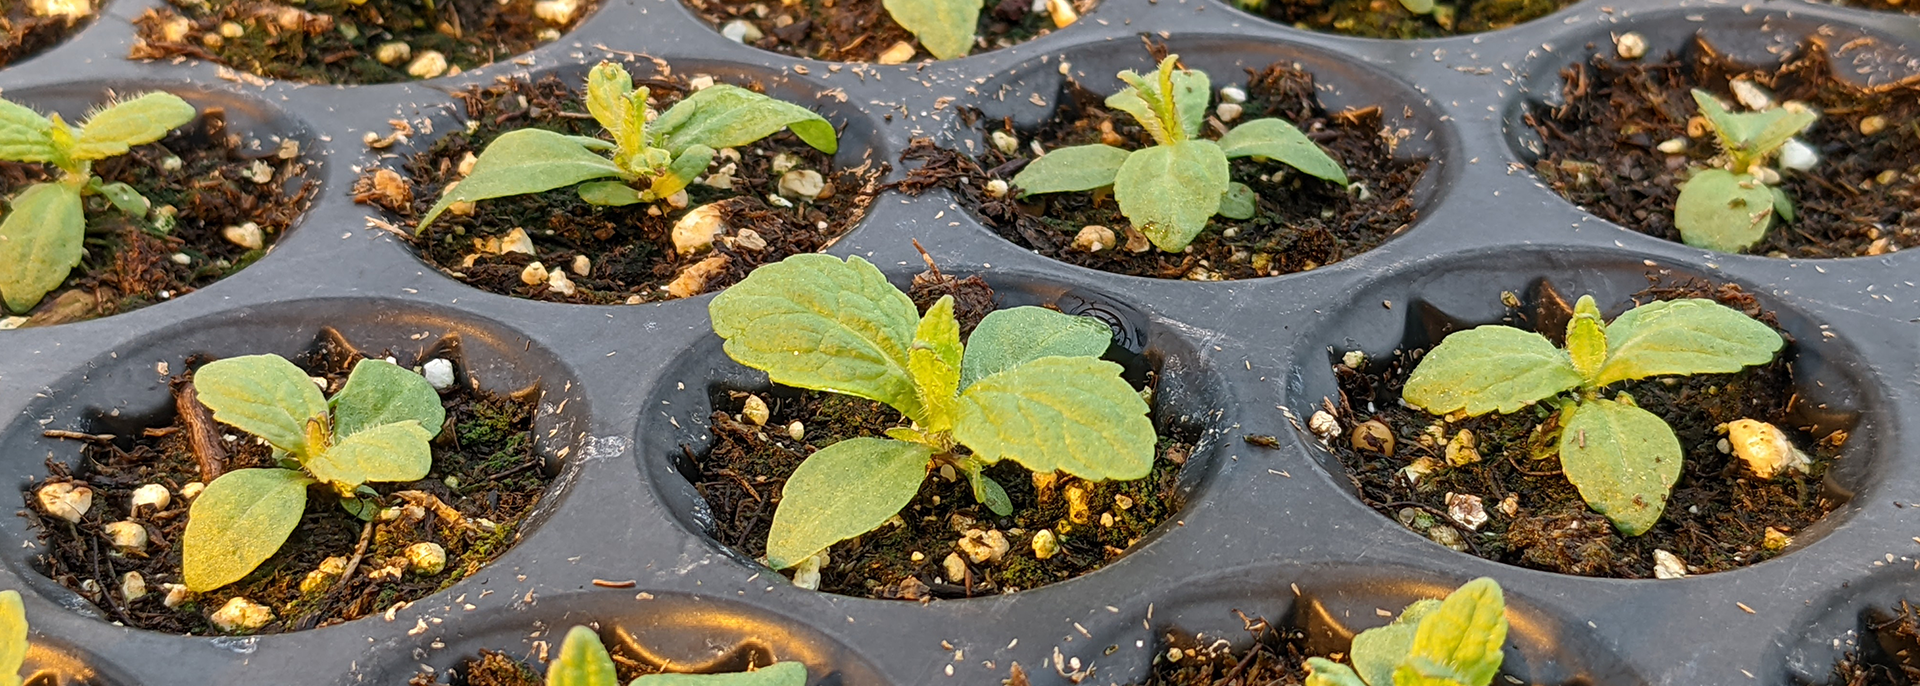
Eupatorium perfoliatum, L.
Alternate Common Names: boneset, thoroughwort
Scientific Synonyms: Eupatorium chapmanii Small, Eupatorium perfoliatum var. colpophilum Fernald & Griscom, Eupatorium perfoliatum var. cuneatum Engelmann
Family: aster or sunflower family (Asteraceae)
Functional Group: forbs (wildflowers)
Description
- Life cycle and growth form
Perennial, short-rhizomatous, spreads slowly to form small colonies.
Height: 2-4 ft
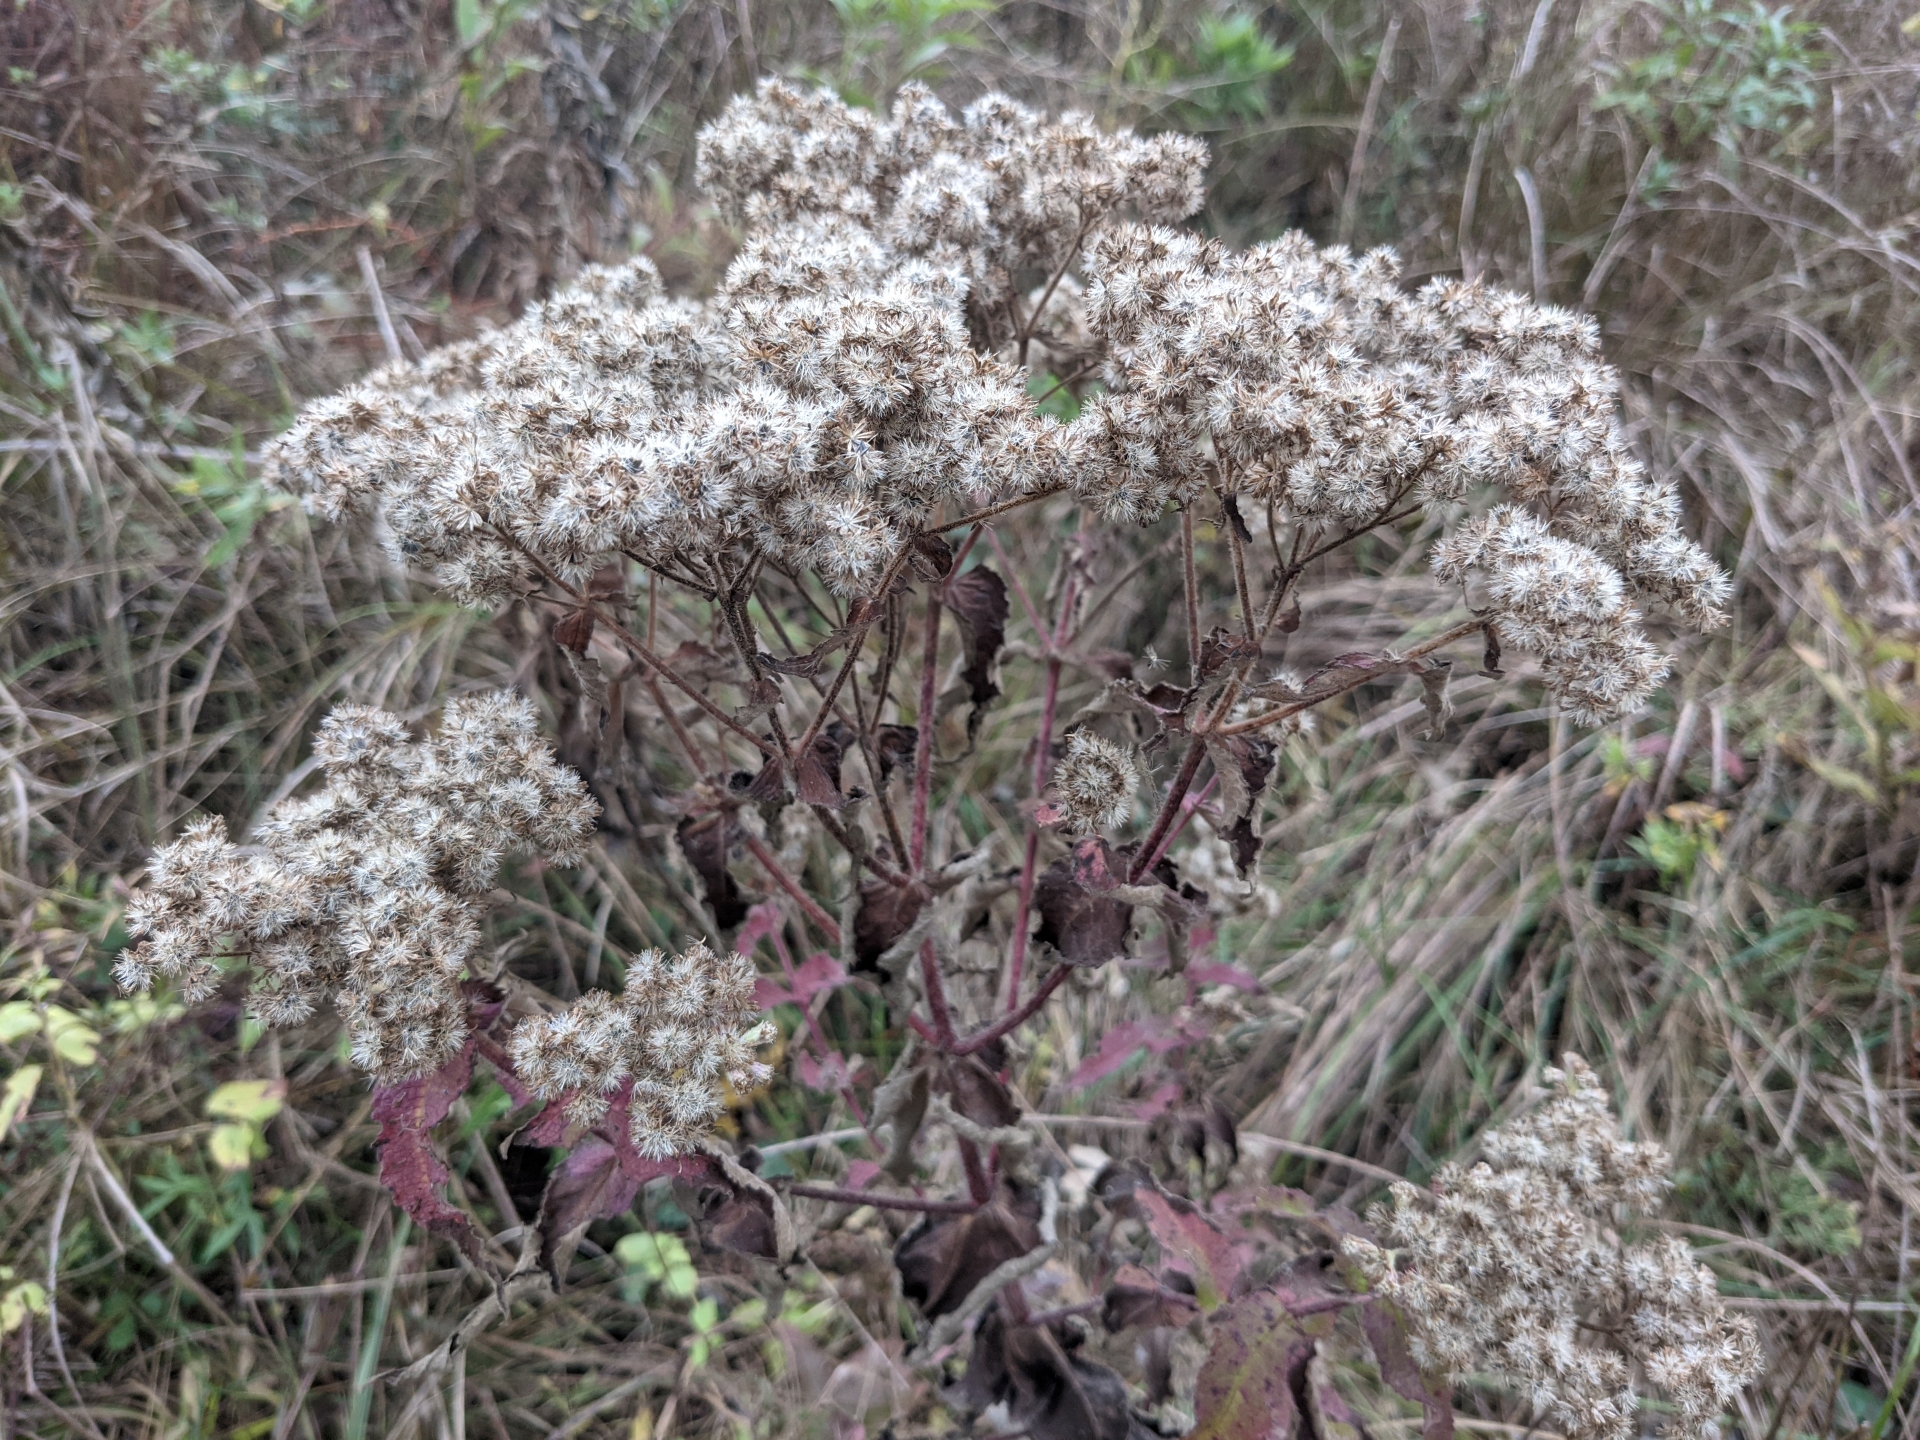
- Leaves and stem
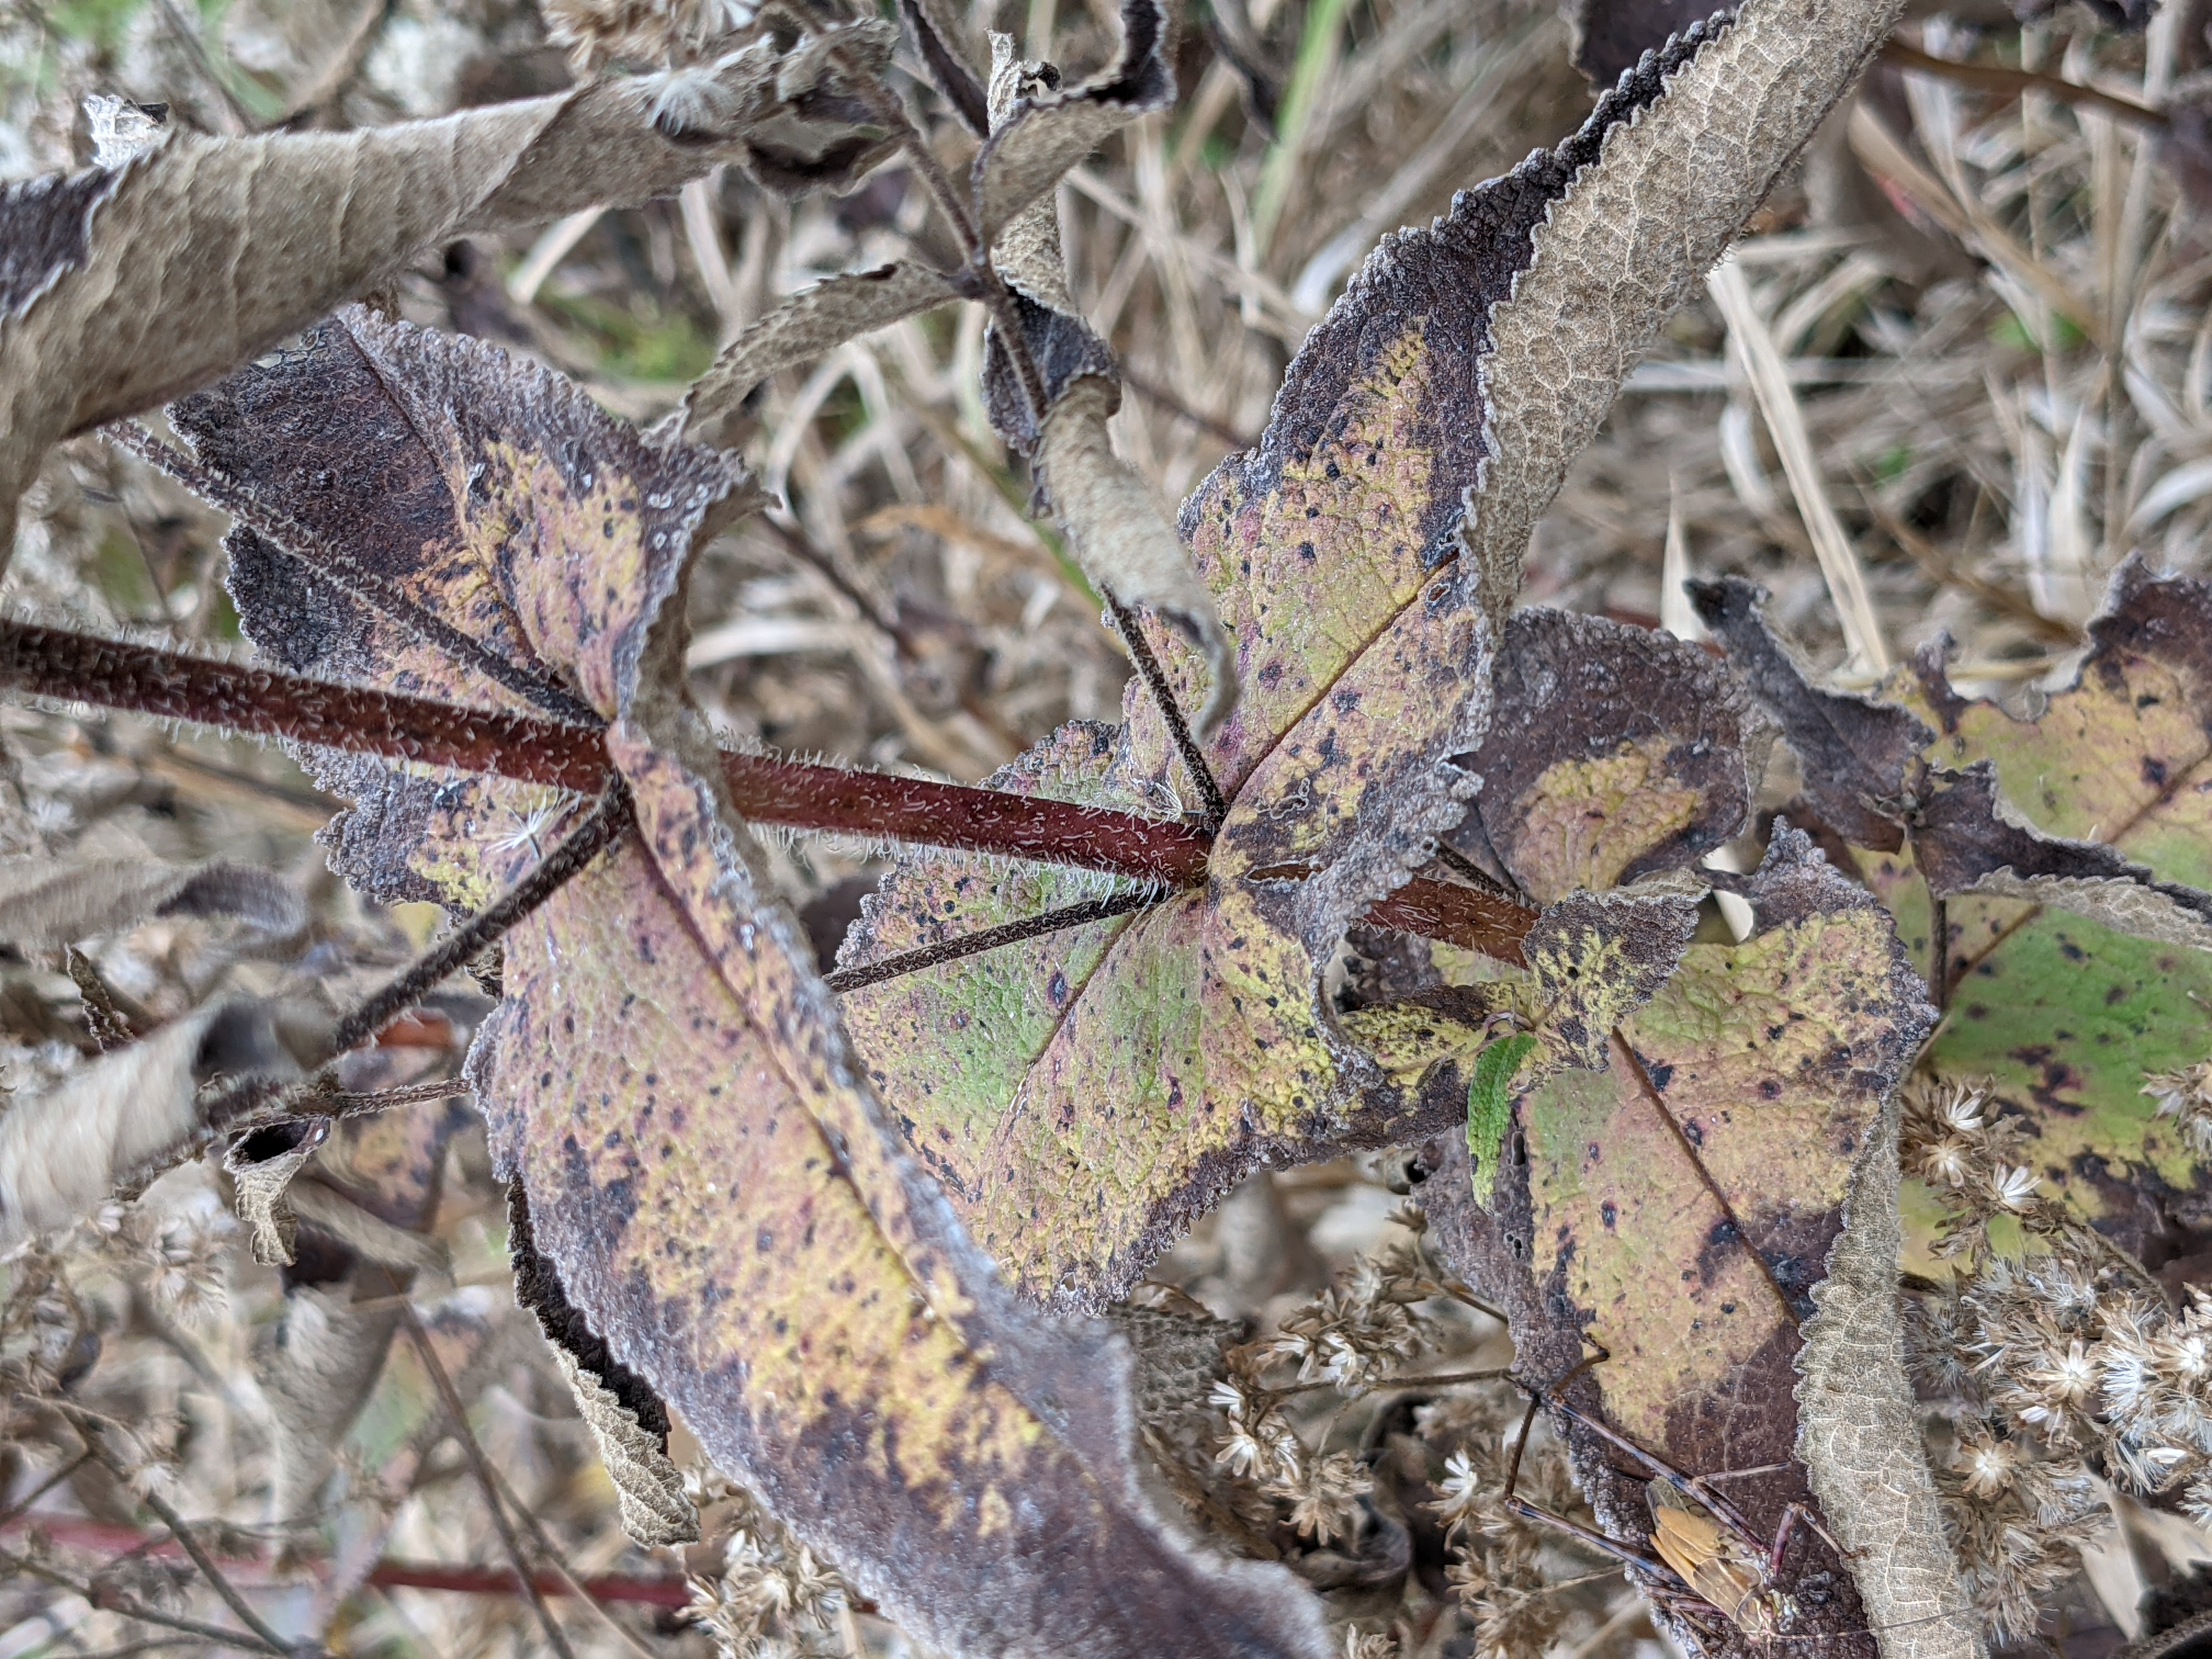
Leaves join around the stem making them look like one leaf (perfoliate) and then taper to a point, opposite arrangement (rarely whorled), leaf margins are wavy with small teeth (crenulate), leaf surfaces have a wrinkled appearance, upper and lower leaf sides are hairy; stems are hairy, erect, and branched in the upper portion of the plant.
- Flower, fruit and seedhead
Flower: Tiny heads (¼ in) of up to 15 disc florets (no visible “petals” or rays), grouped in flat-topped to slightly domed clusters of dozens to hundreds of heads; flower clusters appear fuzzy due to thin styles that extend from each floret.
Fruit/seedhead: Clusters become fluffy from the center outwards as seeds mature and pappus expands.
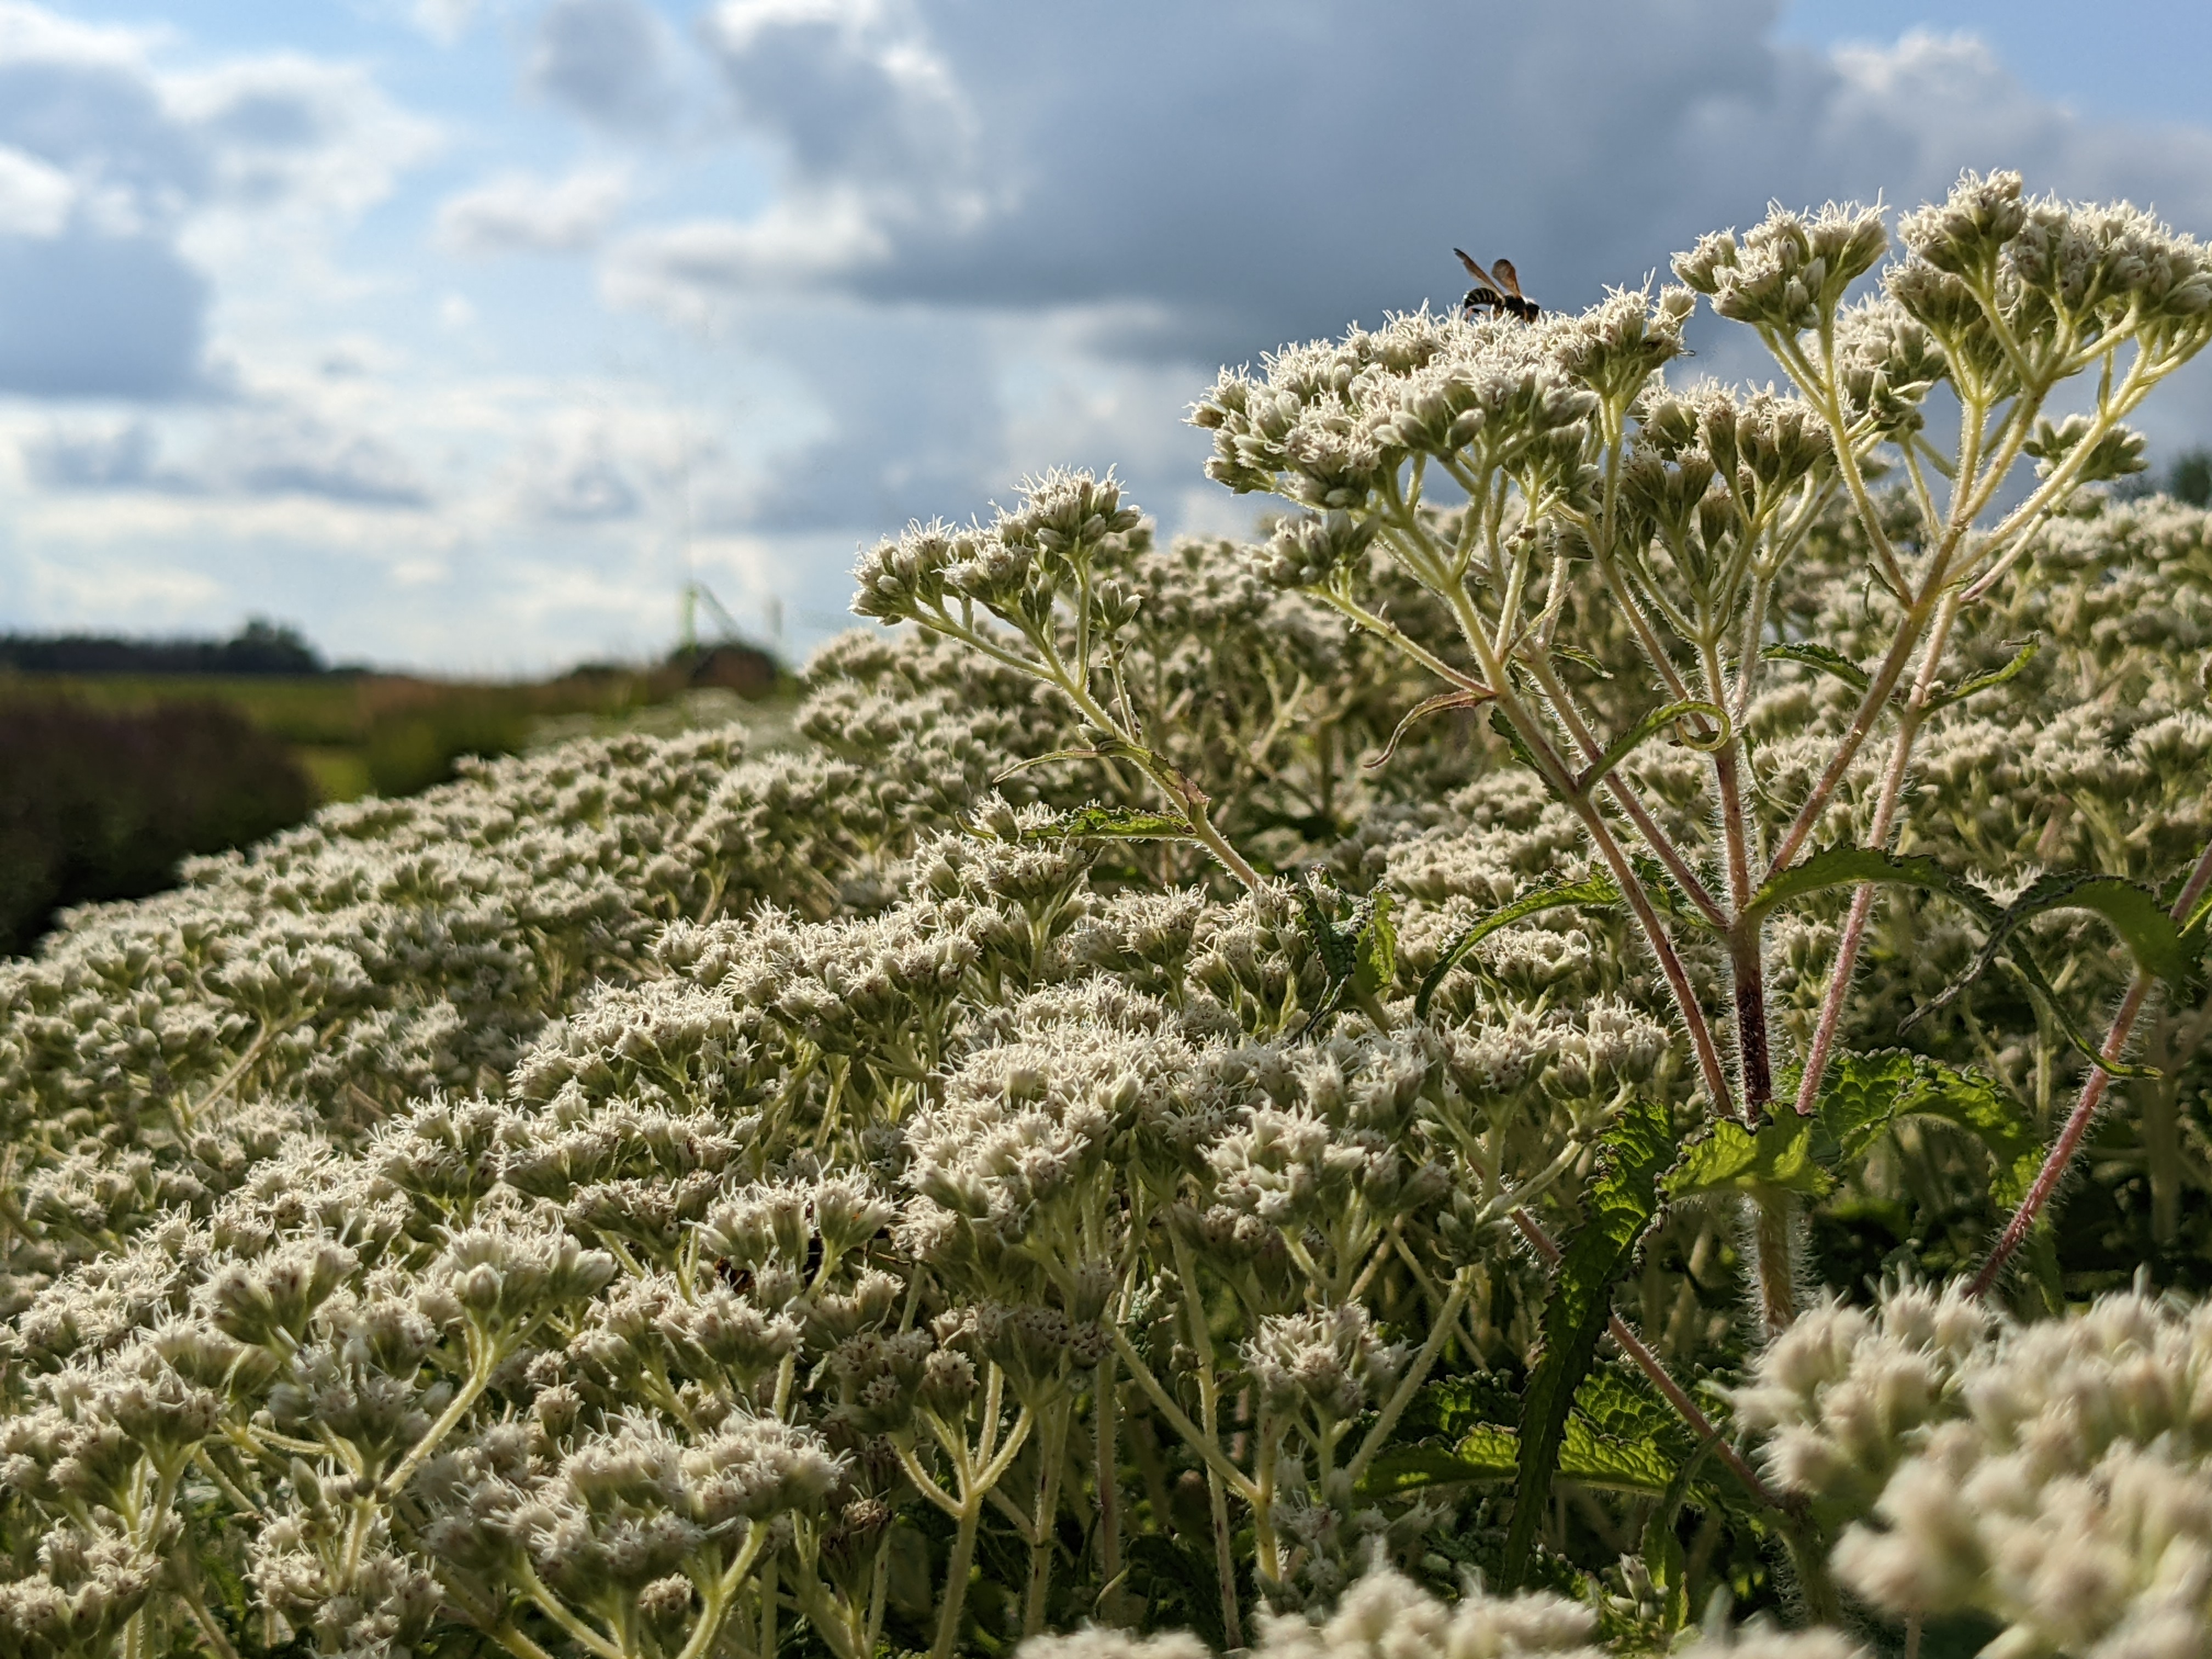
- Seed
Seed characteristics
Seeds per ounce: 160,000 (IA NRCS)
1000 seed weight: 0.11 g (Seed Information Database)
Description: Long slender, dark gray seeds (achenes) up to 2.5 mm long with a short tuft of white hairs (pappus).
Typical seed test
PLS: 68% (n = 6)
Purity: 71% (n = 6)
Germination: 16% (n = 5)
Dormant: 81% (n = 5)
(averages obtained from n tests of purchased seed lots)
- Habitat and range
Habitat: Moist to wet, organic-rich soil; full sun; wet pastures, sedge meadows, fens; The USDA classifies it as an Obligate Wetland species in the Midwest region. It benefits from irrigation in production systems.
Conservation status: Global- G5, secure; Kansas- S3, vulnerable (NatureServe)
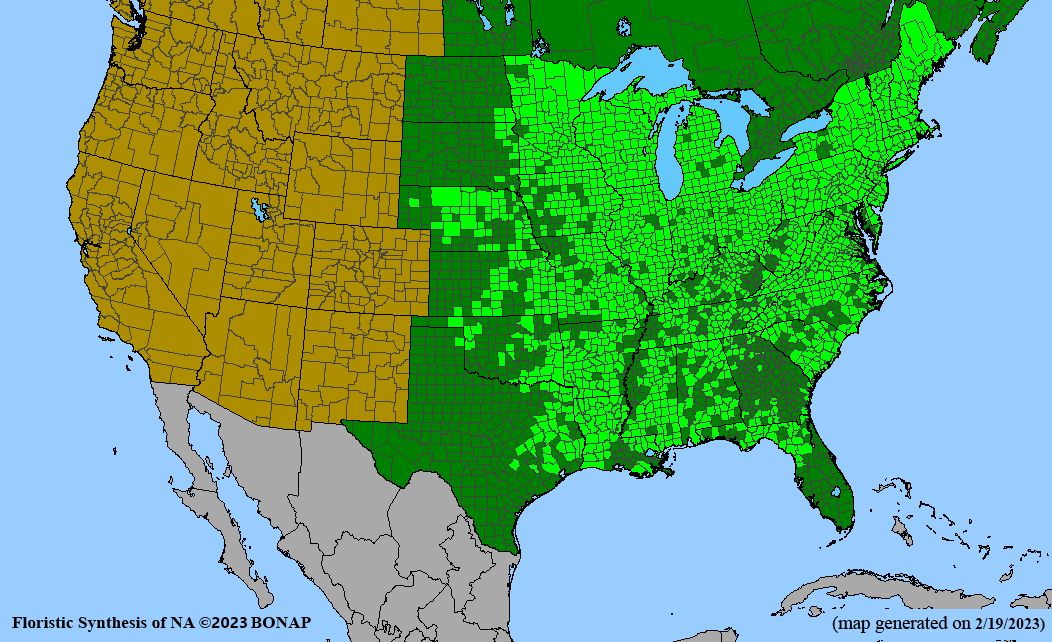
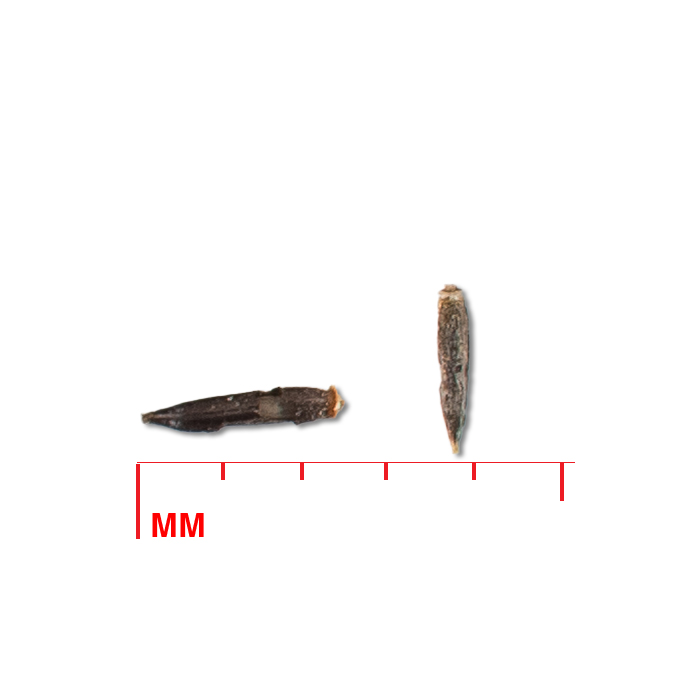
General Comments
The clouds of sweet-scented flowers attract a diverse assemblage of pollinating insects. Bitter compounds in the foliage deter mammalian herbivores, although some moth larvae use common boneset as a host plant. This species has traditional medicinal and ceremonial uses among Native tribes within its range, and was adopted as a treatment for colds and fevers by colonial settlers. It is currently under investigation by researchers in Germany and India for use in treatment of viral illnesses such as colds, flu, and dengue fever as well as malaria. Caution: this plant also contains phytochemicals that may be toxic to the liver.
Recommendations for Seed Production
- Establishment for seed production
Direct seeding
We do not have experience direct seeding this species for seed production. It reportedly has low germination rates in direct seedings. High seeding rates and fall planting are recommended.
Greenhouse
Seed pre-treatment: 60 days cold-moist stratification.
Sowing: Seed is small and should be surface sown. If started in germination flats, transplant to individual plugs when seedlings have their first pair of true leaves, about 4 weeks after seeding.
Transplanting: Seedlings are ready to transplant to the field about 6-8 weeks after being transferred to plugs, when their roots are well-branched and numerous root tips are visible at hole(s) in the base of the plug. Pop out a few plugs to check for adequate root development that will provide sturdy plugs for planting. Seedlings are fast growing and may need to be clipped back before transplanting to improve the shoot:root ratio. A week or two before transplanting, move flats outside to ‘harden off.’ (See Propagation chapter in General Information for more details).
- Stand management
Weeds: In the first season after transplanting, weeds are suppressed by a plastic weed barrier. Plants spread slowly by short rhizomes; in second and subsequent years, holes in plastic may need to be expanded or plastic removed to make room for new stems. Well-established plots shade out most weeds.
Pests: None noted.
Diseases: None noted.
Soil moisture: Irrigation is necessary in most soils to obtain maximum seed yield.
- Seed production
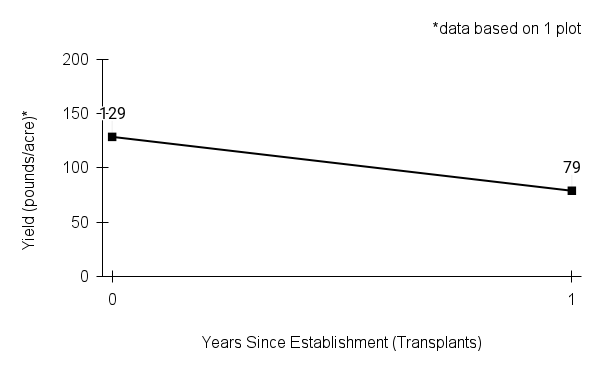 First harvest: Plants flower and set a little seed the first year when transplanted in spring.
Yield: 80-130 pounds/acre (based on 1 plot)
Stand life: unknown
Flowering date: August - September in northeast Iowa
Seed maturity: mid-September - mid-October
Harvest date range at TPC (2022-2023): Sept 15 - Oct 7
Recommended harvest method: Watch for the centers of seed clusters to begin shattering, and pick early maturing seed heads (clip stalks below seed clusters). If some heads in a cluster are still closed (not fluffy), pull apart a few heads to see if the seeds are dark colored and separate easily from the base (receptacle). Combine the rest of the plot at peak maturity. Turn off air or combine will disperse the fluffy seeds.
- Seed cleaning and storage
Cleaning process: If hand clipped, run dried material through a ¼ in mesh to thresh seed from stalks. Use a brush machine (soft bristles, minimum vacuum) to remove pappus. Seed is fragile, and some seed is dehulled, even when soft bristles are used. Winnow with a box fan to separate seed from most of the pappus and chaff. Airscreen 2-3 times to finish cleaning. See Appendix C for specific settings.
Seed storage: Cool/dry (orthodox) for up to 3 years (USDA Plant Fact Sheet).
Released Germplasm
Source Identified material: Natural Selections/Iowa Ecotype Zone NI
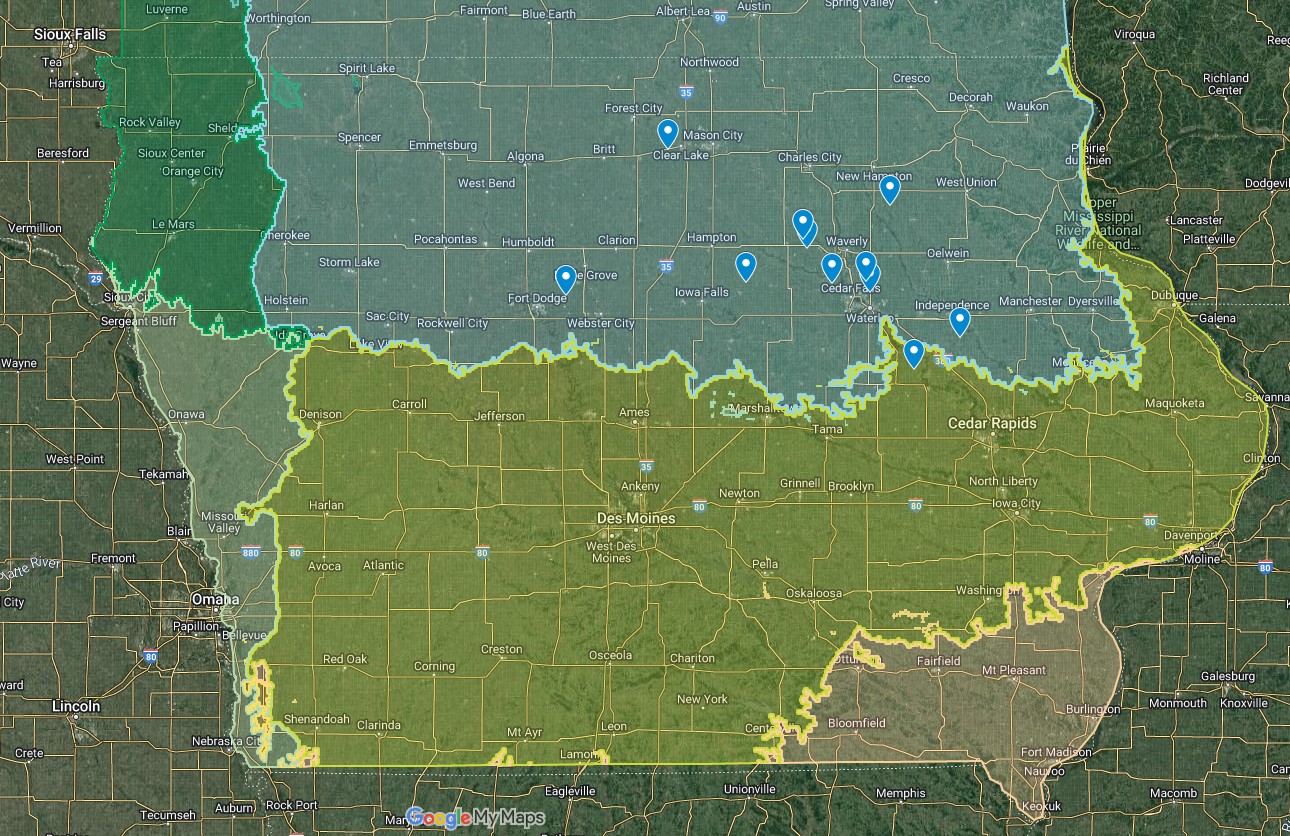
- References
Belt, S. (2009). Plant fact sheet for common boneset (Eupatorium perfoliatum L.). USDA-Natural Resources Conservation Service, Norman A. Berg National Plant Materials Center, Beltsville, MD 20705.
Chayka, Katy. (n.d.). Eupatorium perfoliatum (Common Boneset). Minnesota Wildflowers. https://www.minnesotawildflowers.info/flower/common-boneset
Cochrane, T. S., Elliot, K., & Lipke, C. S. (2014). Boneset. In Prairie Plants of the University of Wisconsin-Madison Arboretum (3rd ed., p. 79). University of Wisconsin-Madison Arboretum.
Eupatorium perfoliatum. Prairie Moon Nursery. (n.d.). https://www.prairiemoon.com/eupatorium-perfoliatum-boneset-prairie-moon-nursery.html
Hilty, J. (2019). Common Boneset - Eupatorium perfoliatum. Illinois Wildflowers. https://www.illinoiswildflowers.info/prairie/plantx/cm_boneset.htm
Kartesz, J.T., The Biota of North America Program (BONAP). 2023. North American Plant Atlas. (http://bonap.net/napa). Chapel Hill, N.C. [maps generated from Kartesz, J.T. 2023. Floristic Synthesis of North America, Version 1.0. Biota of North America Program (BONAP). (in press)]
NatureServe. 2024. NatureServe Network Biodiversity Location Data accessed through NatureServe Explorer [web application]. NatureServe, Arlington, Virginia. Available https://explorer.natureserve.org/. (Accessed: February 28, 2024).
SER, INSR, RBGK, Seed Information Database (SID). (2023). Eupatorium perfoliatum. https://ser-sid.org/species/e29e87df-3177-43f1-bfcd-bc052339de84
USDA NRCS National Plant Data Team. (n.d.). Eupatorium perfoliatum L. USDA plants database. https://plants.usda.gov/home/plantProfile?symbol=EUPE3
Siripun, K. C., & Schilling, E. E. (2020, November 6). Eupatorium perfoliatum Linnaeus. Flora of North America. http://floranorthamerica.org/Eupatorium_perfoliatum
Species Guide Updated 3/5/2024
parasol whitetop
parasol whitetop sagem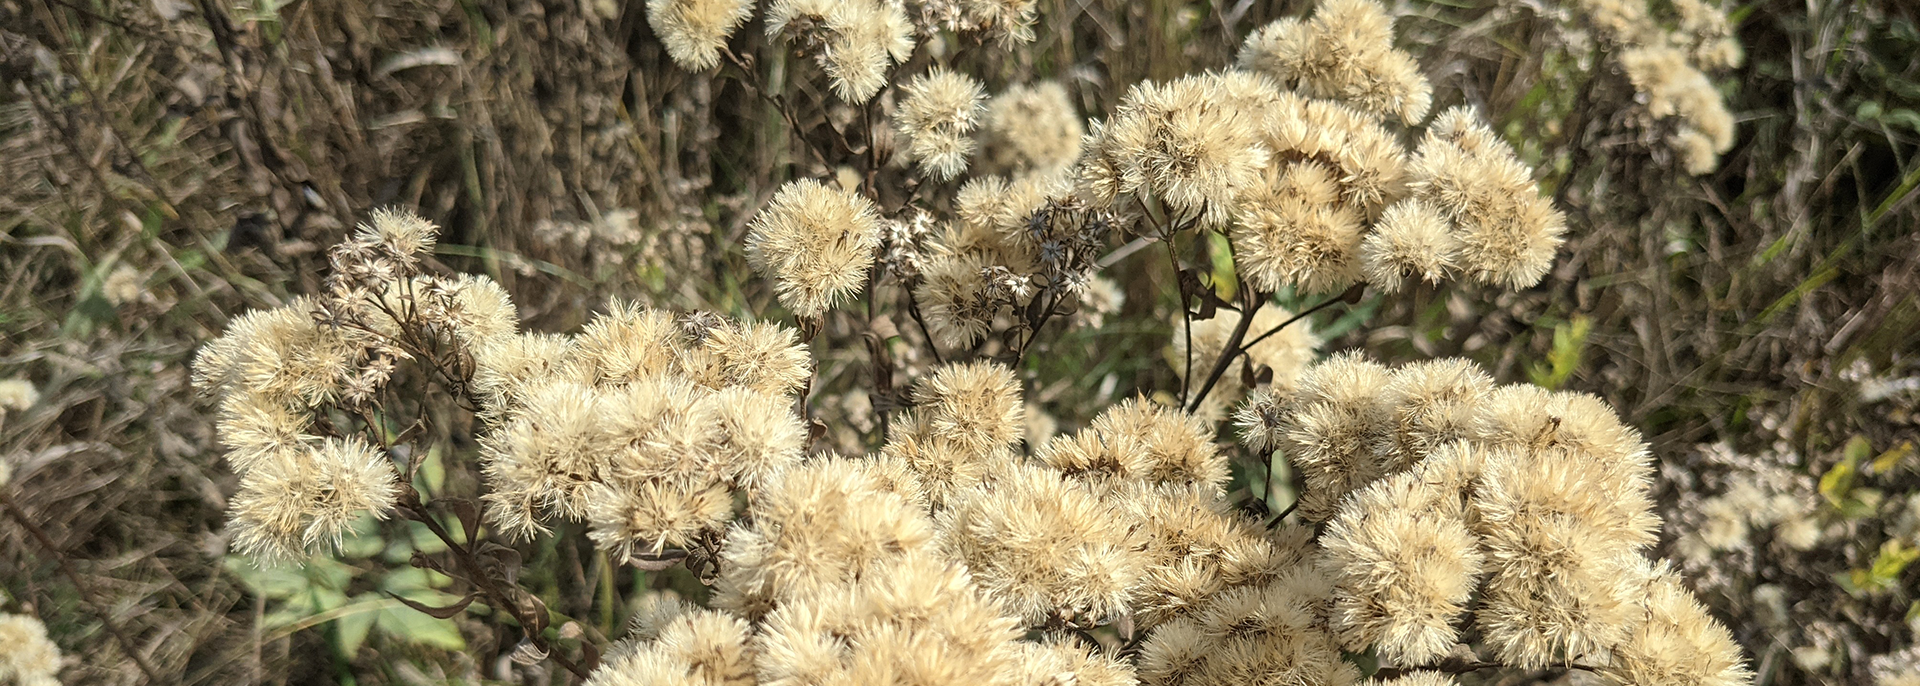
Doellingeria umbellata, (Mill.) Nees
Alternate Common Names: flat-top aster, parasol aster, tall flat-topped white aster
Scientific Synonyms: Aster umbellatus Miller, Diplopappus umbellatus (Miller) Hooker, Diplostephium umbellatum (Miller) Cassini
Family: aster or sunflower family (Asteraceae)
Functional Group: forbs (wildflowers)
Description
- Life cycle and growth form
Long-lived perennial, spreads by short rhizomes to form small colonies.
Height: 1-5 ft
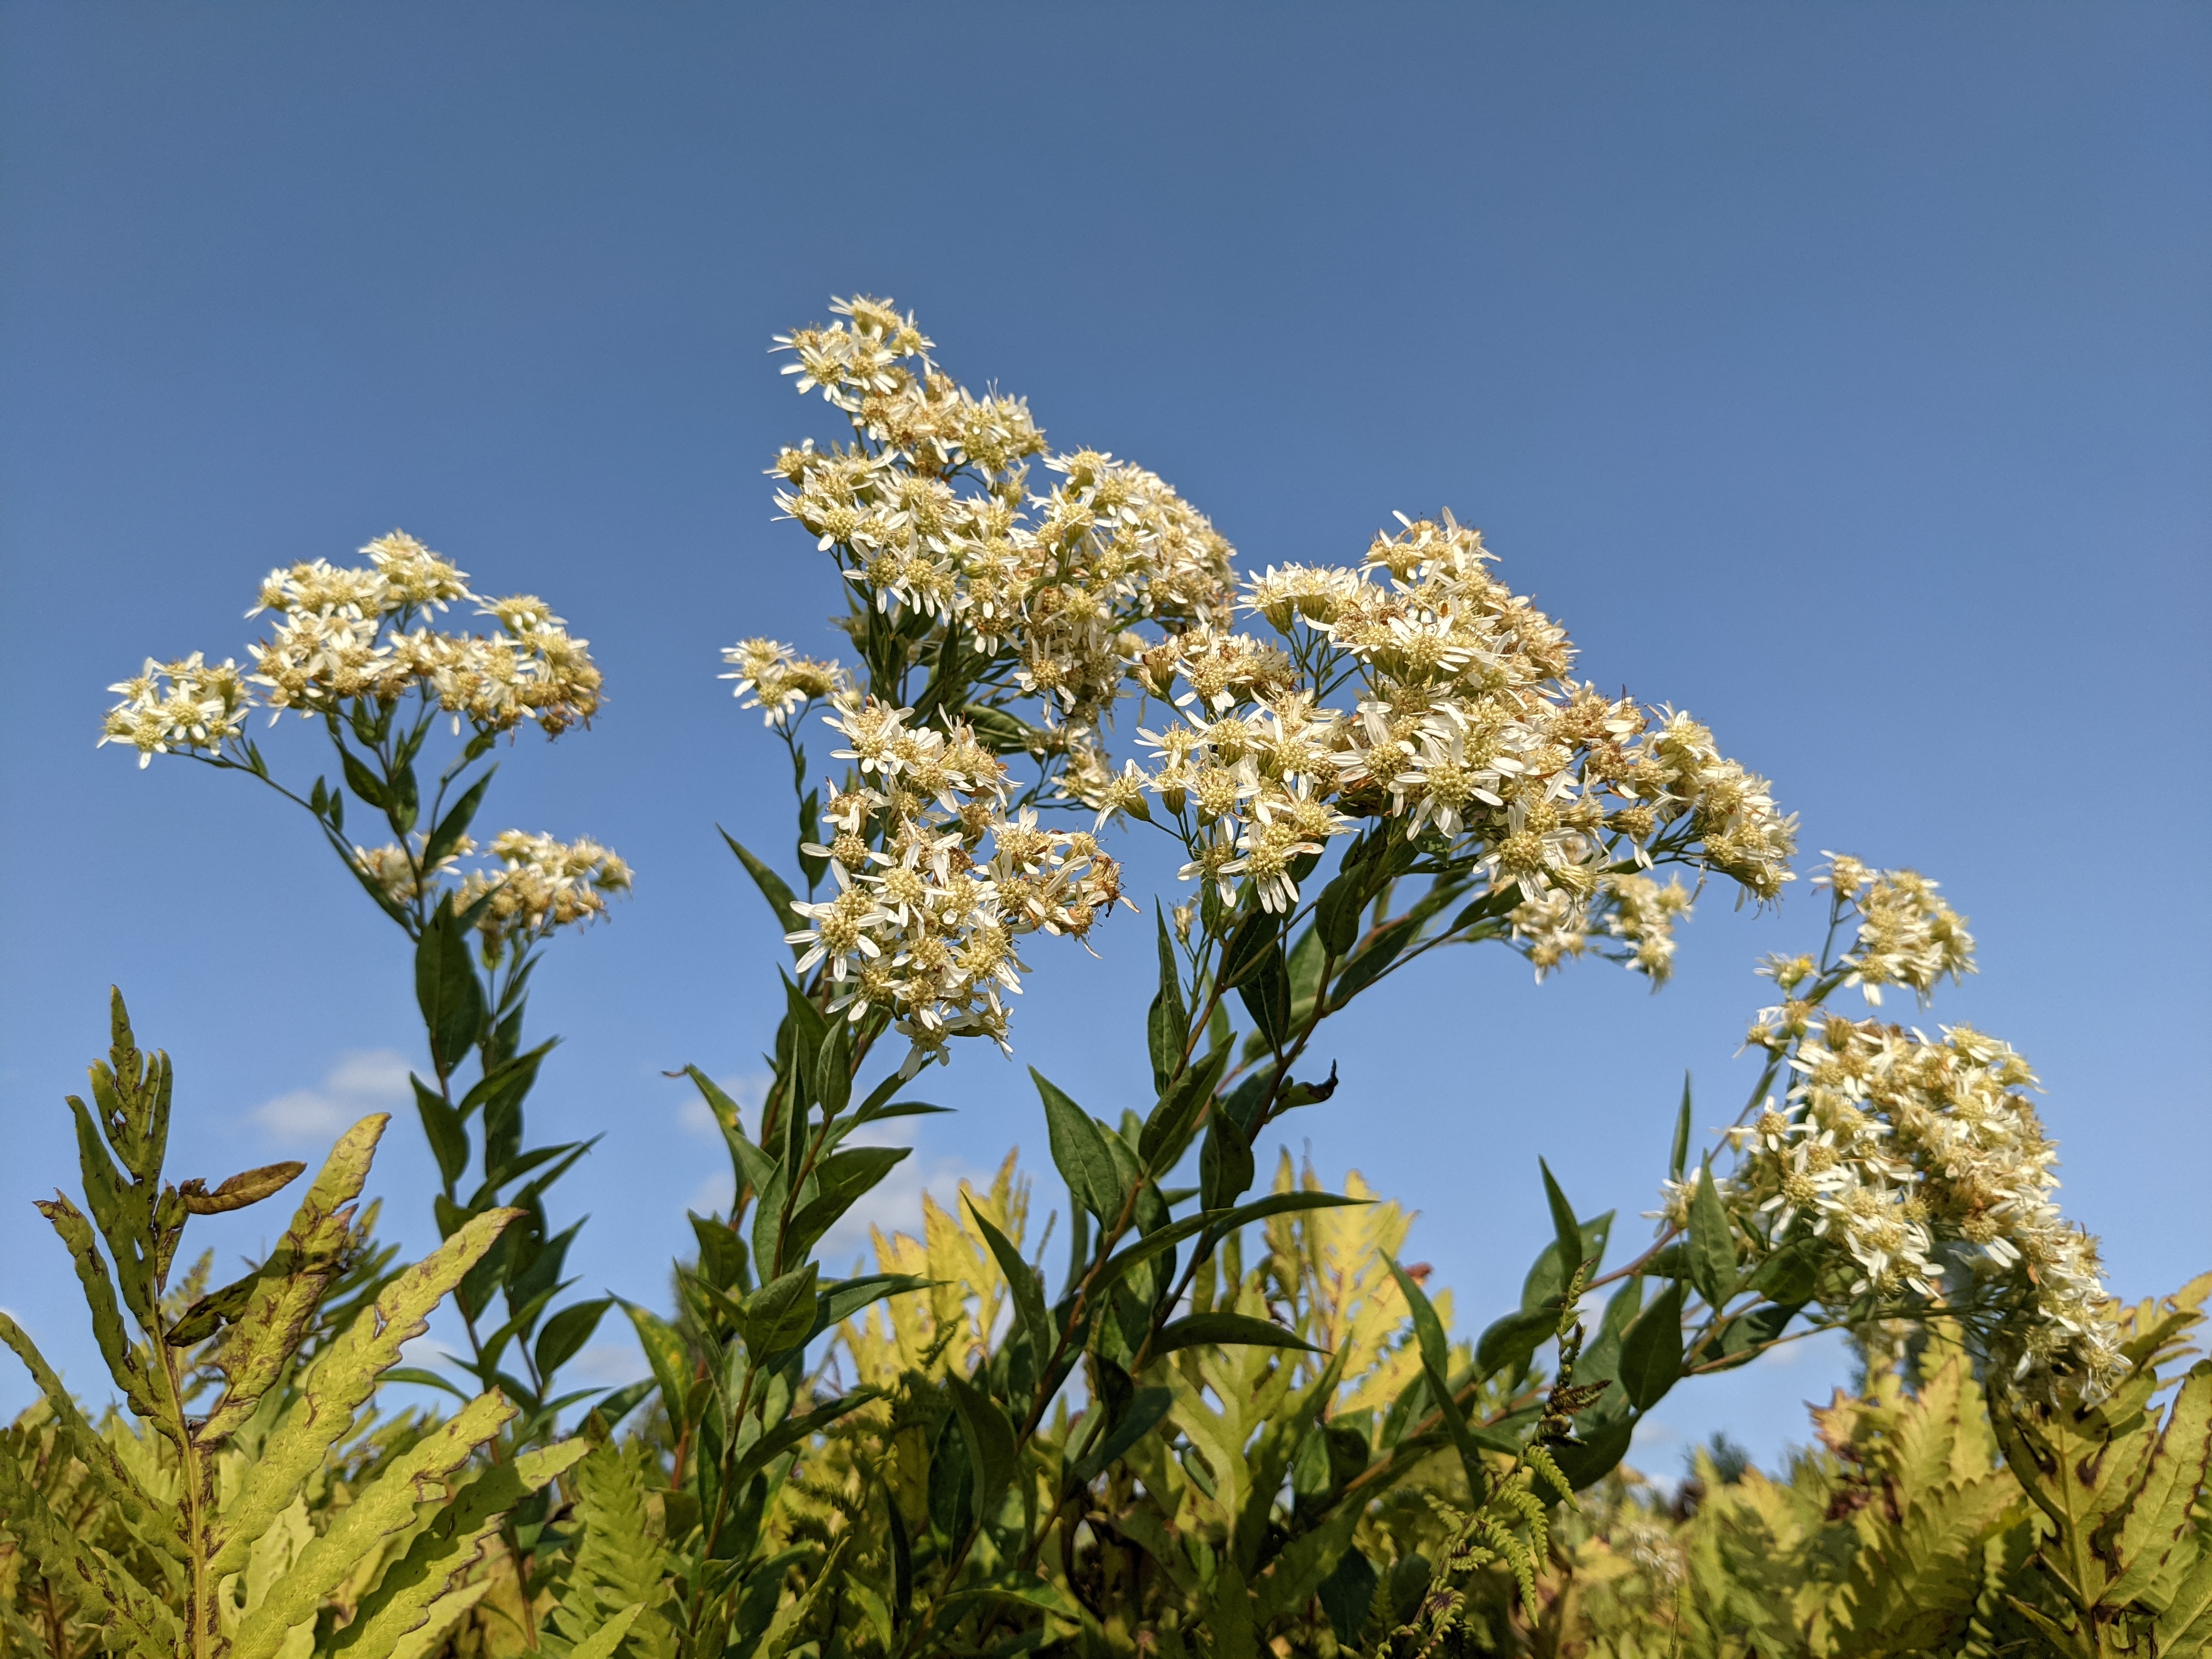
- Leaves and stem
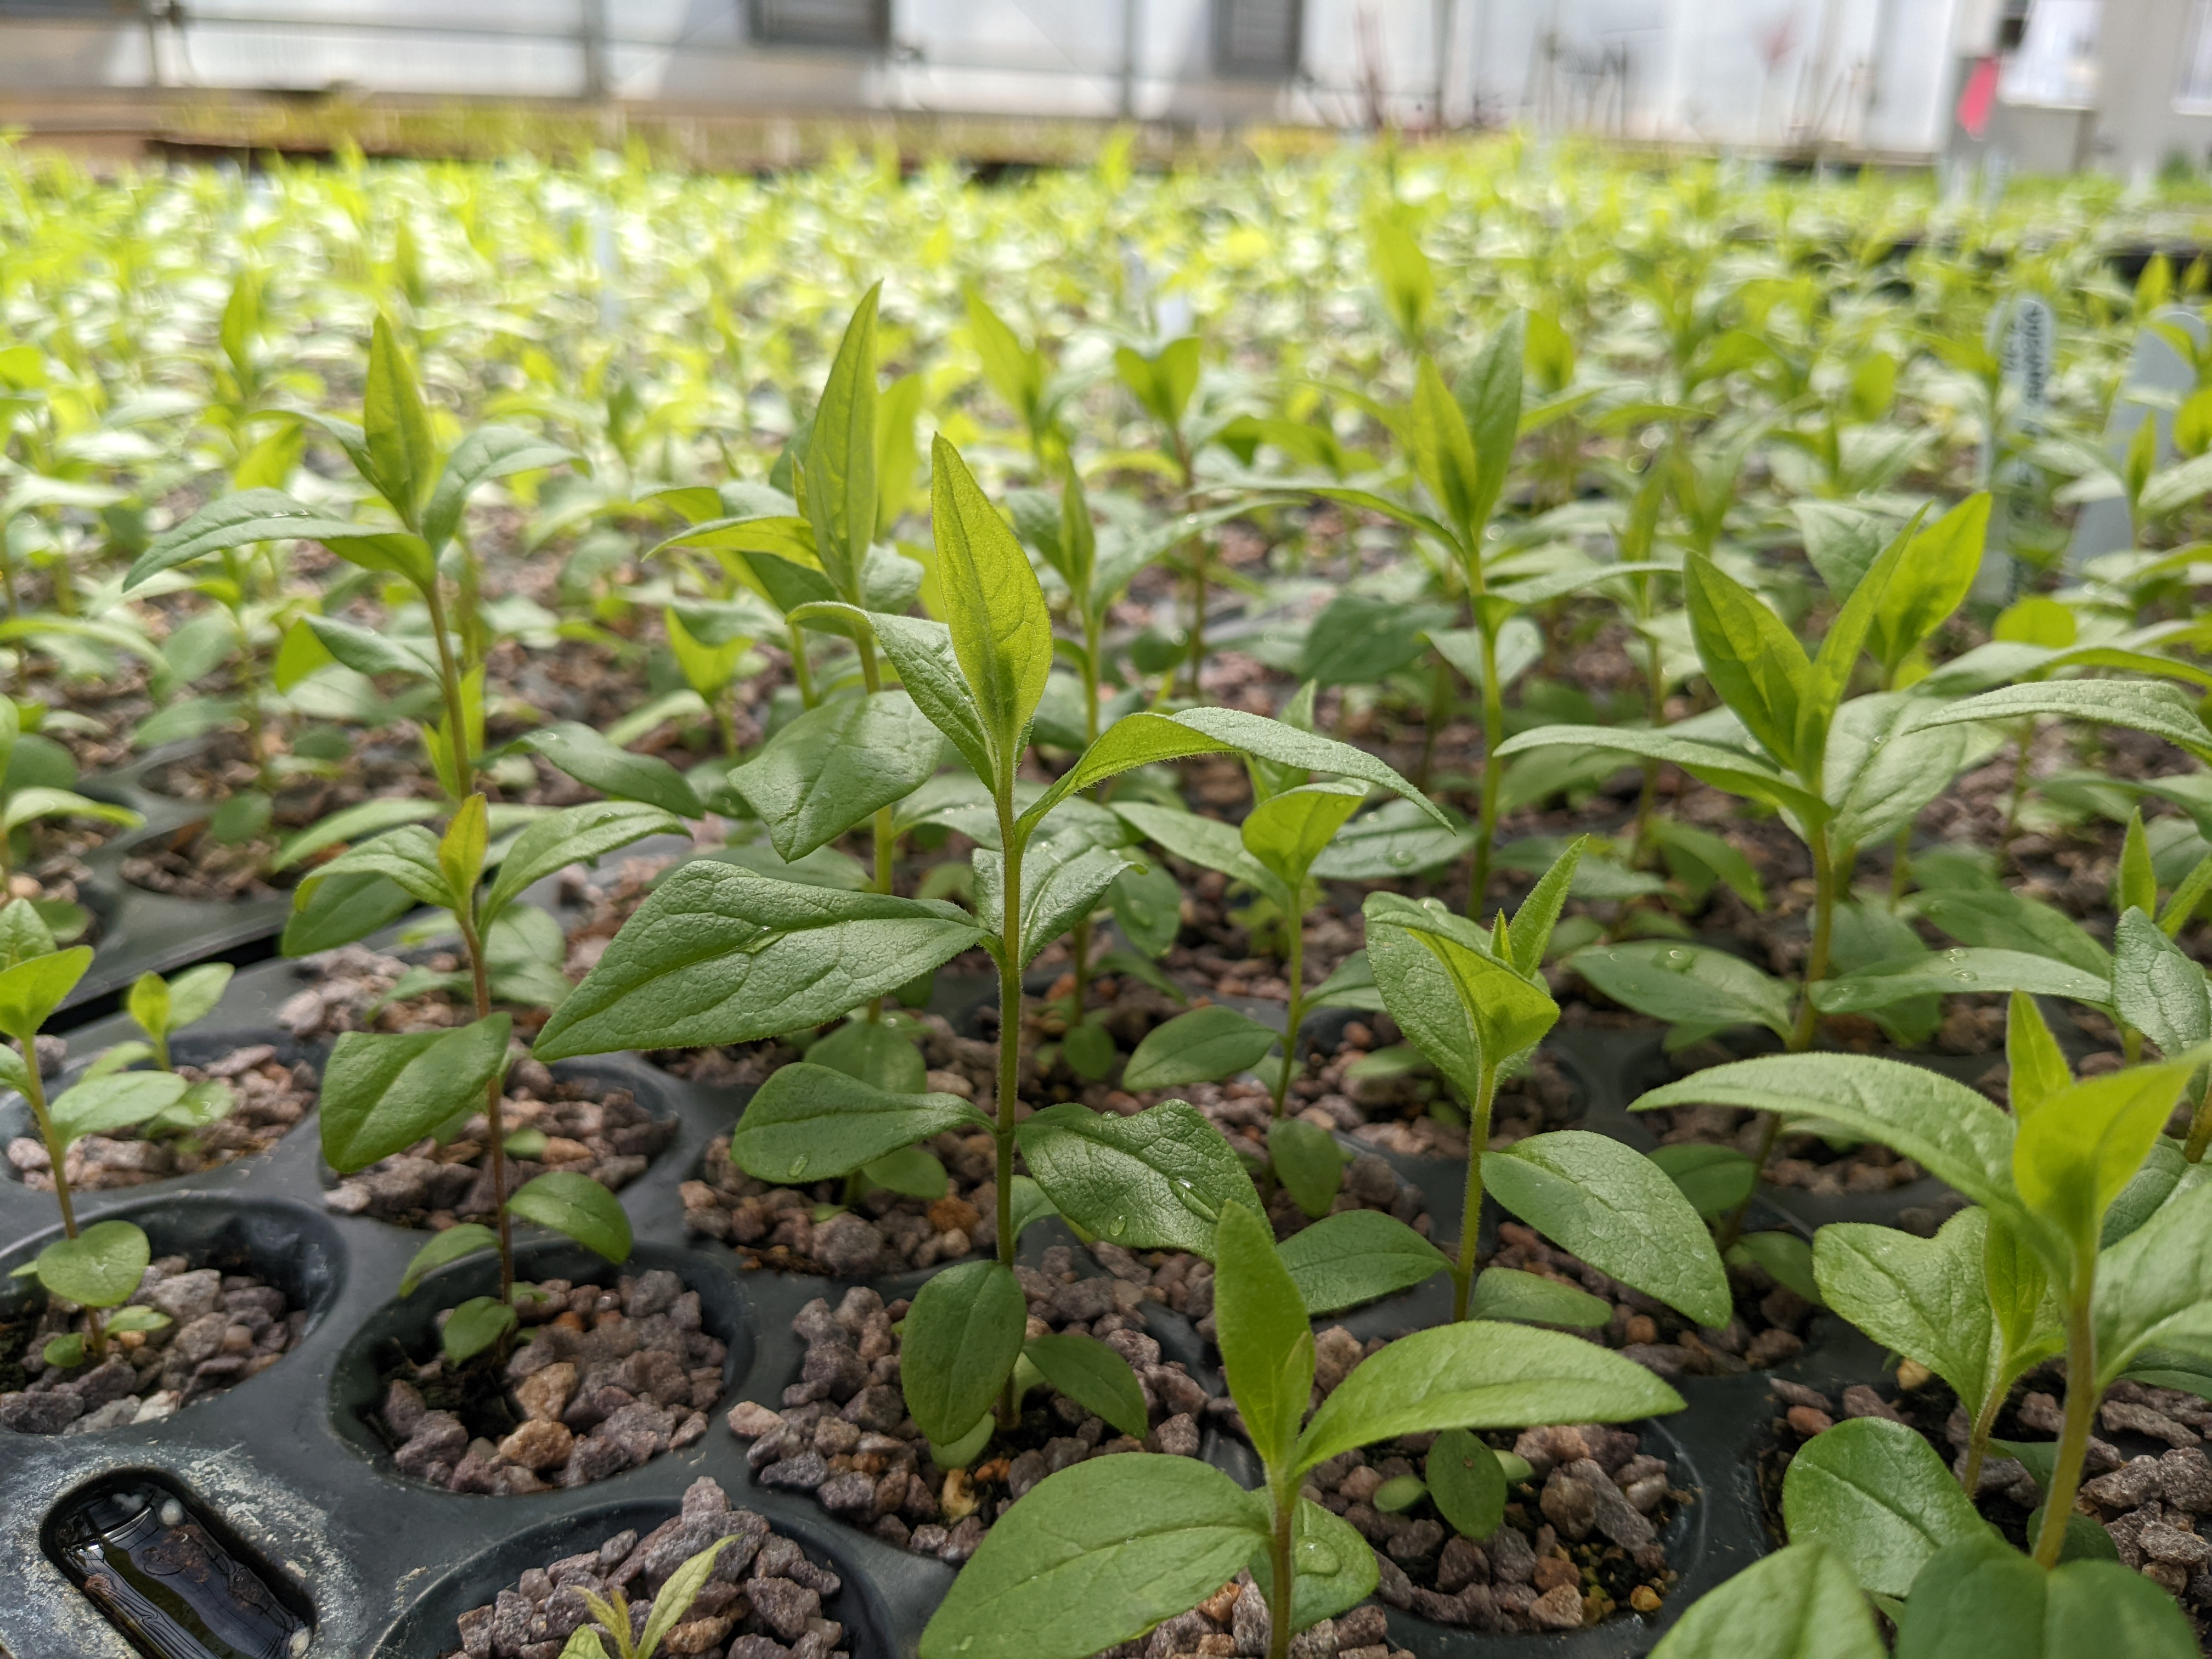
Lance-shaped, 3-5 in long and ½-1 in wide, leaf margins toothless, leaf surfaces usually hairless or with short hairs, alternate arrangement; stems are erect and unbranched except within the flower head, with few to no hairs, generally light yellowish-green but sometimes purple.
- Flower, fruit and seedhead
Flower: Individual heads are daisy-like, about ½ in wide, with yellow to tan centers and usually 5-10 (up to 15) white “petals” (rays) irregularly arranged around the central disc; dozens to hundreds of heads in a branched, flattened cluster up to 10 or 12 in wide.
Fruit/seedhead: Seed head appears fuzzy due to creamy-white fluff (pappus) on seeds.
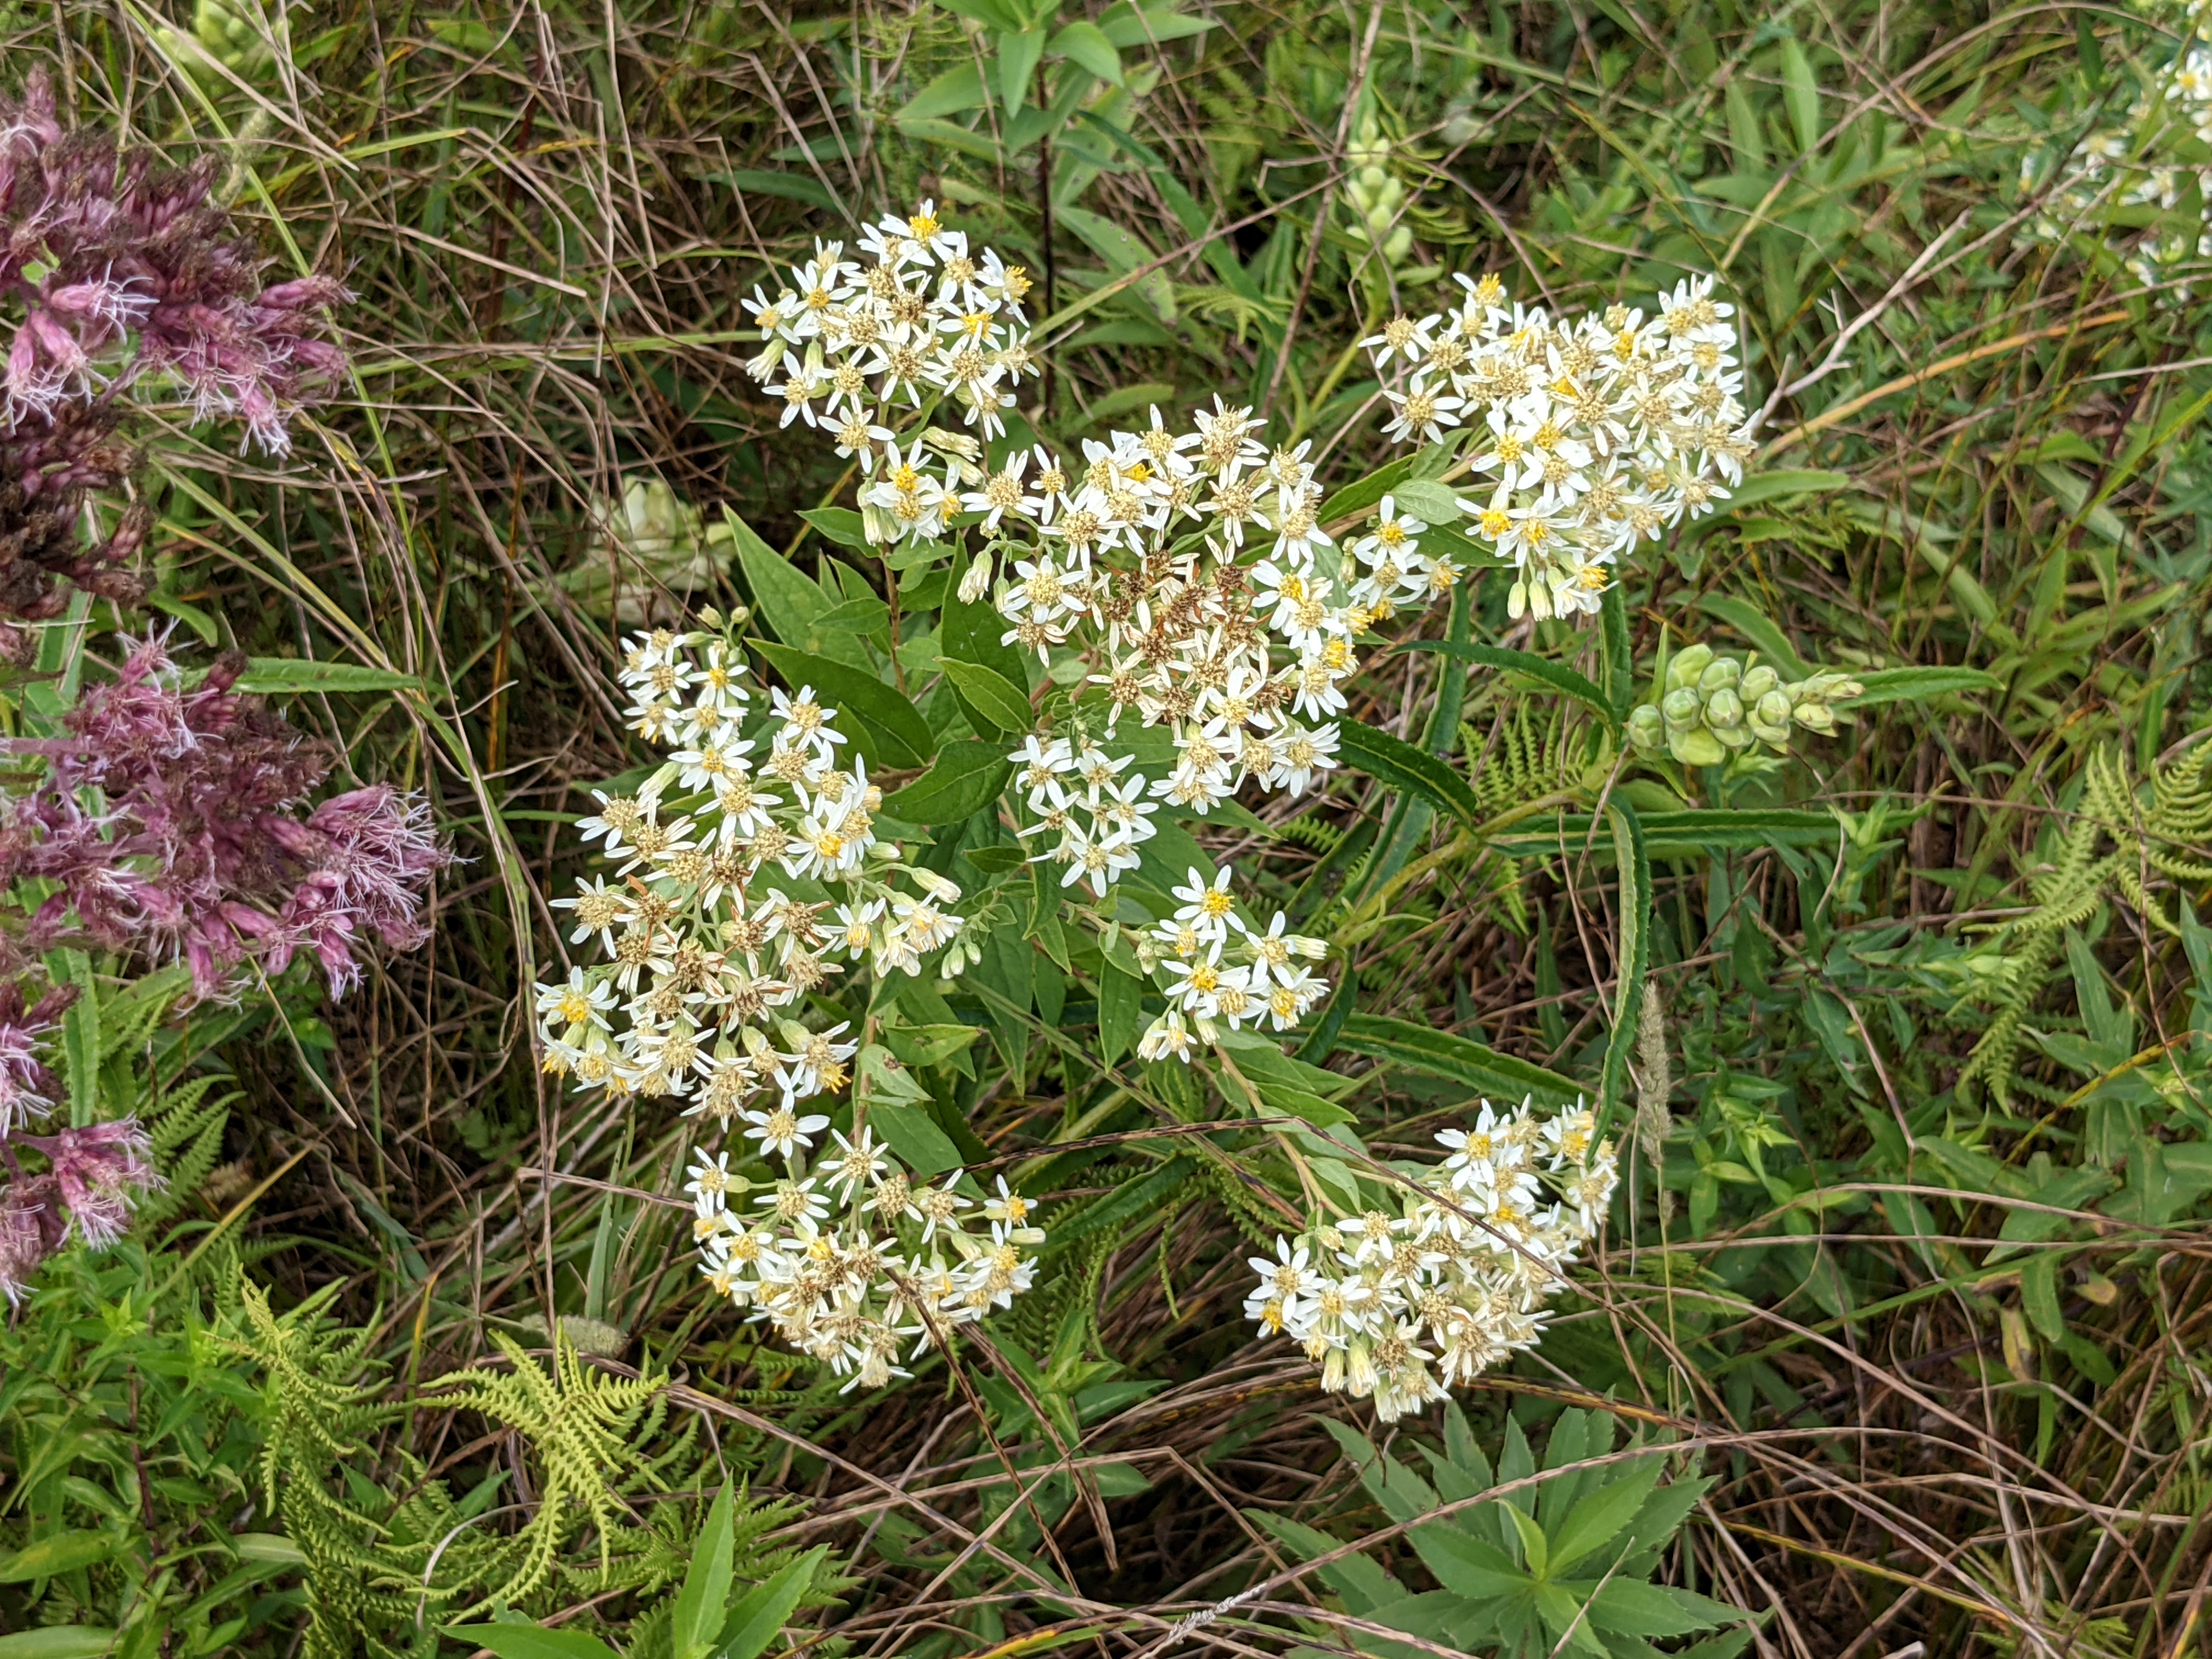
- Seed
Seed characteristics
Seeds per ounce: 67,000 (IA NRCS)
1000 seed weight: 0.7 g (Seed Information Database)
Description: Seed (achene) is light brown, 2.5-3 mm long, approximately 1 mm wide near the top, tapered to a point on the lower end, and bears a “parachute” of creamy white fluff (pappus).
Typical seed test
PLS: 85% (n = 5)
Purity: 90% (n = 5)
Germination: 22% (n = 4)
Dormant: 71% (n = 4)
(averages obtained from n tests of purchased seed lots)
- Habitat and range
Habitat: Moist to wet soils, preferably with some sand; partial to full sun; wet prairies, sedge meadows, seasonally wet ditches, and fens; benefits from irrigation in production systems. The USDA classifies it as a Facultative Wetland species in the Midwest region.
Conservation status: Global- G5, secure; Delaware, Iowa, and North Carolina- S3, vulnerable (NatureServe)
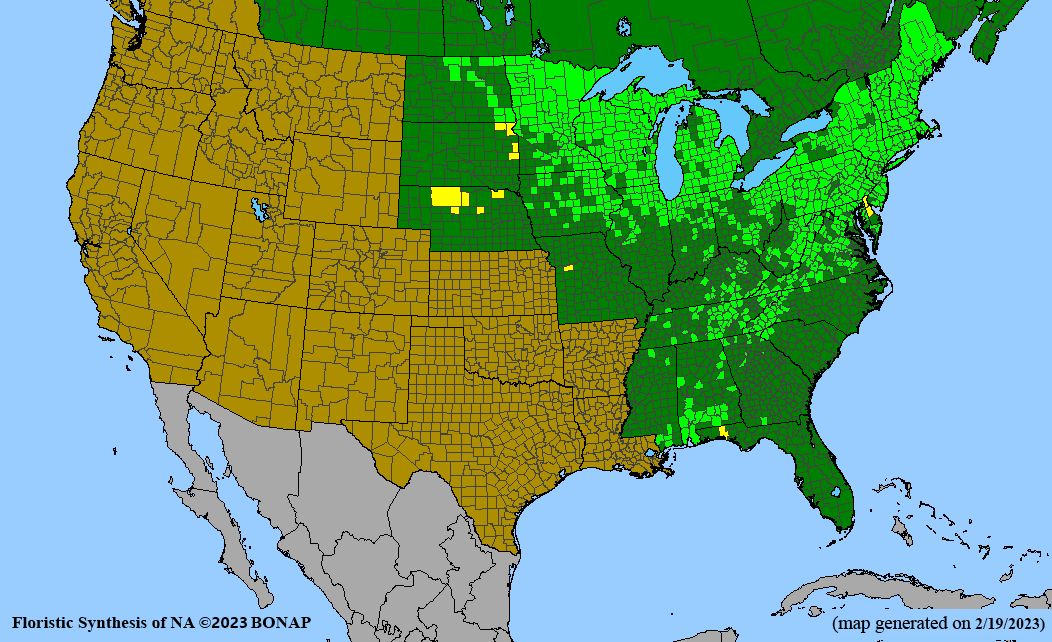
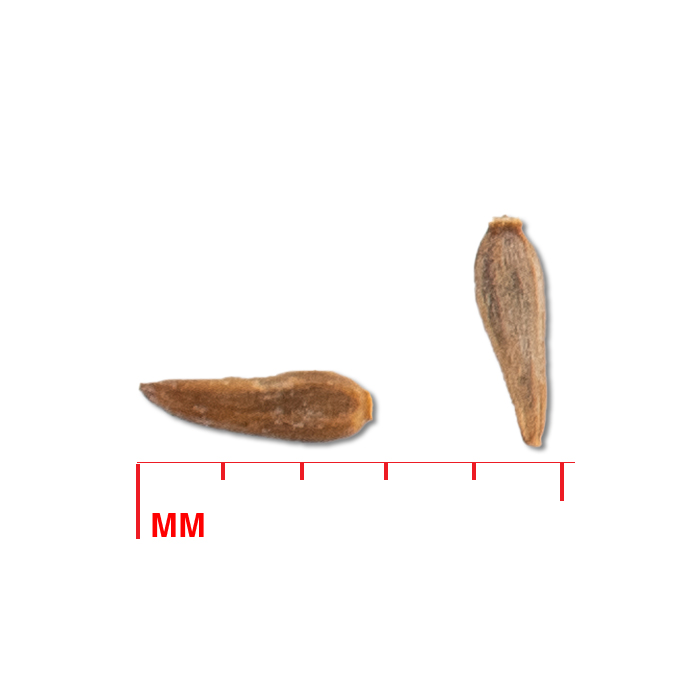
General Comments
Parasol whitetop is a late season nectar and pollen source for diverse species of bees (including specialist bees), wasps, beetles, flower flies, and skipper butterflies. It is a larval host to some species of checkerspot and crescent butterflies. It can grow and flower for many years in mesic soils but benefits from irrigation in production systems.
Recommendations for Seed Production
- Establishment for seed production
Direct seeding
We do not have experience with direct seeding this species for seed production.
Greenhouse
Seed pre-treatment: 60 days cold-moist stratification results in uniform and high rates of germination.
Sowing: Seed is small and should be only lightly covered with growing media. If started in germination flats, transplant to individual plugs when seedlings have their first pair of true leaves, about 2 weeks after seeding.
Transplanting: Seedlings are ready to transplant to the field about 6-8 weeks after transferring them to plugs, when their roots are well-branched and numerous root tips are visible at hole(s) in the base of the plug. Pop out a few plugs to check for adequate root development that will provide sturdy plugs for planting. Seedlings are fast growing and may need to be clipped back before transplanting to improve the shoot:root ratio. A week or two before transplanting, move flats outside to ‘harden off.’ (See Propagation chapter in General Information for more details).
- Stand management
Weeds: In the first season after transplanting, weeds are suppressed by a plastic weed barrier. Plants spread slowly by short rhizomes; in second and subsequent years, holes in plastic may need to be expanded or plastic removed to make room for new stems.
Pests: None noted.
Diseases: None noted.
Soil moisture: This species benefits from drip irrigation when planted in mesic soils.
- Seed production
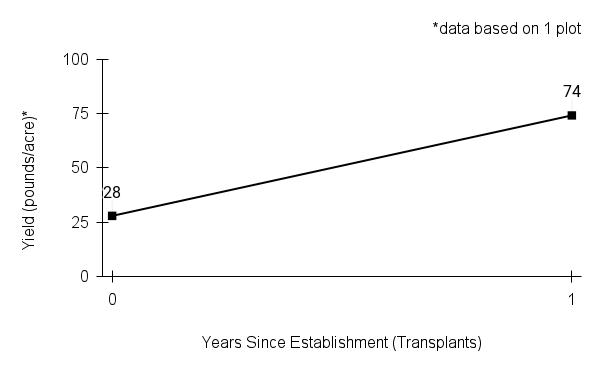 First harvest: Plants will flower and produce a small amount of seed in the planting year when started from transplants.
Yield: 28-74 pounds/acre (based on 1 plot)
Stand life: unknown
Flowering date: August - September
Seed maturity: late September - late October
Harvest date range at TPC (2022-2023): Sept 15 - Oct 20
Recommended harvest method: Seed is released from heads within days of the fluffy “parachutes” expanding. Watch for the centers of seed clusters to begin shattering, and pick early maturing seed heads (clip stalks below seed clusters). If some heads in a cluster are still closed (not fluffy), pull apart a few heads to see if the seeds are dark colored and separate easily from the base (receptacle). Combine the rest of the plot at peak maturity. Turn off air or combine will disperse the fluffy seeds.
- Seed cleaning and storage
Cleaning process: If hand clipped, run dried material through a ¼ in mesh to thresh seed from stalks. Use a brush machine (medium bristles, low vacuum) to remove pappus. May need two rounds of brushing. Winnow with a box fan to separate seed from most of the pappus and chaff. Airscreen 2-3 times, then indent to remove broken bits of stems. See Appendix C for specific settings.
Seed storage: cool/dry (orthodox)
Released Germplasm
Source Identified material: Natural Selections/Iowa Ecotype Zone NI
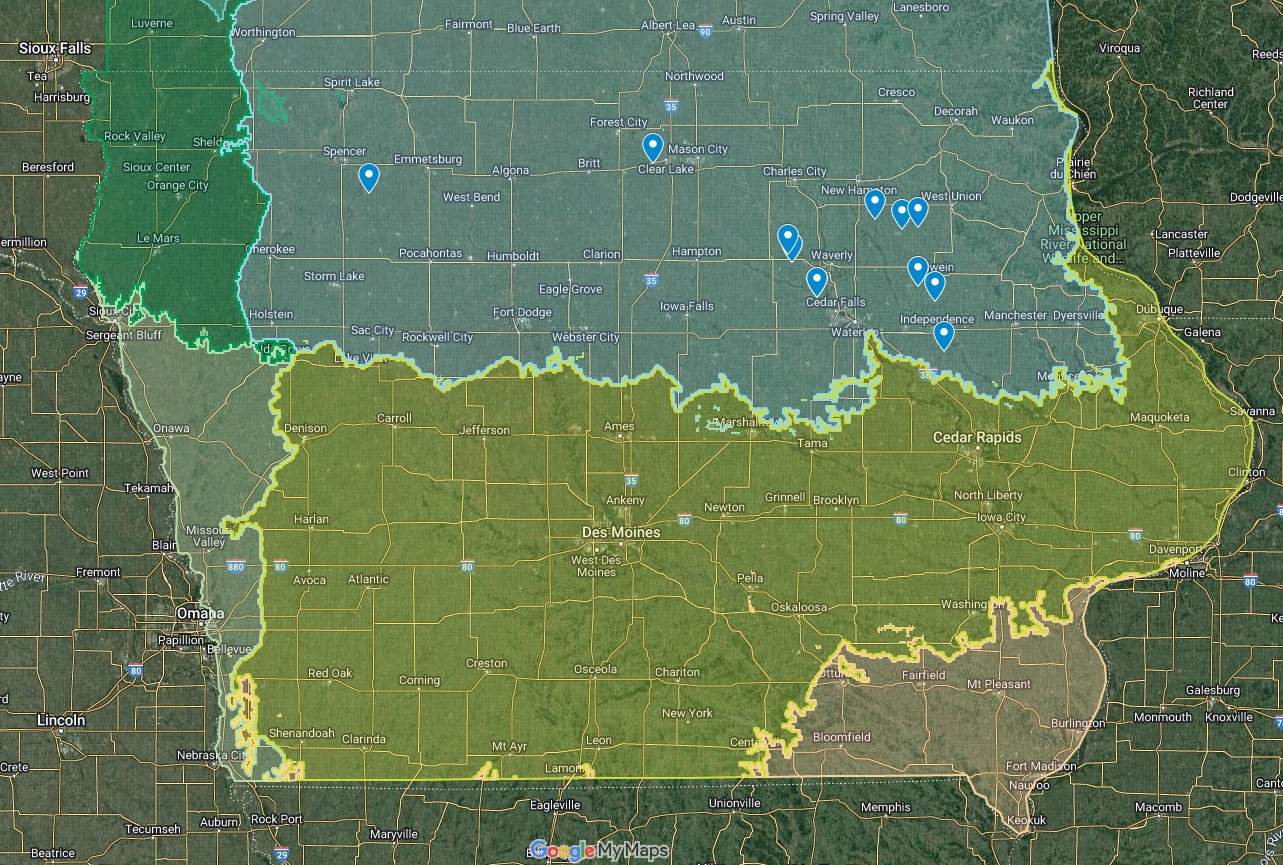
- References
Cochrane, T. S., Elliot, K., & Lipke, C. S. (2014). Asteraceae - Sunflower Family. In Prairie Plants of the University of Wisconsin-Madison Arboretum (3rd ed., p. 133). University of Wisconsin-Madison Arboretum.
Chayka, Katy (n.d.). Doellingeria umbellata (Flat-topped White Aster). Minnesota Wildflowers. https://www.minnesotawildflowers.info/flower/flat-topped-white-aster
Hilty, J. (2019). Flat-Topped Aster - Doellingeria umbellata. Illinois Wildflowers. https://www.illinoiswildflowers.info/wetland/plants/fltp_aster.html
Kartesz, J.T., The Biota of North America Program (BONAP). 2023. North American Plant Atlas. (http://bonap.net/napa). Chapel Hill, N.C. [maps generated from Kartesz, J.T. 2023. Floristic Synthesis of North America, Version 1.0. Biota of North America Program (BONAP). (in press)]
NatureServe. 2024. NatureServe Network Biodiversity Location Data accessed through NatureServe Explorer [web application]. NatureServe, Arlington, Virginia. Available https://explorer.natureserve.org/. (Accessed: February 28, 2024).
Society for Ecological Restoration, International Network for Seed Based Restoration and Royal Botanic Gardens Kew. (2023) Seed Information Database (SID). Available from: https://ser-sid.org/ (February 2023)
USDA NRCS National Plant Data Team. (n.d.). Doellingeria umbellata (Mill.) Nees. USDA plants database. https://plants.usda.gov/home/plantProfile?symbol=DOUM2
Van Der Grinten, Martin. (2001). Propagation protocol for production of Container (plug) Aster umbellatus P. Mill. plants USDA NRCS - Big Flats Plant Materials Center Corning, New York. In: Native Plant Network. URL: https://NativePlantNetwork.org (accessed 2024/02/02). US Department of Agriculture, Forest Service, National Center for Reforestation, Nurseries, and Genetic Resources.
Semple, J. C., & Chmielewski, J. G. (2020, November 6). Doellingeria umbellata (Miller) Nees. Flora of North America. http://floranorthamerica.org/Doellingeria_umbellata
Species Guide Updated 3/5/2024
spotted joe pye weed
spotted joe pye weed sagem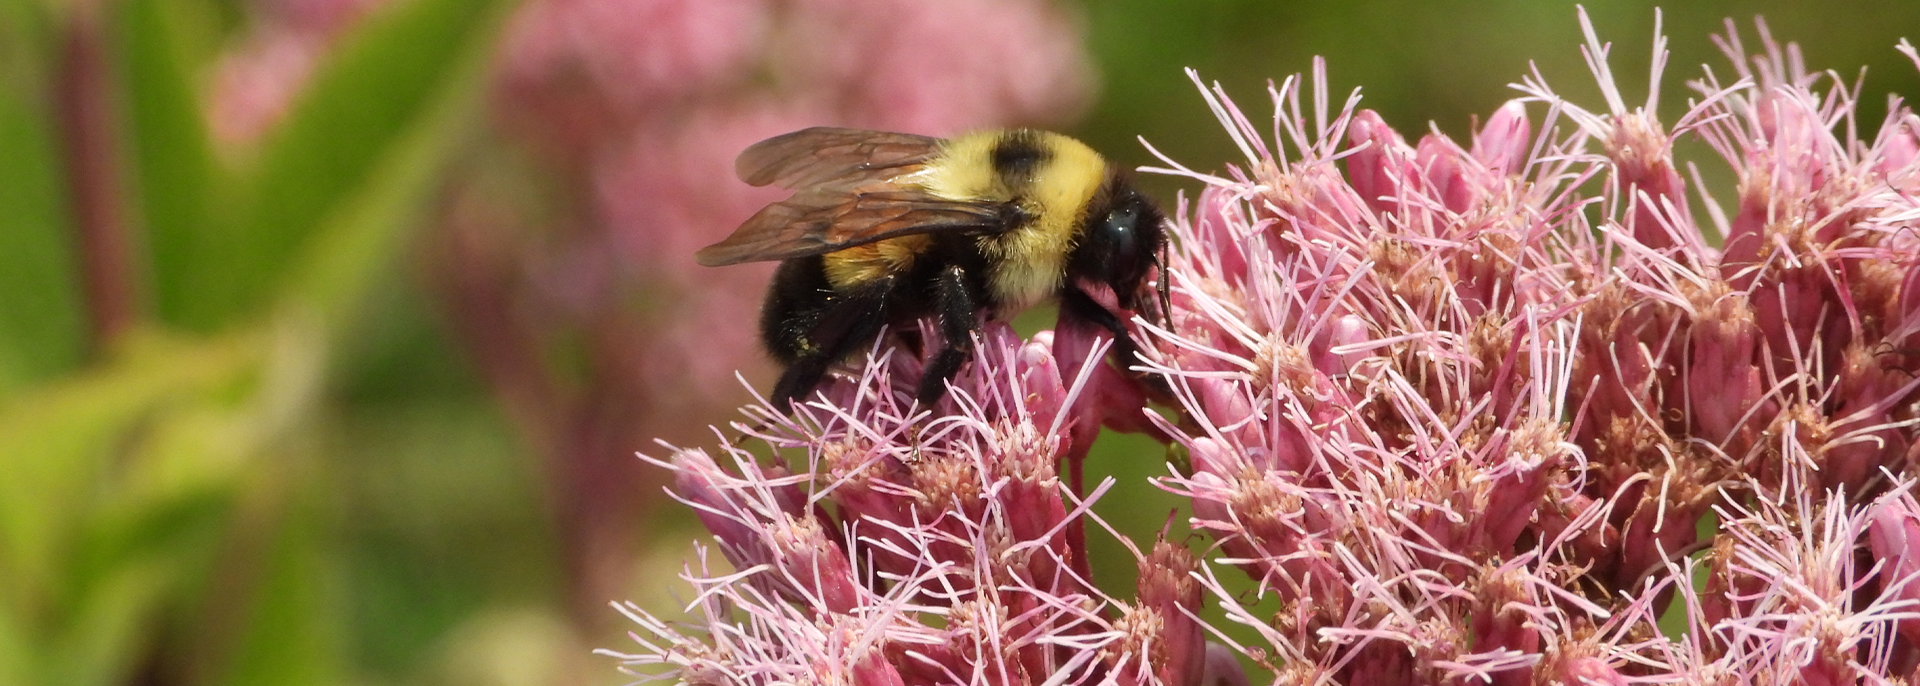
Eutrochium maculatum, (L.) E. E. Lamont
Alternate Common Names: purple boneset, spotted trumpetweed
Scientific Synonyms: Eupatoriadelphus maculatus (L.) R. M. King & H. Rob., Eupatorium maculatum L., Eupatorium purpureum L. var. maculatum (L.) Darl., Eupatorium purpureum subsp. maculatum (L.) Á. Löve & D. Löve, Eupatorium trifoliatum var. maculatum (L.) Farwell
Family: aster or sunflower family (Asteraceae)
Functional Group: forbs (wildflowers)
Description
- Life cycle and growth form
Perennial, spreads slowly by rhizomes to form clumps.
Height: 2-10 ft (mostly 3-6 ft)
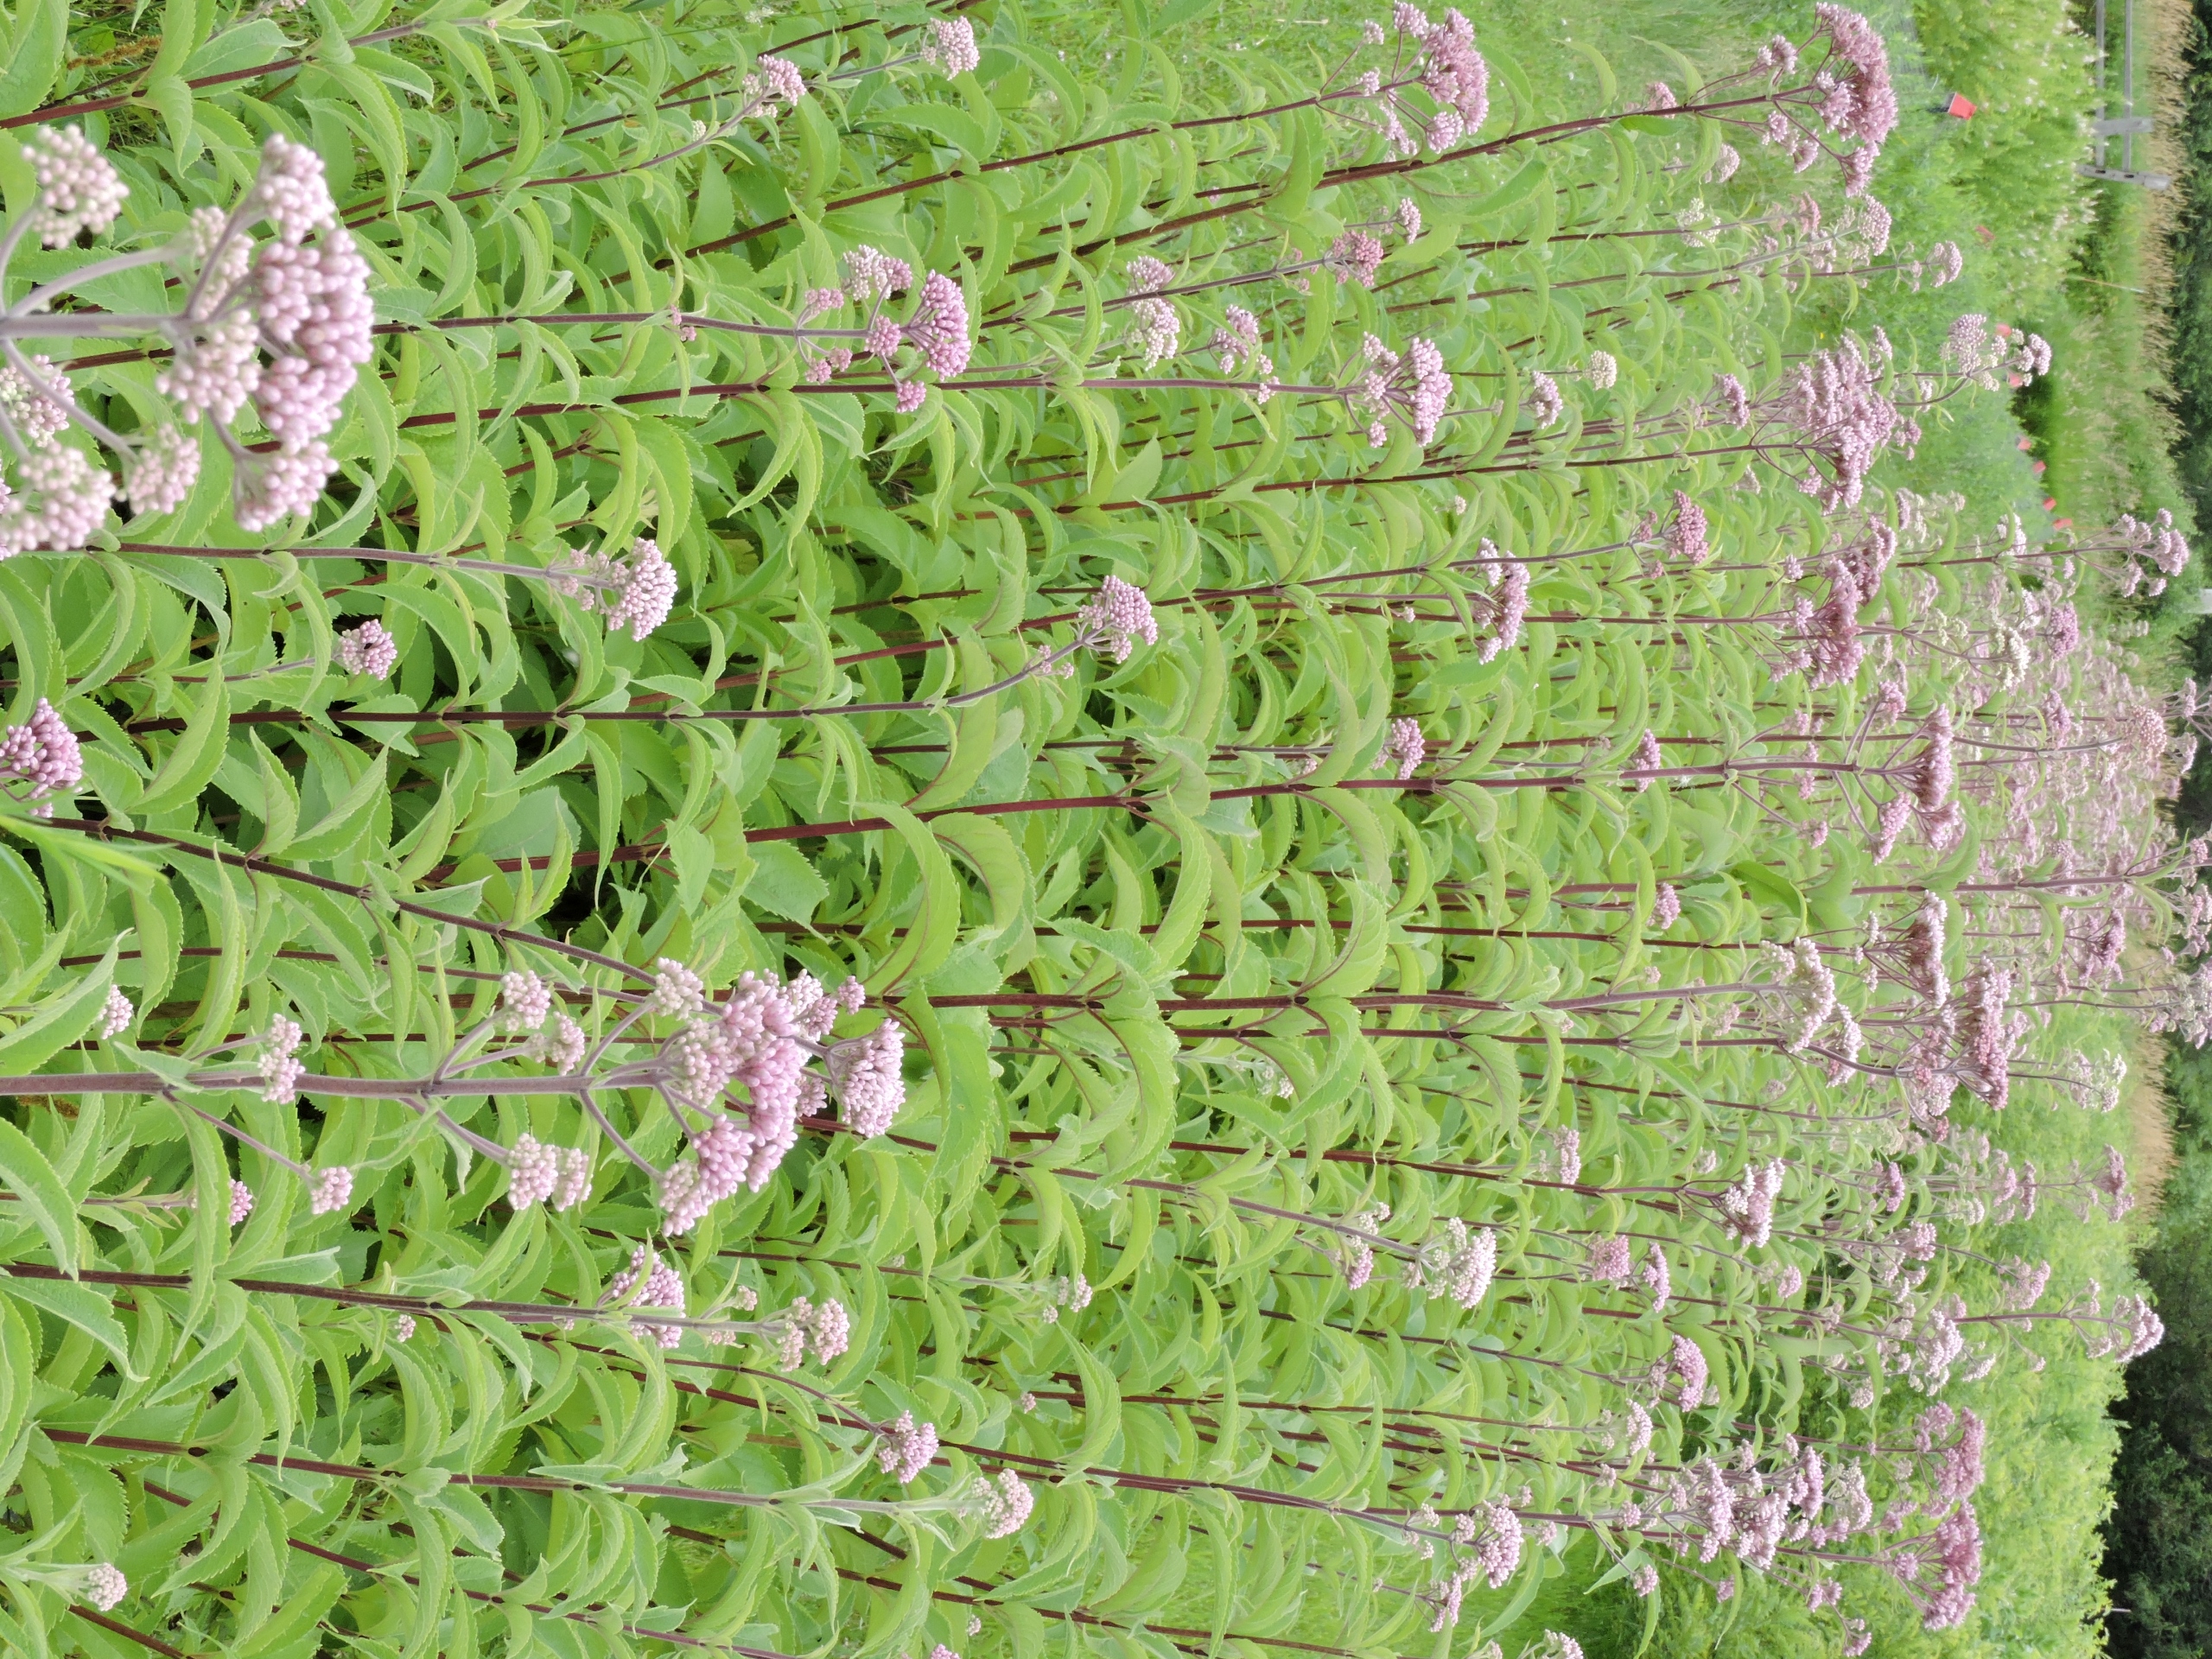
- Leaves and stem
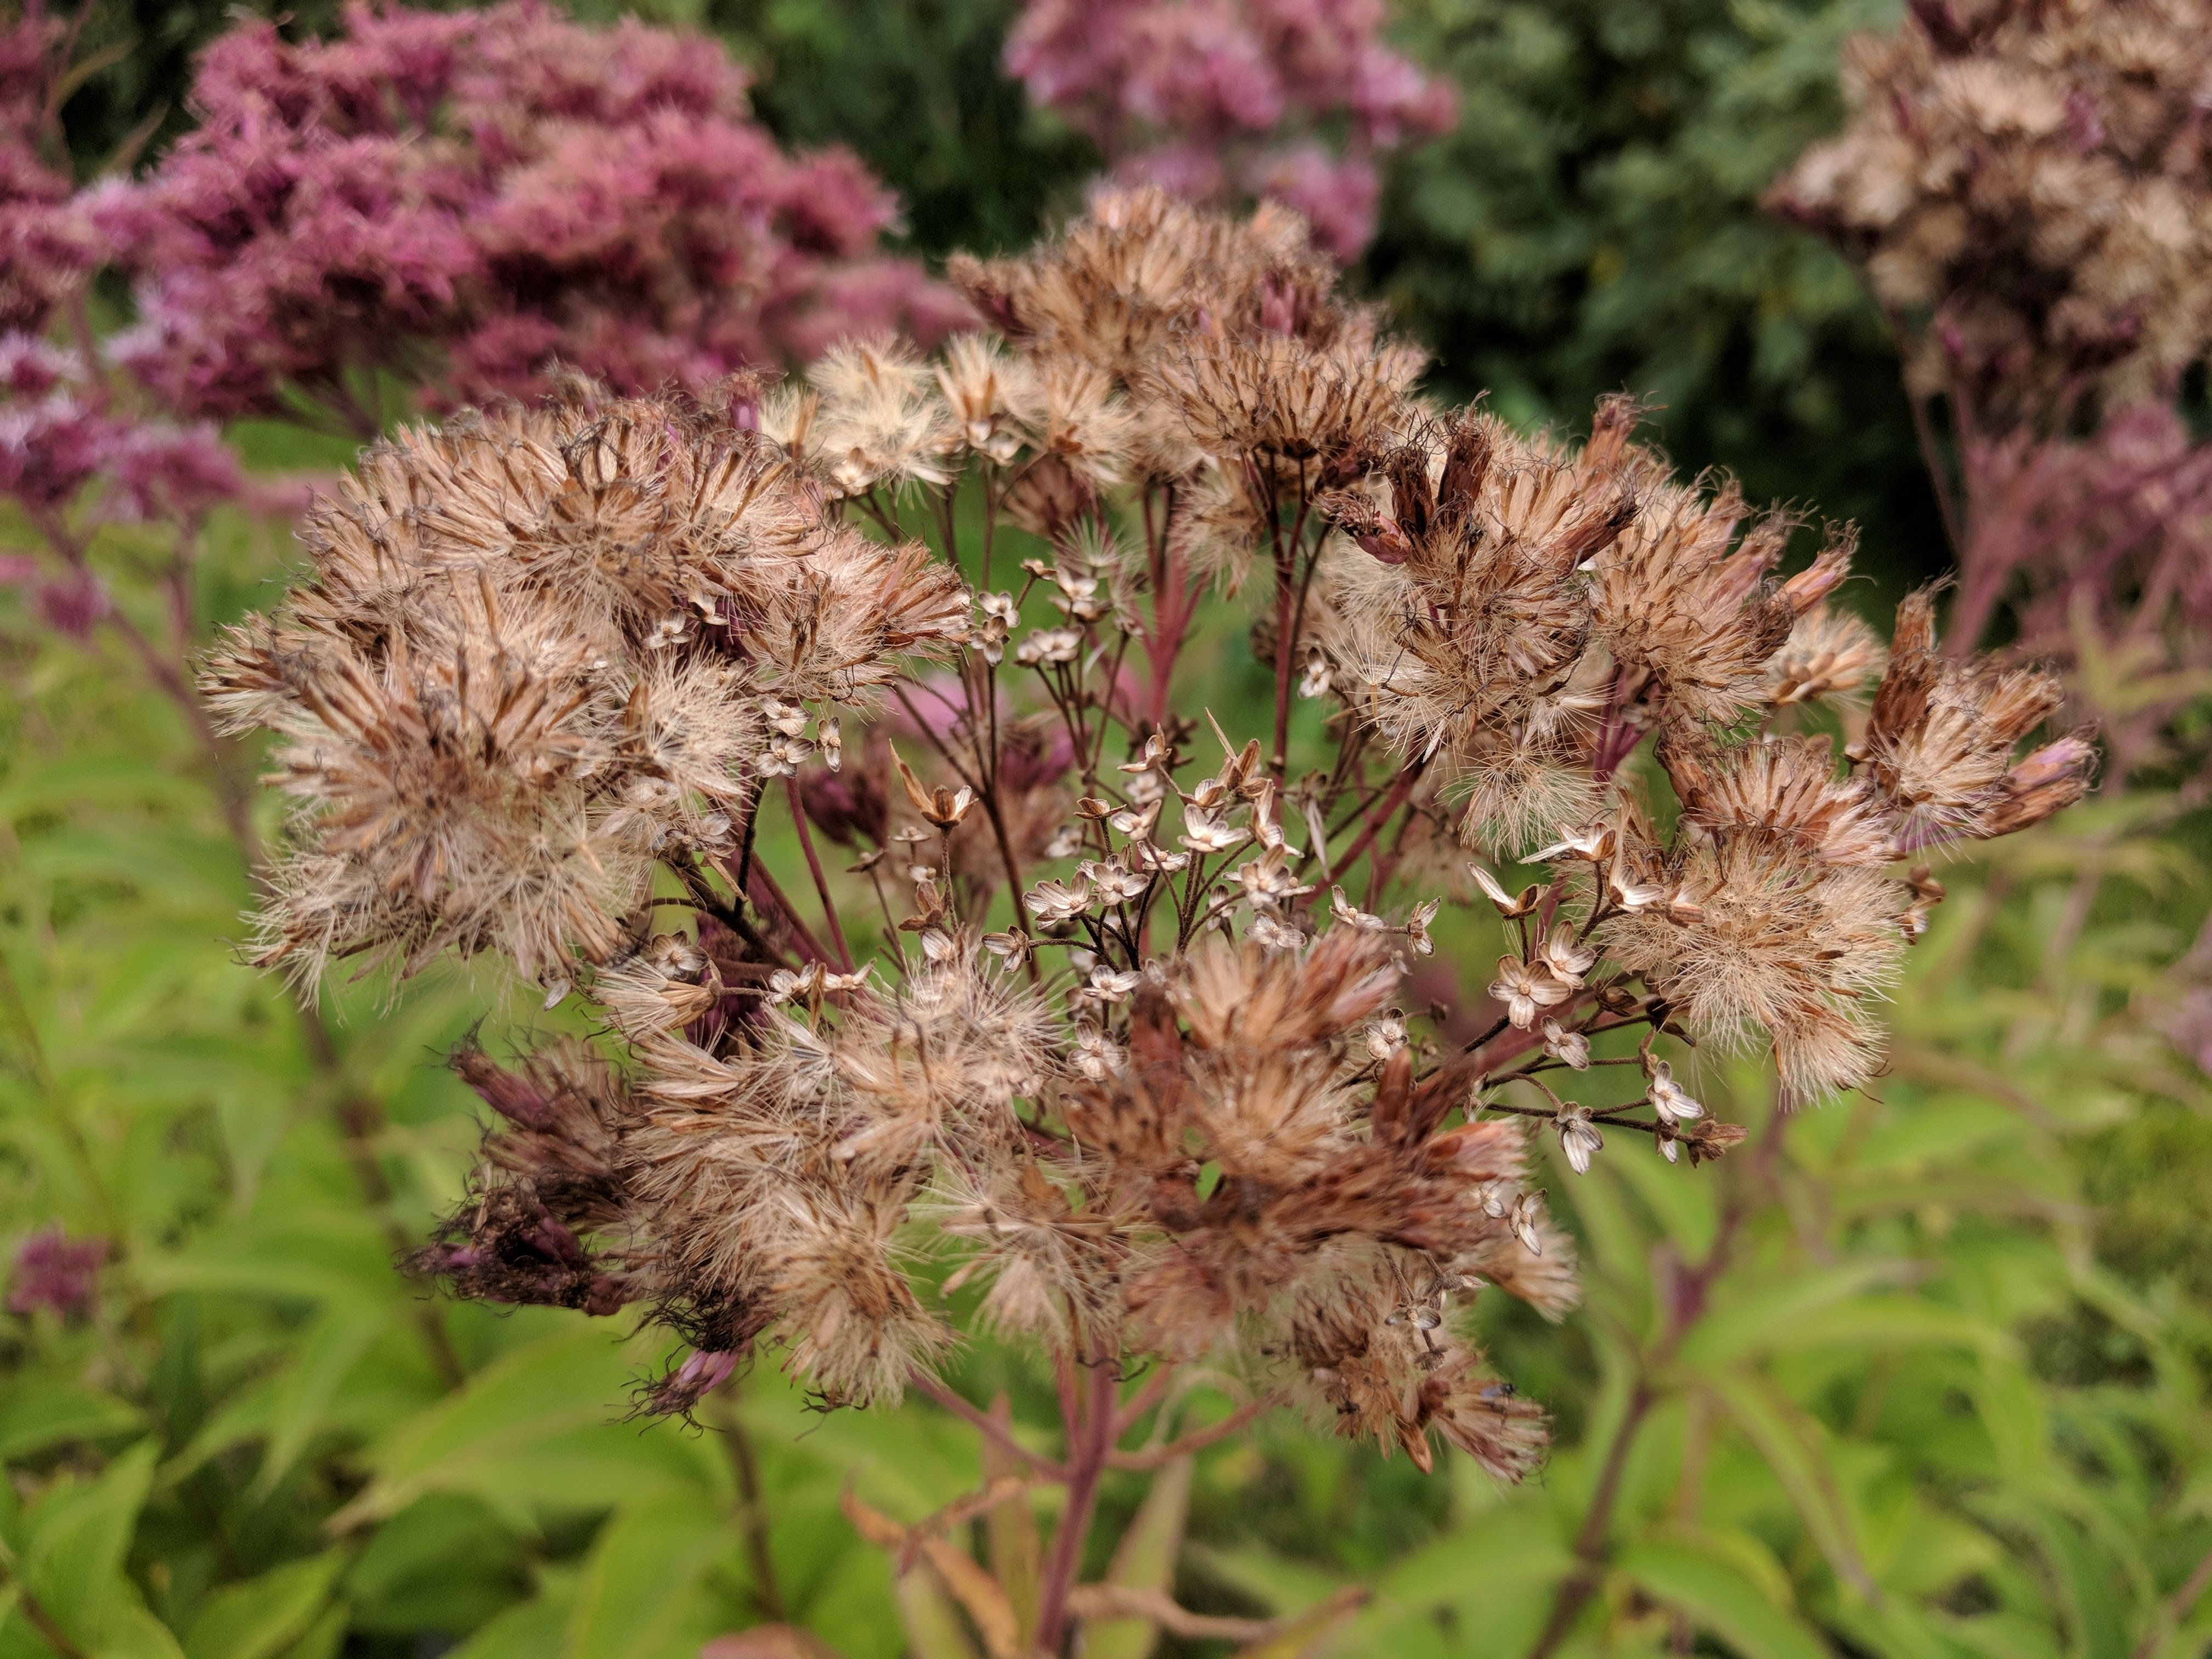
Lance-shaped, up to 9 in long with serrated margins, whorled in groups of 4-5 (usually) at each node; unbranched stems purple to purple-spotted (the name ‘maculatum’ means spotted and refers to this trait).
- Flower, fruit and seedhead
Flower: 3-5 small, indistinct florets per head, in flat-topped to domed inflorescences with dozens to hundreds of pink to purplish heads (rarely white); inflorescences appear fuzzy due to the long styles that stick out of the florets.
Fruit/seedhead: Seed clusters ripen from the center outward, becoming tan and fluffy as seed matures; seed is wind-dispersed and susceptible to shattering in windy weather.
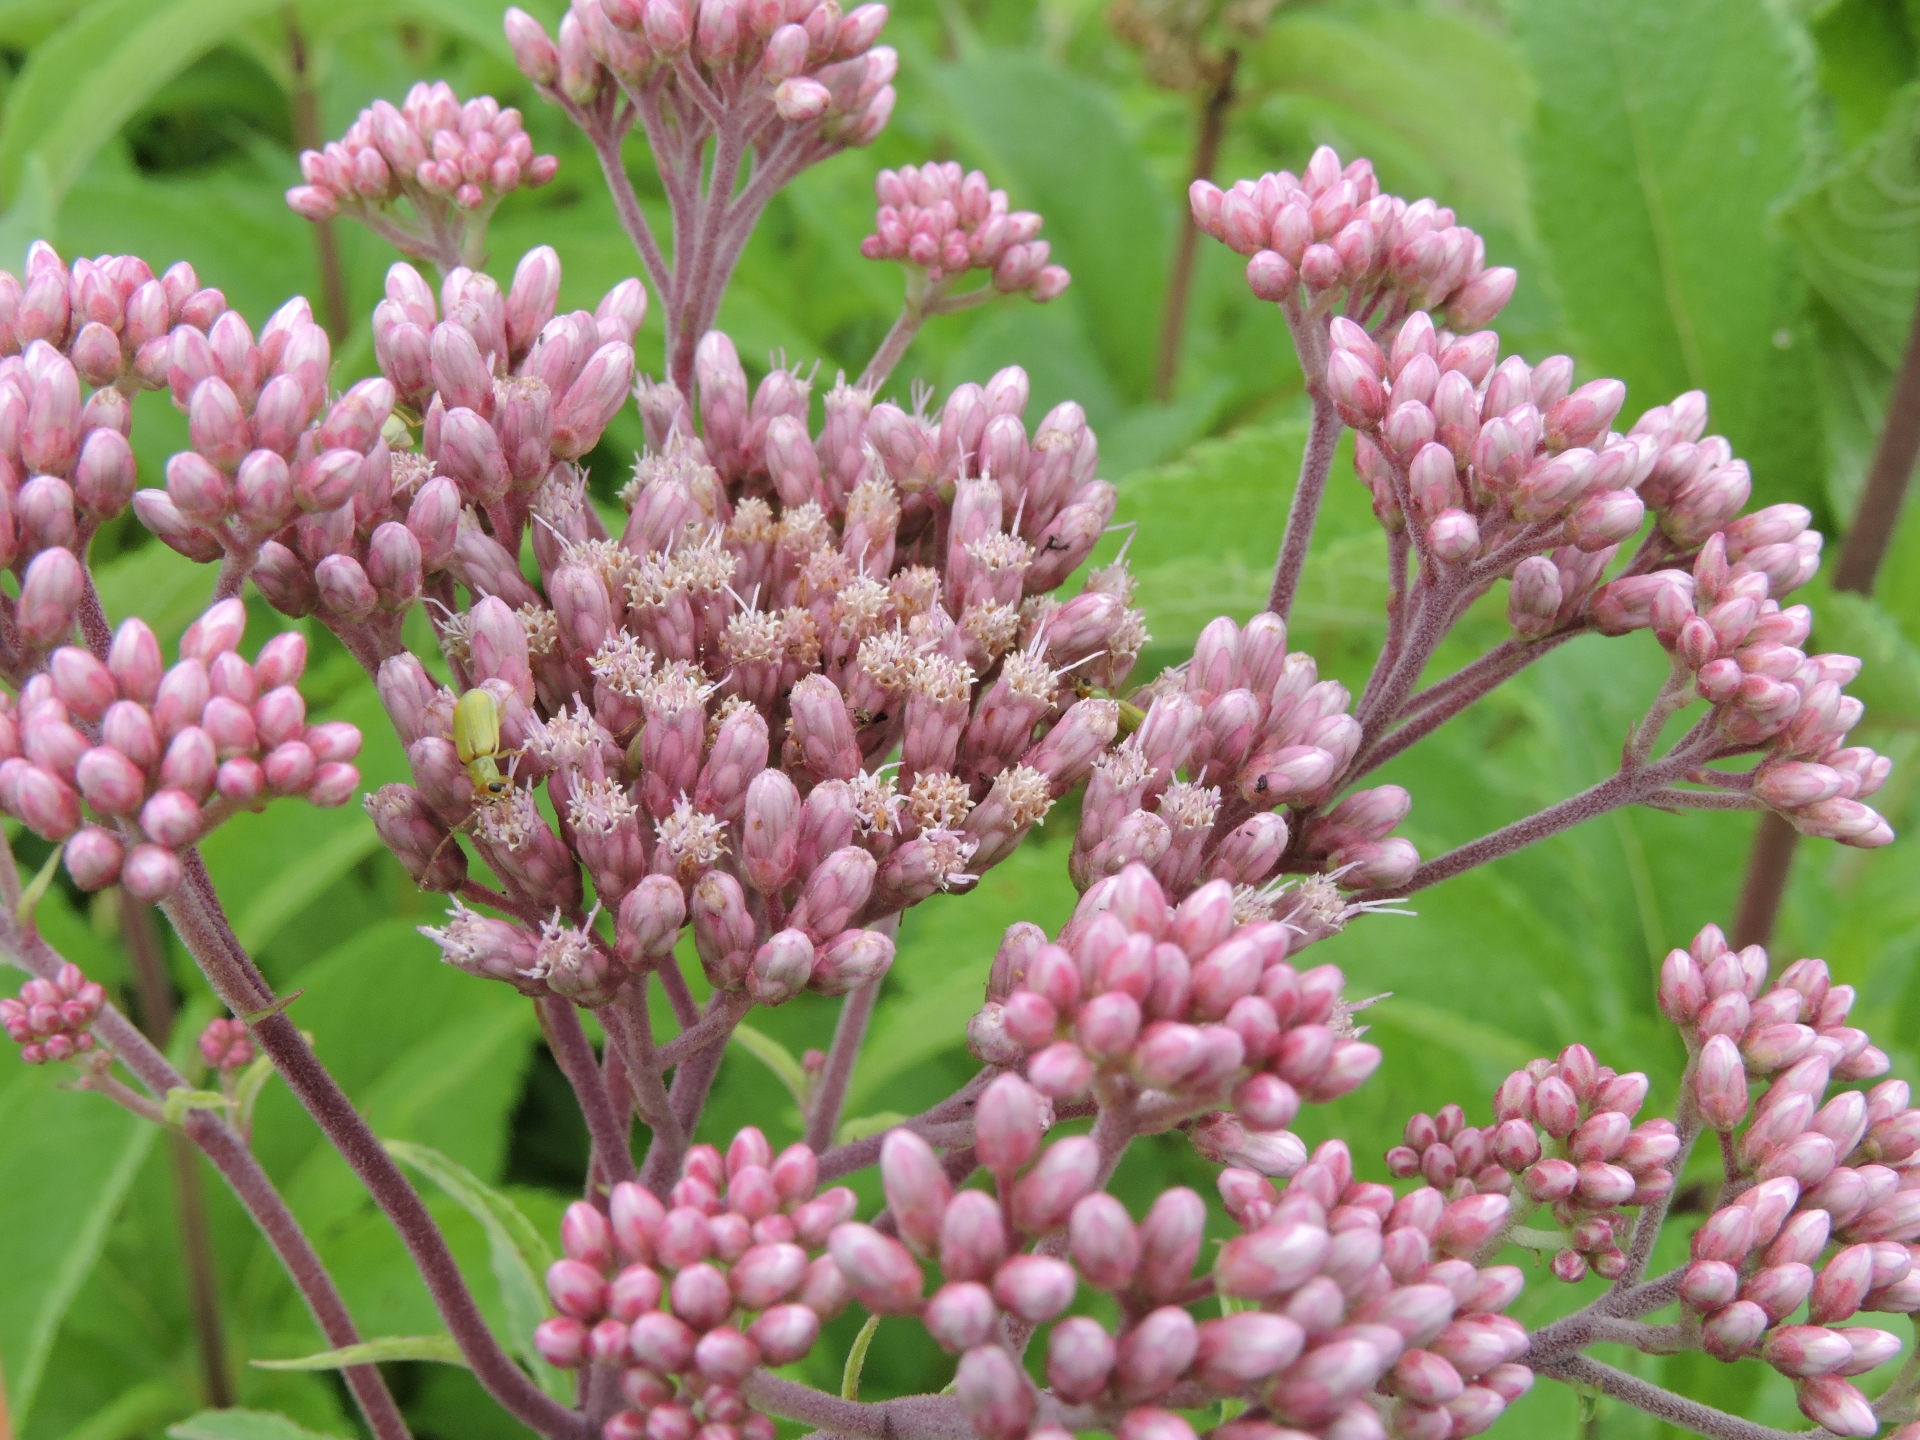
- Seed
Seed characteristics
Seeds per ounce: 95,000 (IA NRCS)
1000 seed weight: 0.28 g (Seed Information Database)
Description: Slender, charcoal-gray seeds about 3 mm long with a tuft of tan pappus.
Typical seed test
PLS: 74% (n = 5)
Purity: 86% (n = 5)
Germination: 17% (n = 4)
Dormant: 72% (n = 4)
(averages obtained from n tests of purchased seed lots)
- Habitat and range
Habitat: Moist to wet soil; full sun; wet prairies, sedge meadows, fens, ditches, and other wet places. The USDA classifies it as an Obligate Wetland species in the Midwest region. It benefits from irrigation in production systems.
Conservation status: Global- G5, secure; Idaho and West Virginia- S1, critically imperiled; Montana- S1/S2, critically imperiled to imperiled; Arizona, Virginia, and Georgia- S2, imperiled; Wyoming- S3, vulnerable (NatureServe)
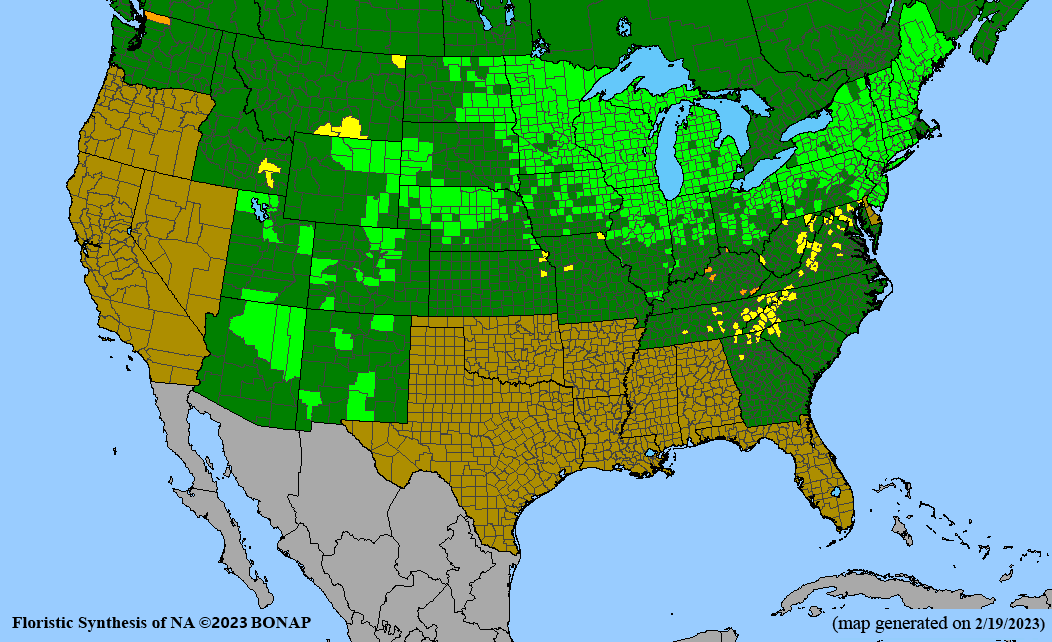
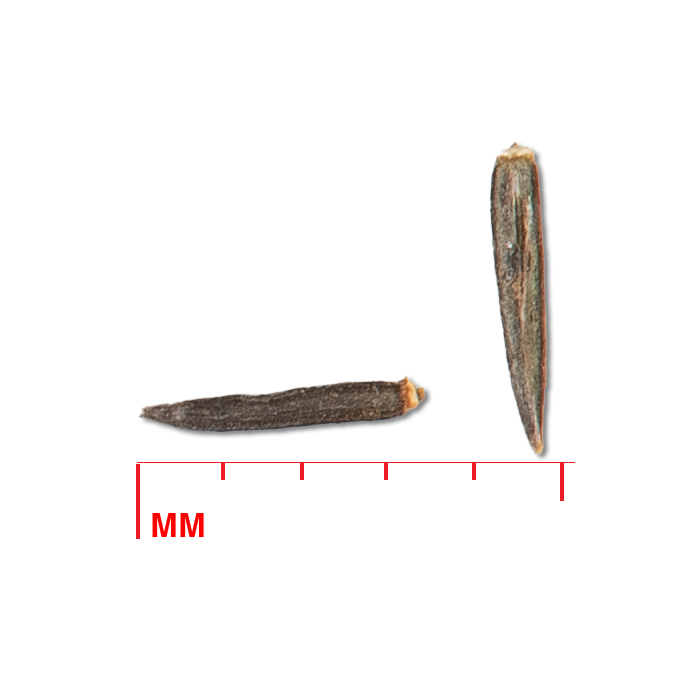
General Comments
The sweet-scented flowerheads attract numerous and diverse pollinators including the endangered rusty patched bumble bee. We once identified seven species of butterflies along a 150 foot row of flowering spotted joe pye weed in one 15-minute observation. Traditional uses of this species by Native tribes include treatments for digestive, urinary, kidney, and women’s complaints and using the hollow stems as straws. The clumped stems and whorled leaves produce dense shade that excludes most weeds from a well-established plot. Irrigation is important for seed production.
Recommendations for Seed Production
- Establishment for seed production
Direct seeding
We do not have experience direct seeding this species for seed production.
Greenhouse
Seed pre-treatment: 60 days cold-moist stratification.
Sowing: Seed is small and should be surface sown or very lightly covered or seedlings will not have enough energy to emerge. If started in germination flats, transplant to individual plugs when seedlings have their first pair of true leaves.
Transplanting: Seedlings are ready to transplant to the field about 8-12 weeks after starting in plugs, when their roots are well-branched and numerous root tips are visible at hole(s) in the base of the plug. Pop out a few plugs to check for adequate root development that will provide sturdy plugs for planting. A week or two before transplanting, move flats outside to ‘harden off.’ (See Propagation chapter in General Information for more details).
- Stand management
Weeds: In the first season after transplanting, weeds are suppressed by a plastic weed barrier. Plants spread by short rhizomes; in second and subsequent years, holes in plastic must be expanded or plastic removed to make room for new stems. Well-established plots shade out most weeds.
Pests: None noted.
Diseases: None noted.
Soil moisture: Irrigation is necessary in most soils to obtain maximum seed yield.
- Seed production
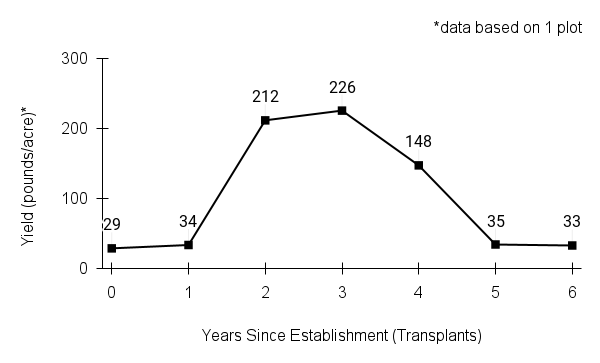 First harvest: Plants flower and set a little seed the first year when transplanted in spring.
Yield: 29-226 pounds/acre (based on 1 plot)
Stand life: Peak seed production in years 3-5, but plants are long-lived and vigorous for many years.
Flowering date: late July - early September in northeast Iowa
Seed maturity: second to third week of September
Harvest date range at TPC (2016-2022): Aug 26 - Oct 3
Recommended harvest method: Watch for the centers of seed clusters to begin shattering, and pick early maturing seed heads (clip stalks below seed clusters). If some heads in a cluster are still closed (not fluffy), pull apart a few heads to see if the seeds are dark colored and separate easily from the base (receptacle). Combine the rest of the plot at peak maturity. Turn off air or combine will disperse the fluffy seeds.
- Seed cleaning and storage
Cleaning process: If hand clipped, run dried material through a ¼ in mesh to thresh seed from stalks. Use a brush machine (medium bristles, minimum vacuum) to remove pappus. Winnow with a box fan to separate seed from most of the pappus and chaff. Airscreen 2-3 times to finish cleaning. See Appendix C for specific settings.
Seed storage: cool/dry (orthodox)
Released Germplasm
Source Identified material: Natural Selections/Iowa Ecotype Zone 1
Cultivated variety: ‘Gateway’ is a compact cultivar used in landscaping.
- References
Chayka, Katy. (n.d.). Eutrochium maculatum (Spotted Joe-pye Weed). Minnesota Wildflowers. https://www.minnesotawildflowers.info/flower/spotted-joe-pye-weed
Eutrochium maculatum. Prairie Moon Nursery. (2024). https://www.prairiemoon.com/eutrochium-maculatum-joe-pye-weed-prairie-moon-nursery.html
Hilty, J. (n.d.). Spotted Joe-Pye Weed - Eutrochium maculatum. Illinois Wildflowers. https://www.illinoiswildflowers.info/wetland/plants/sp_joepye.htm
Kartesz, J.T., The Biota of North America Program (BONAP). 2023. North American Plant Atlas. (http://bonap.net/napa). Chapel Hill, N.C. [maps generated from Kartesz, J.T. 2023. Floristic Synthesis of North America, Version 1.0. Biota of North America Program (BONAP). (in press)]
Lamont, Eric E. (2020, November 6). Eutrochium maculatum (Linnaeus) E. E. Lamont. Flora of North America. http://floranorthamerica.org/Eutrochium_maculatum
Missouri Botanical Garden. (n.d.). Eutrochium maculatum “Gateway.” Plant Finder. https://www.missouribotanicalgarden.org/PlantFinder/PlantFinderDetails.aspx?taxonid=302488&is
Moerman, D. (2003). Native American ethnobotany database. BRIT. http://naeb.brit.org/uses/search/?string=eupatorium%2Bmaculatum
NatureServe. 2024. NatureServe Network Biodiversity Location Data accessed through NatureServe Explorer [web application]. NatureServe, Arlington, Virginia. Available https://explorer.natureserve.org/. (Accessed: February 28, 2024).
SER, INSR, RBGK, Seed Information Database (SID). (2023). Eupatorium maculatum. https://ser-sid.org/species/567dc915-c79f-4608-a9d6-e1351ee9a2cb
USDA NRCS National Plant Data Team. (n.d.). Eutrochium maculatum (L.) E.E. Lamont. USDA plants database. https://plants.usda.gov/home/plantProfile?symbol=EUMA9
Species Guide Updated 3/5/2024
swamp milkweed
swamp milkweed sagem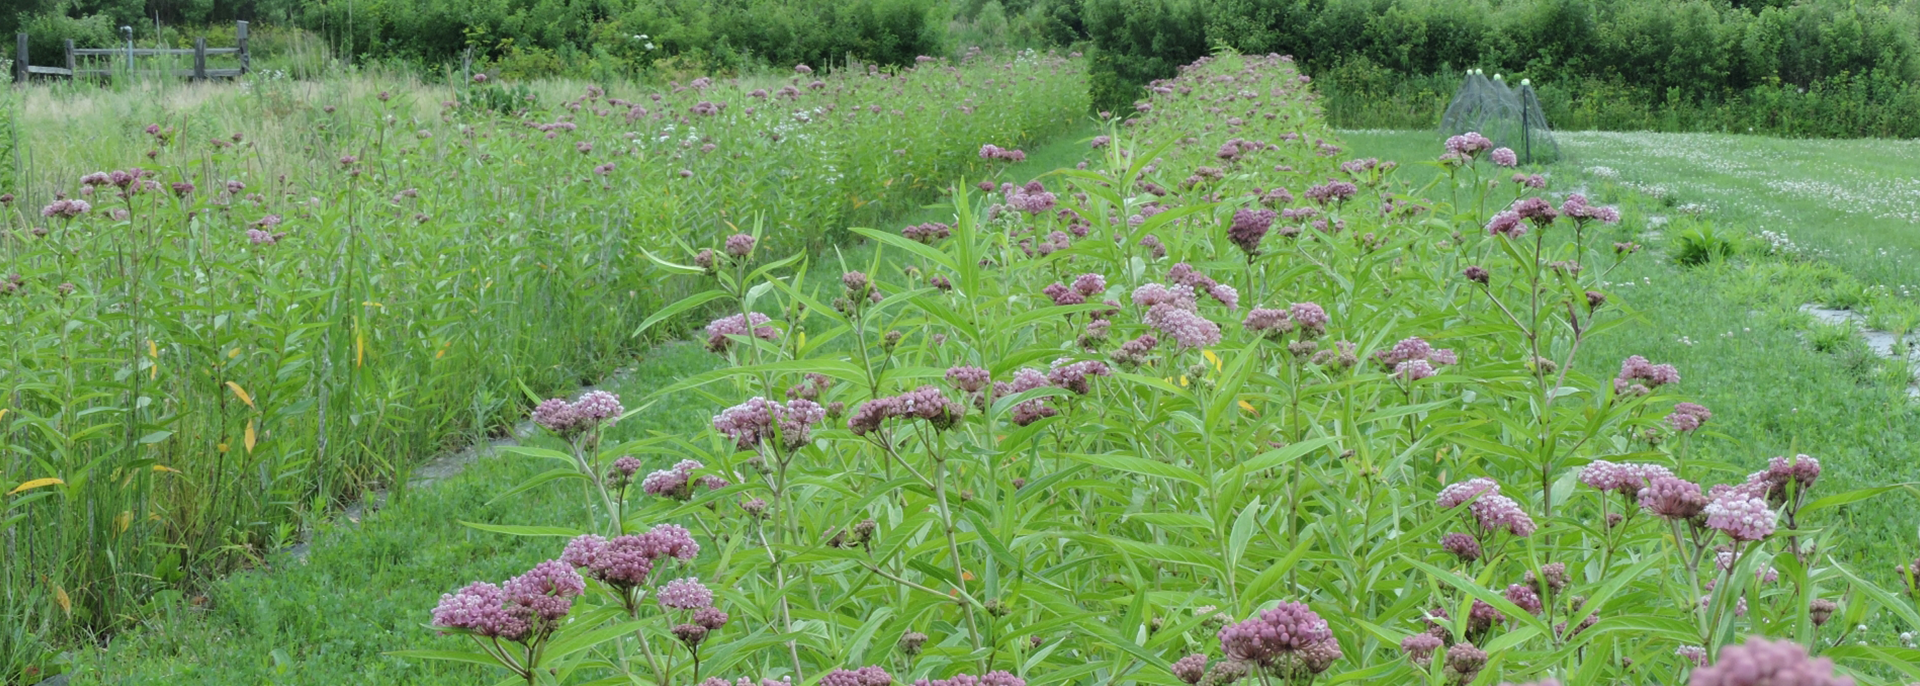
Asclepias incarnata, L.
Alternate Common Names: rose milkweed, silkweed, water nerve root, white Indian hemp, swamp silkweed
Family: dogbane family (Apocynaceae), formerly assigned to the milkweed family (Asclepiadaceae)
Functional Group: forbs (wildflowers)
Description
- Life cycle and growth form
Perennial, weakly rhizomatous, forming small clones of several stems; root systems are more fibrous than other commonly cultivated milkweeds such as butterfly milkweed (e.g., A. tuberosa).
Height: 2-5 ft
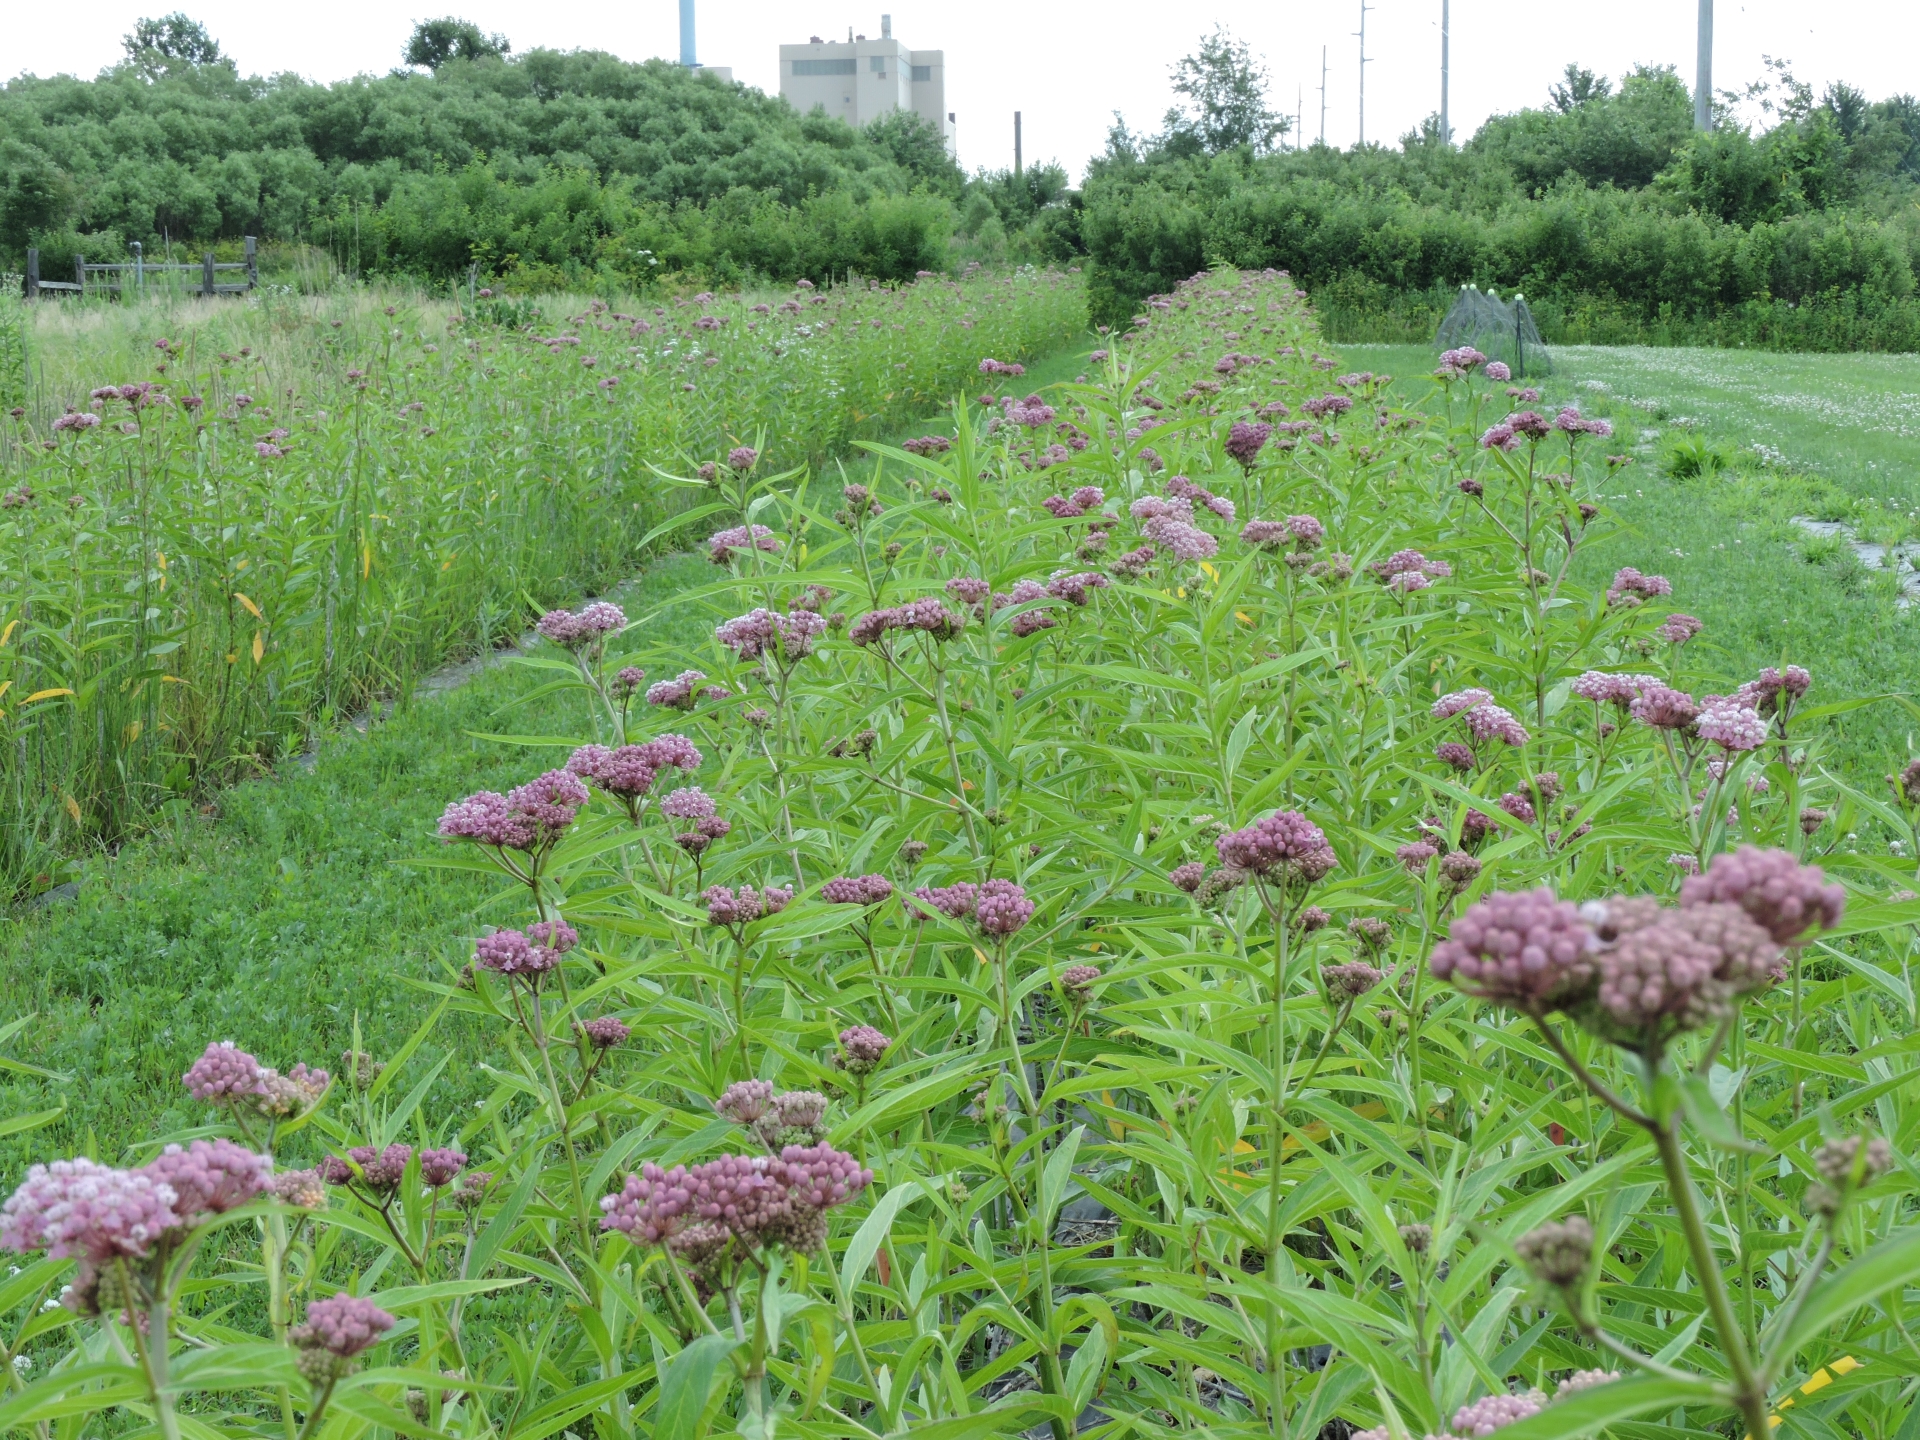
- Leaves and stem
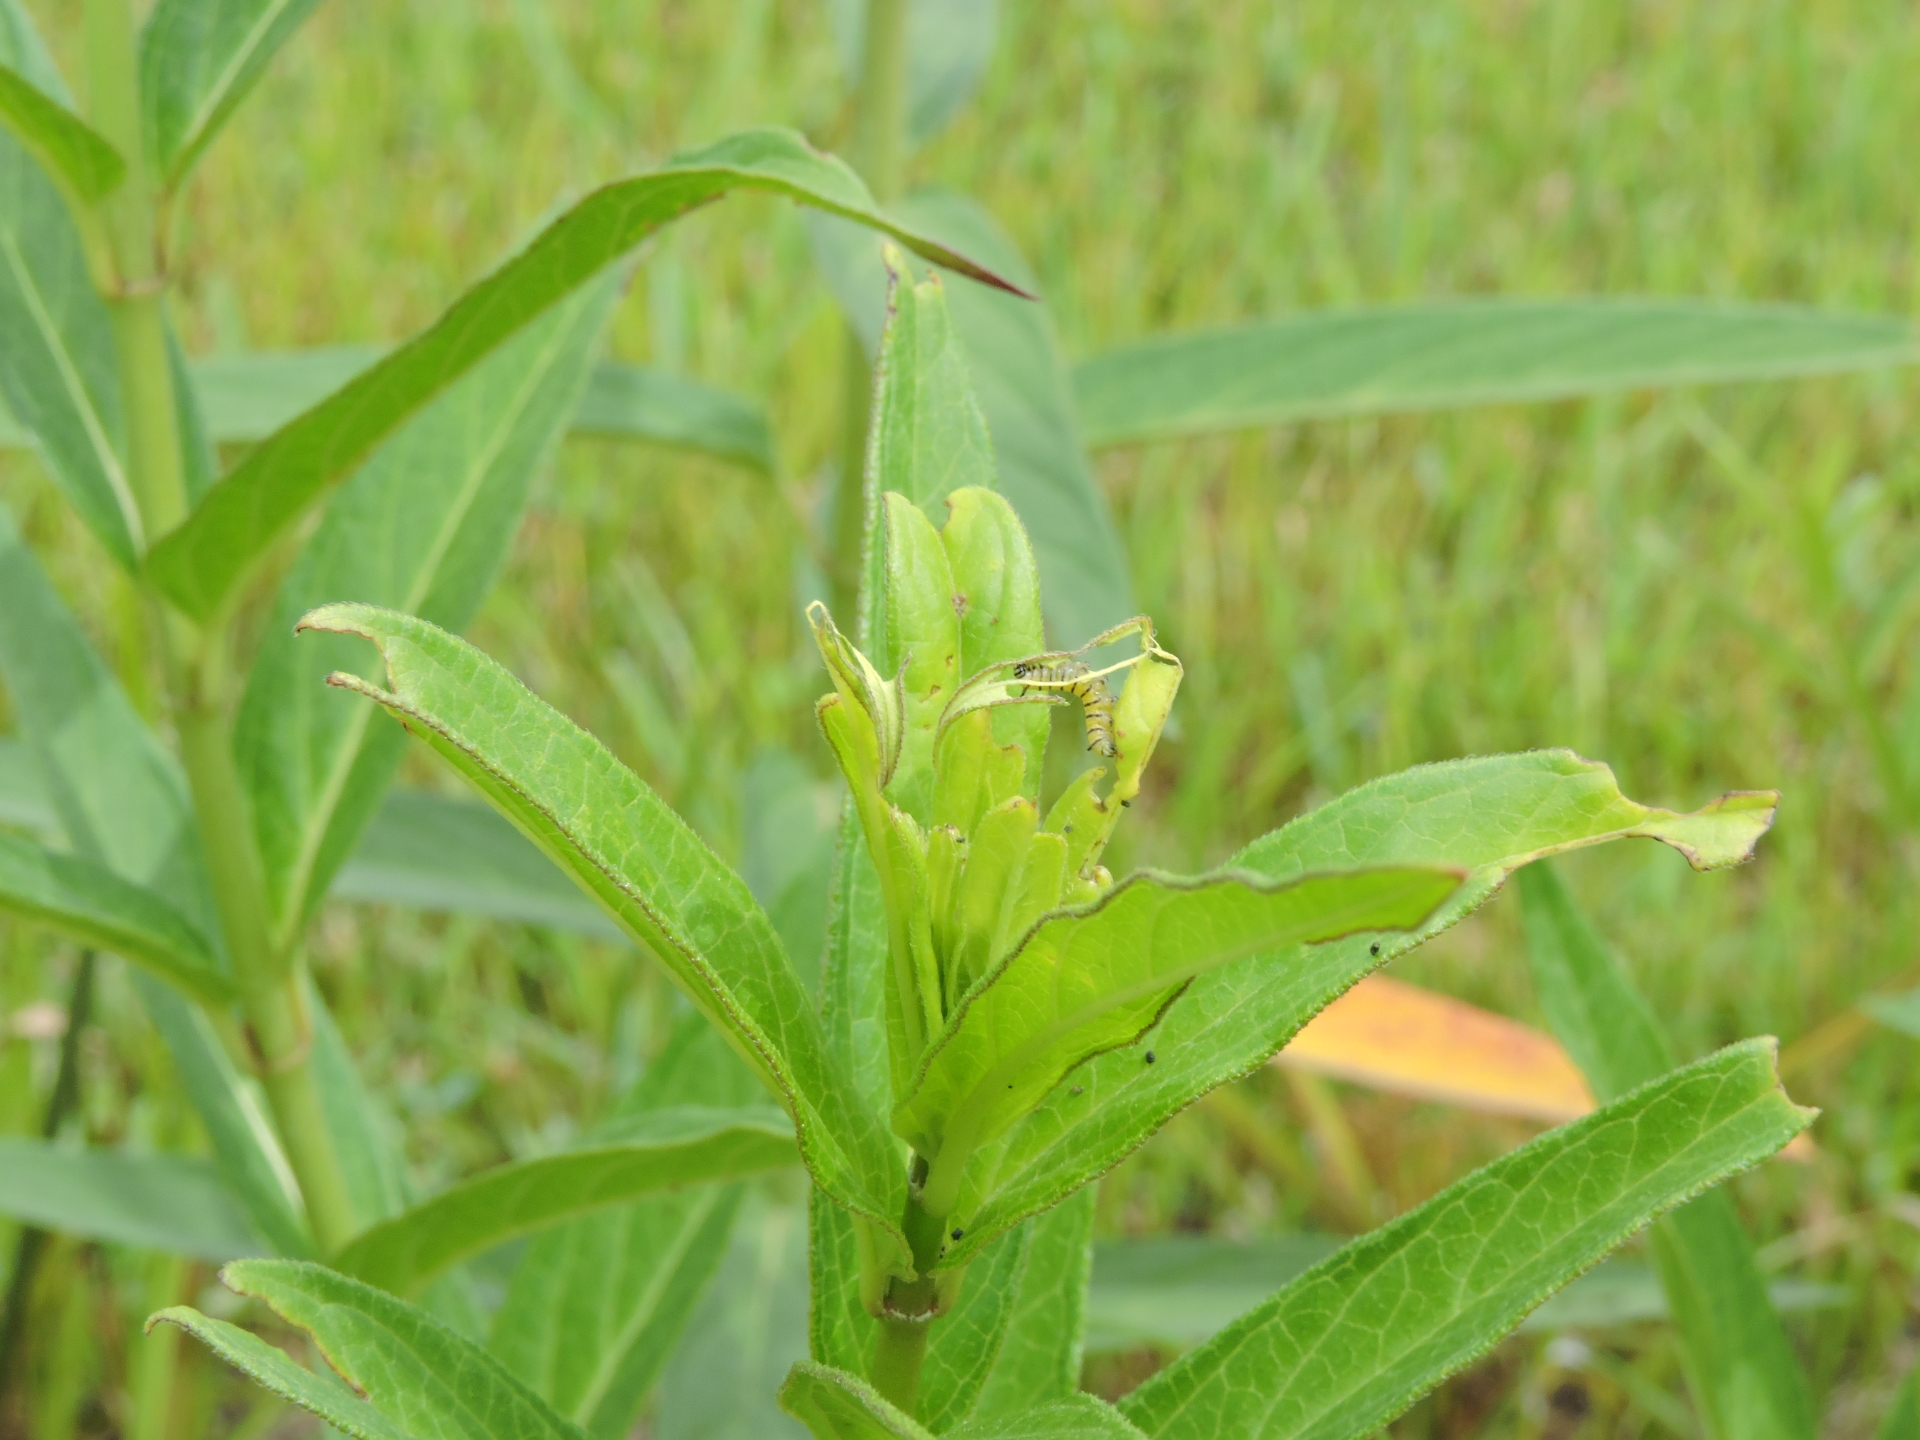
Leaves 3-6 in long, usually narrowly lanceolate with smooth, untoothed edges and sessile on the stem or short-stalked, opposite arrangement; stems mostly hairless, usually unbranched (occasionally branched above).
- Flower, fruit and seedhead
Flower: Numerous, various shades of rose-pink with a pronounced fragrance similar to bubblegum, in domed clusters 2-3 in across; individual flowers five-parted, radially symmetrical, with a crown of five tubular hoods surrounding a central column, petals and sepals curved downward (typical milkweed flowers).
Fruit/seedhead: Pods (follicles) are 2-4 in long, smooth/waxy, and teardrop-shaped; follicles open along one side at maturity, revealing many shiny brown seeds each of which bears a flattened wing and a plume of soft, white floss.
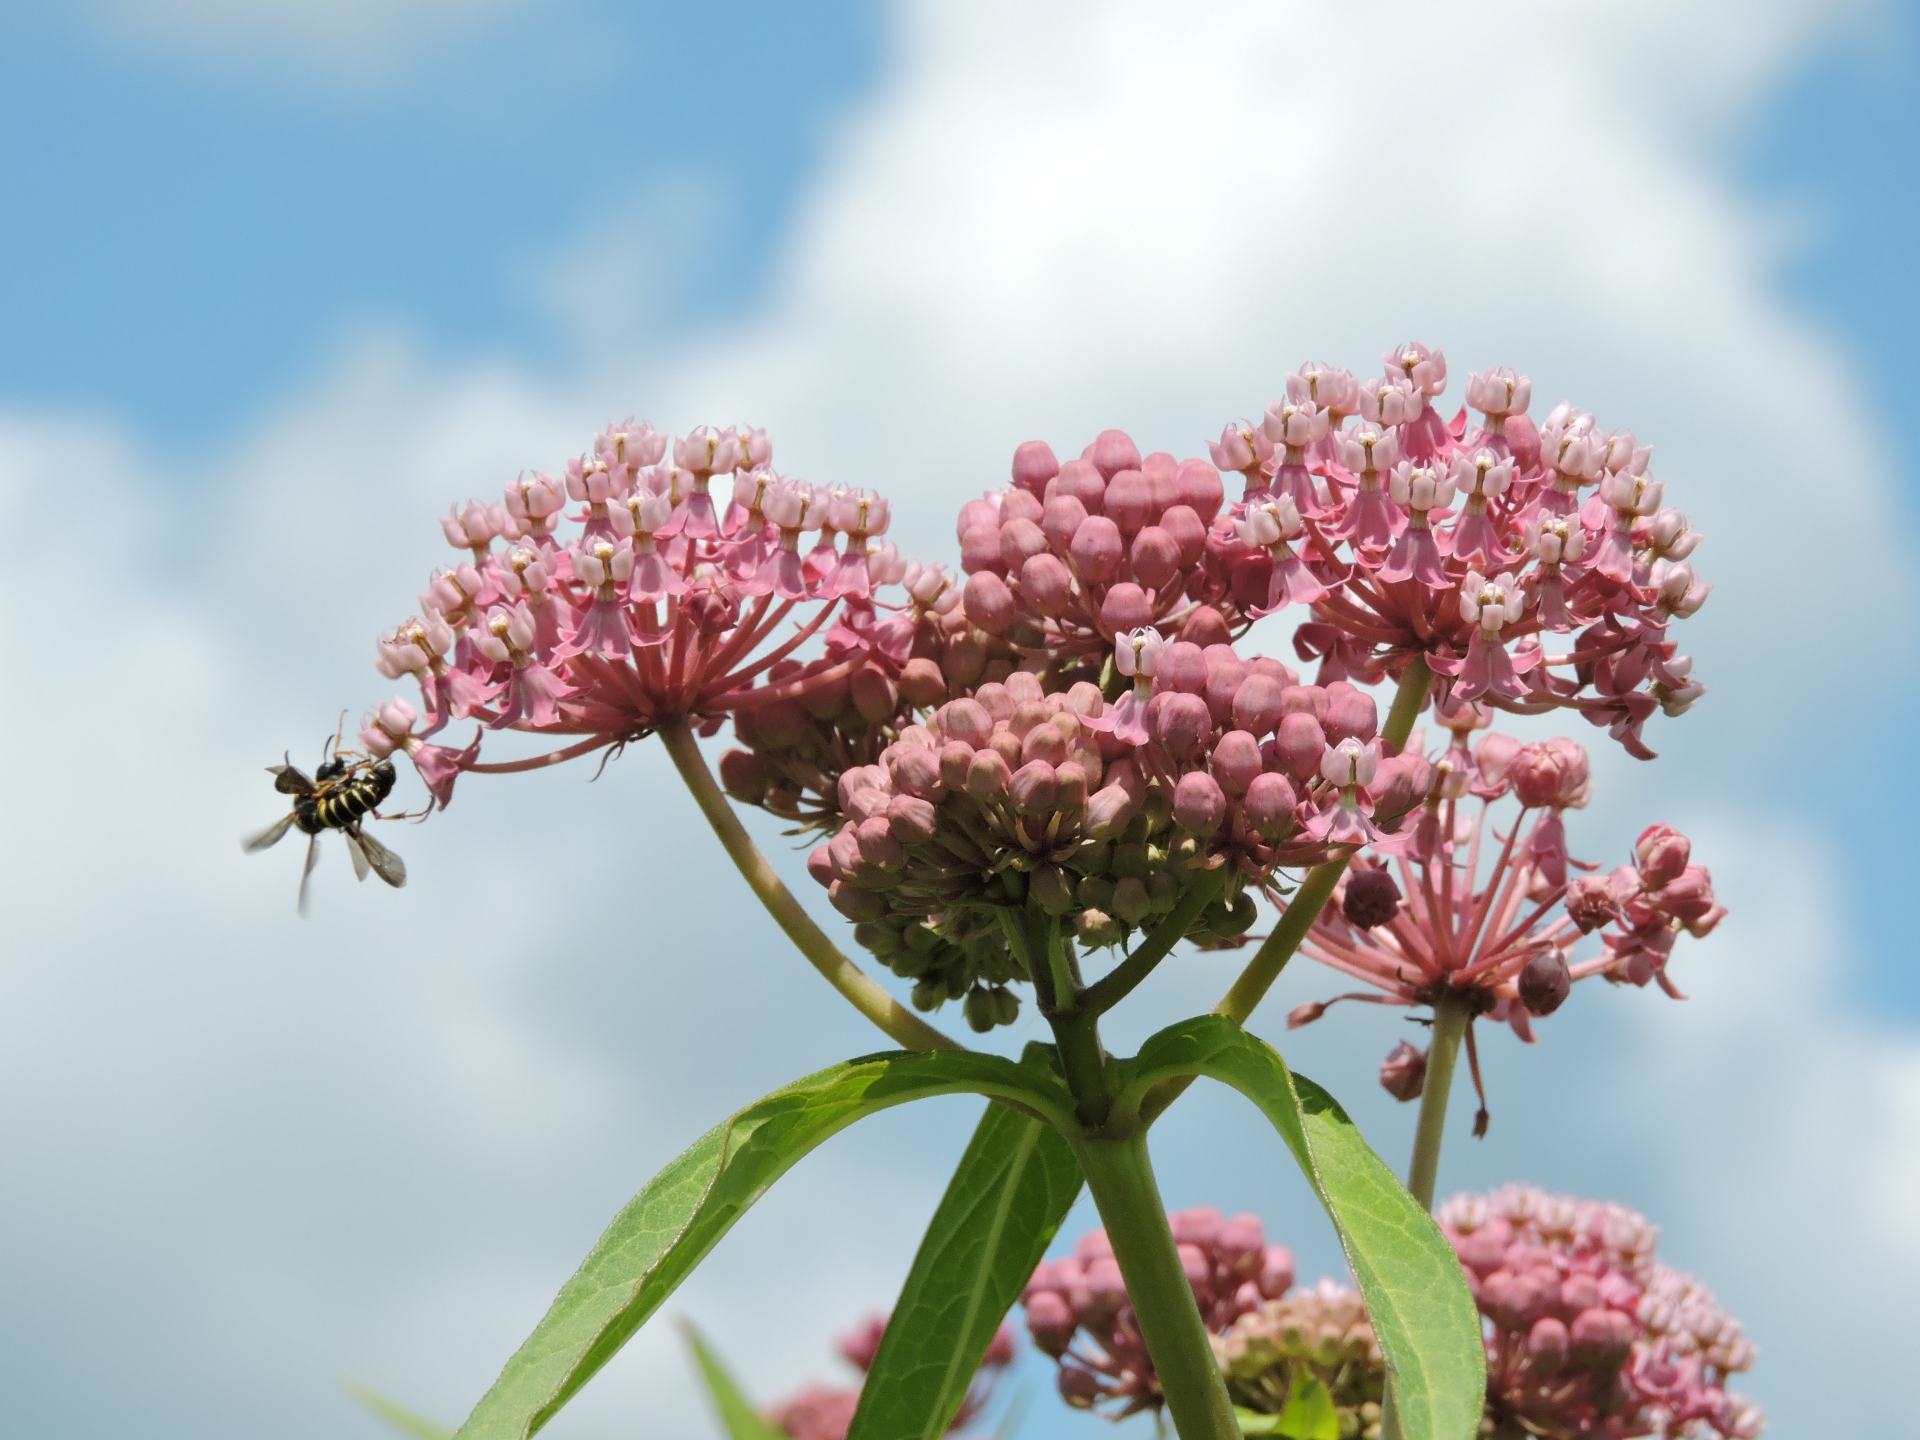
- Seed
Seed characteristics
Seeds per ounce: 4,800 (IA NRCS)
1000 seed weight: 3.65 g (Seed Information Database)
Description: Dark brown, oval, surrounded by flattened ‘wing’ and tuft of soft hairs.
Typical seed test
PLS: 89% (n = 11)
Purity: 98% (n = 11)
Germination: 7% (n = 7)
Dormancy: 58% (n = 7)
(averages obtained from n tests of purchased seed lots)
- Habitat and range
Habitat: Moist to wet, neutral to slightly acidic soil in partial to full sun. Wild populations are found in open floodplains, lakeshores, ditches, and wet prairies. Obligate wetland status (OBL) in Midwest, facultative (FACW) in Great Plains. Benefits from irrigation in production systems.
Conservation status: Global- G5, secure; Arizona, Mississippi, Montana, and Nevada- S1, critically imperiled; Arkansas, Idaho, and Louisiana- S2, imperiled; Wyoming- S2/S3 imperiled to vulnerable; Georgia- S3, vulnerable (NatureServe)
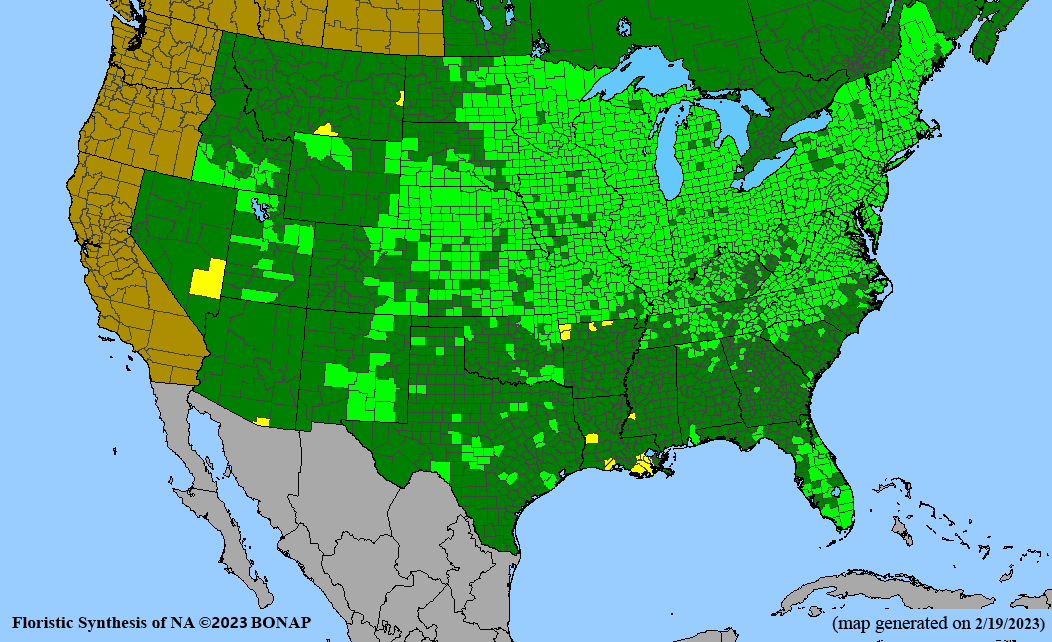
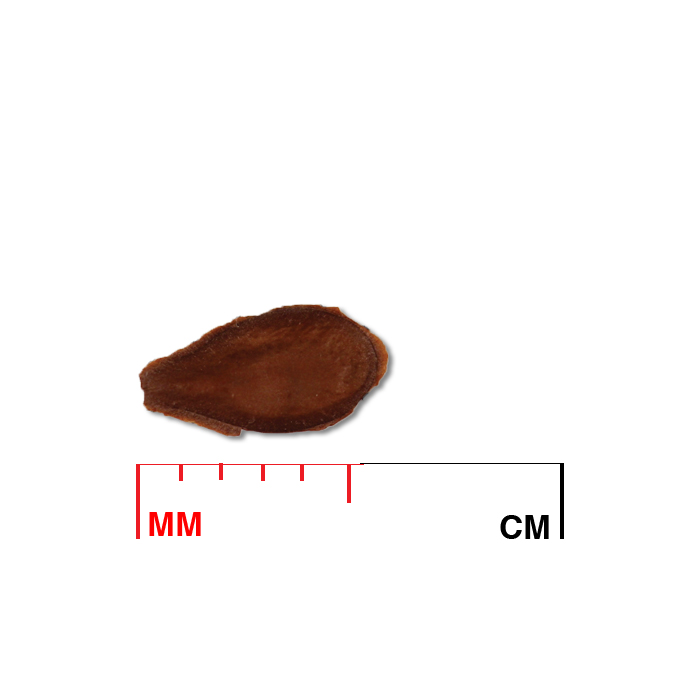
General Comments
Swamp milkweed is a valuable addition to pollinator habitat plantings on wetter soils and a showy, mannerly milkweed for home landscaping. This species is an important host for caterpillars of the monarch butterfly which feed upon its leaves. The fragrant flowers attract and provide nectar for numerous pollinators including various species of butterflies, bees, wasps, and flies. The strong, silky stem fibers are used as nesting material by songbirds and have traditionally been used for spinning and weaving by Native peoples, giving rise to some of the alternate common names such as silkweed and white Indian hemp. Establishment from plugs is rapid, and seed can be harvested the first fall, but production stands are short-lived (2-3 years).
Recommendations for Seed Production
- Establishment for seed production
Direct seeding
We do not have experience with direct seeding this species for seed production.
Greenhouse
Seed pre-treatment: To break dormancy, use 30-60 days cold stratification (check frequently for early germination) or a 24-hour soak in 250 ppm gibberellic acid (GA-3).
Sowing: Seed directly into plugs (2-3 seeds per cell) or on germination flat and lightly cover with potting mix, or germinate between sheets of moistened paper toweling and move to individual plugs as radicles (seed roots) emerge from seeds; start seeds 8-10 weeks before the average frost-free date.
Transplanting: Move plug flats outdoors 1-2 weeks before transplanting to allow seedlings to adjust to ambient conditions; plant with 1 ft spacing in plastic mulch with drip irrigation.
- Stand management
Weeds: Field preparation through repeated tillage and application of plastic mulch reduces weed issues; hand harvesting of pods as they mature results in very pure seed.
Pests: Non-native oleander aphids (Aphis nerii) can form dense infestations, reducing plant vigor and causing abortion of flowers or pods or, in extreme cases, death of the plant. Scout for these golden yellow aphids when plants are in bud, as it is easier to control small aphid infestations. Aphid predators (e.g., ladybug larvae, hoverfly larvae, and lacewing larvae) and aphid mummy wasps help reduce damage. Use the least toxic treatment possible (e.g., horticultural oils or insecticidal soaps) to avoid harming aphid enemies and pollinators, as aphids often occur at the time plants are in flower. Native seed-feeding milkweed bug species (Oncopeltus fasciatus and Lygaeus kalmii) pierce pods and feed on seeds. Manually remove clusters of red-orange milkweed bug nymphs from pods. A small proportion of pods is ruined by larvae of native milkweed stem weevils (Rhyssomatus lineaticollis or R. annectans). These appear as grubs or pupae inside the cluster of seeds. Affected pods have a small entry hole on the side and often mature prematurely. Earlier in the growing season, red milkweed longhorn beetles (Tetraopes spp.) feed on the tips of milkweed leaves. Their larvae feed within milkweed roots and rhizomes and may weaken plants over time. Monarch butterflies (Danaus plexippus) are attracted to lay eggs on swamp milkweed. In smaller-scale production systems, caterpillars can be hand-picked from production rows and transferred to nearby wild milkweeds before applying treatments for problem insects.
Diseases: Milkweeds are susceptible to a variety of fungal, bacterial, and viral diseases. Cultural methods such as reducing stand size or density, intercropping, and crop rotations may reduce disease spread and severity.
Soil moisture: Plant in naturally wet soils and/or supply irrigation, especially in dry weather.
Note: Refer to Milkweeds: A Conservation Practitioner’s Guide, published by the Xerces Society, for more detailed information on milkweed insects and diseases and their control.
- Seed production
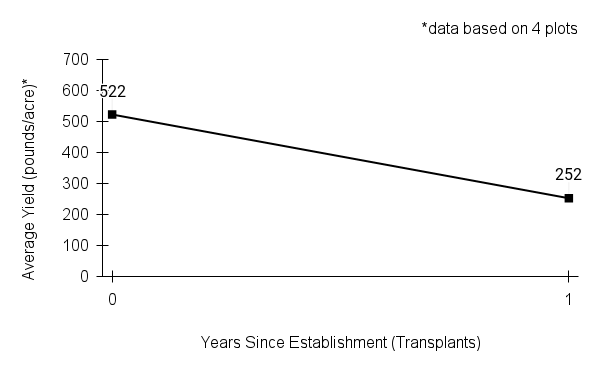 First harvest: Fall of planting year, when started from transplanted plugs.
Yield: 200-300 pounds/acre, with largest harvest in the first year (based on 4 plots)
Stand life: Two years from transplanting. Plants are reported to be longer lived in natural populations.
Flowering date: July in northern Iowa
Seed maturity: Early September - mid-October in northern Iowa
Harvest date range at TPC (2009-2020): Aug 31 - Oct 17
Recommended harvest method: Harvest by hand as pods (follicles) mature; collect pods that are changing color from green to yellowish and split when subjected to gentle pressure on the suture (seam), revealing dark brown seeds.
- Seed cleaning and storage
Cleaning process: Dry pods in cloth bags for two weeks with fan-forced air. Pass pods through a debearder or stationary combine to release seeds and detach fluff. Follow up by fan winnowing (outside on a relatively calm day) to remove most of the fluff. Air-screen the remaining material. Indent cylinder removes broken bits of pods and stems from seed.
Seed storage: cool/dry (orthodox)
Released Germplasm
Source Identified material: Natural Selections/Iowa Ecotype Zones 1, 2, IA
Cultivated varieties: ‘Ice Ballet,’ ‘Cinderella,’ and ‘Milkmaid’
- References
Borders, B. and E. Lee-Mäder. 2014. Milkweeds: A Conservation Practitioner’s Guide. 143 pp. Portland, OR. The Xerces Society for Invertebrate Conservation. https://www.xerces.org/sites/default/files/2018-05/17-031_02_XercesSoc_Milkweeds-Conservation-Guide_web.pdf
Chayka, K. (2010). Asclepias incarnata (swamp milkweed). Minnesota Wildflowers. https://www.minnesotawildflowers.info/flower/swamp-milkweed
Cochrane, T. S., Elliot, K., & Lipke, C. S. (2014). Swamp Milkweed. In Prairie Plants of the University of Wisconsin, Madison Arboretum (3rd ed., p. 55). University of Wisconsin-Madison Arboretum.
Hilty, J. (2020). Swamp Milkweed - Asclepias incarnata. Illinois Wildflowers. https://www.illinoiswildflowers.info/wetland/plants/sw_milkweed.htm
Kartesz, J.T., The Biota of North America Program (BONAP). 2023. North American Plant Atlas. (http://bonap.net/napa). Chapel Hill, N.C. [maps generated from Kartesz, J.T. 2023. Floristic Synthesis of North America, Version 1.0. Biota of North America Program (BONAP). (in press)]
Kirk, S. and Belt, S. (2011). Plant fact sheet for swamp milkweed (Asclepias incarnata). USDA-Natural Resources Conservation Service, Norman A. Berg National Plant Materials Center. Beltsville, MD 20705. https://plants.usda.gov/DocumentLibrary/factsheet/pdf/fs_asin.pdf
NatureServe. 2024. NatureServe Network Biodiversity Location Data accessed through NatureServe Explorer [web application]. NatureServe, Arlington, Virginia. Available https://explorer.natureserve.org/. (Accessed: February 28, 2024).
Runkel, S. T., & Roosa, D. M. (2009). Swamp milkweed. In Wildflowers of the Tallgrass Prairie: The Upper Midwest (Second, p. 179). University of Iowa Press.
Schultz, Jan; Beyer, Patty; Williams, Julie. (2001). Propagation protocol for production of Container (plug) Asclepias incarnata L. plants USDA FS - Hiawatha National Forest Marquette, Michigan. In: Native Plant Network. US Department of Agriculture, Forest Service, National Center for Reforestation, Nurseries, and Genetic Resources. https://NativePlantNetwork.org (accessed 2024/01/09).
Society for Ecological Restoration and Royal Botanic Gardens Kew. (2024). Asclepias incarnata L. SWAMP MILKWEED. Seed Information Database. https://ser-sid.org/species/62fbef4e-ed33-4c71-a18f-f78f9018fda7
University of Wisconsin. (2024). Common milkweed insects. Wisconsin Horticulture, Division of Extension. https://hort.extension.wisc.edu/articles/common-milkweed-insects/
Species Guide Updated 3/5/2024
swamp verbena
swamp verbena sagem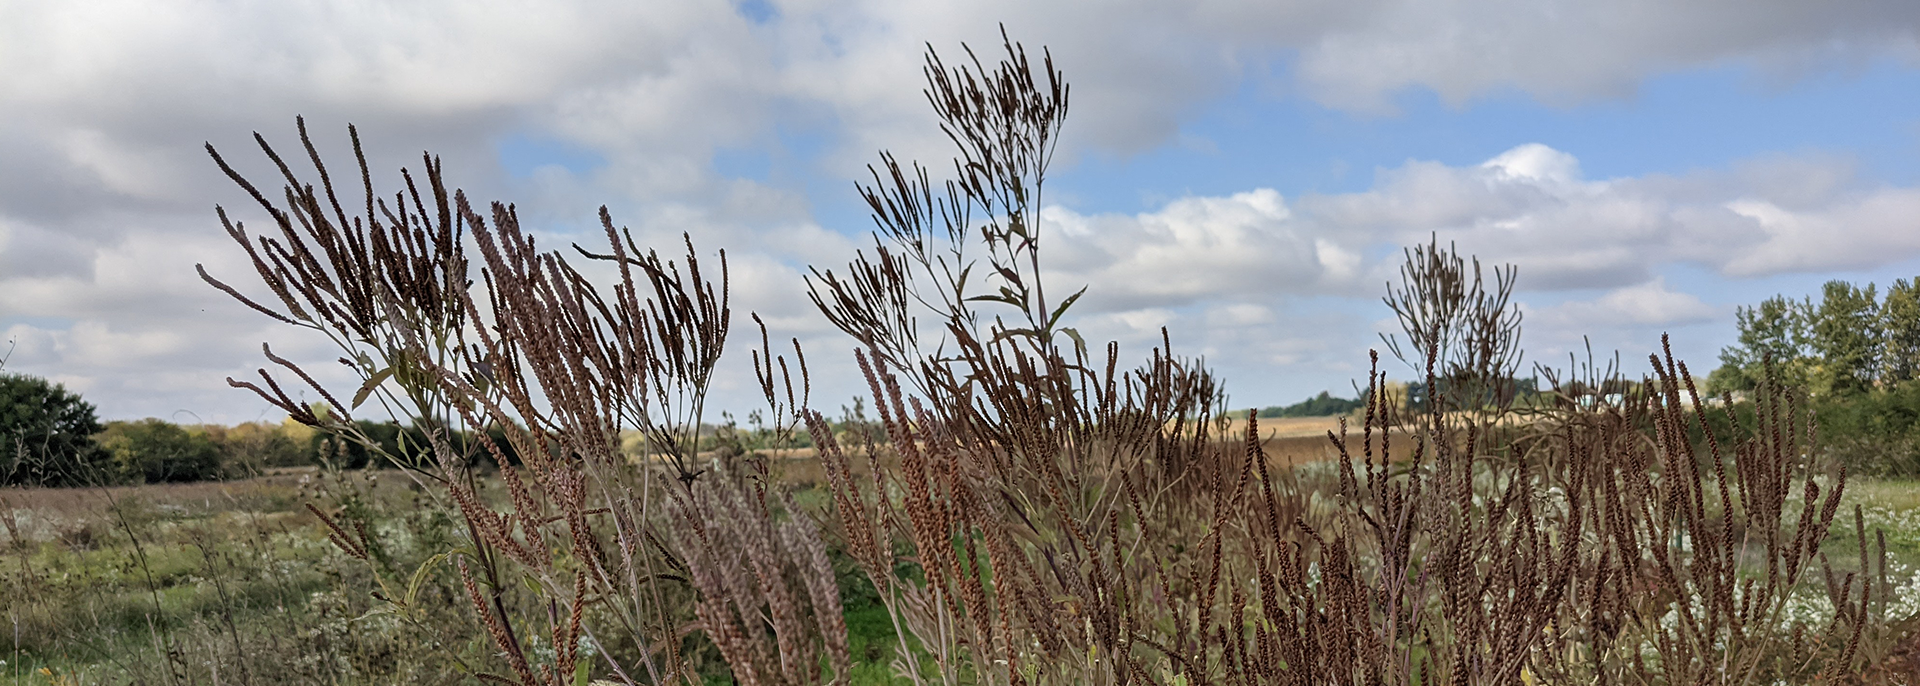
Verbena hastata, L.
Alternate Common Names: blue vervain, simpler’s joy, American blue vervain, American simpler’s joy, wild hyssop
Family: verbena family (Verbenaceae)
Functional Group: forbs (wildflowers)
Description
- Life cycle and growth form
Perennial, short-rhizomatous.
Height: 2-6 ft
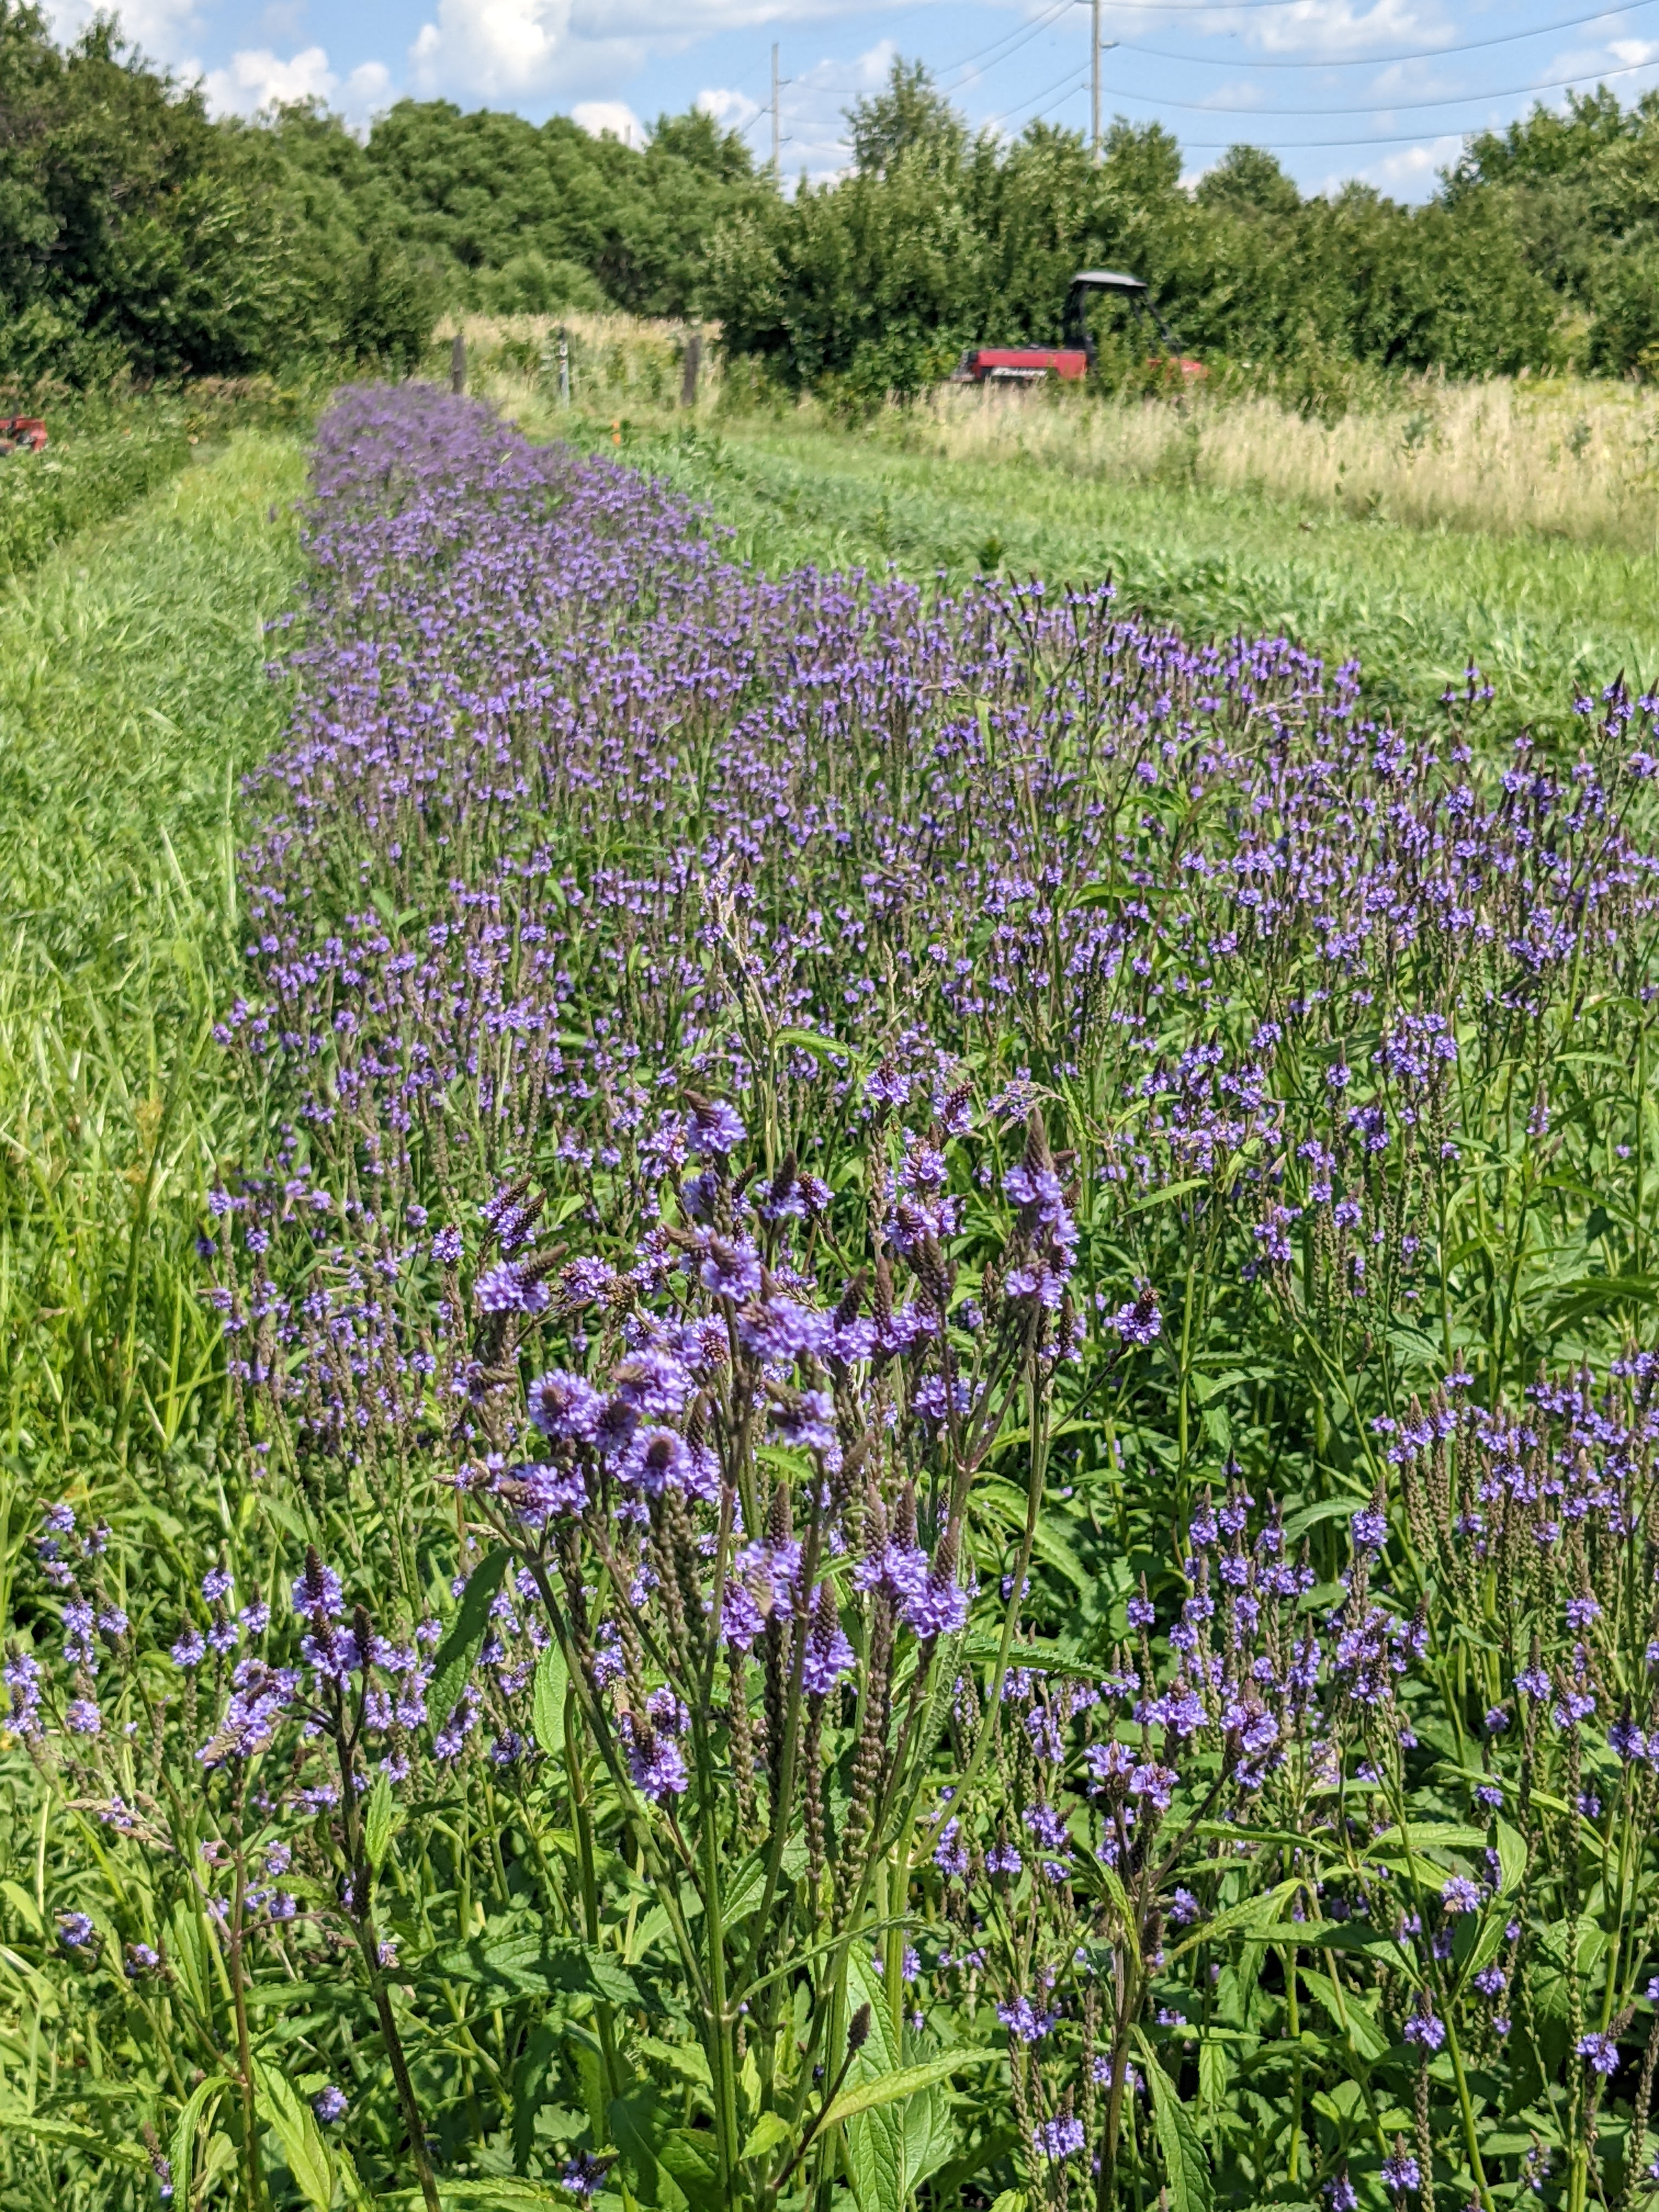
- Leaves and stem
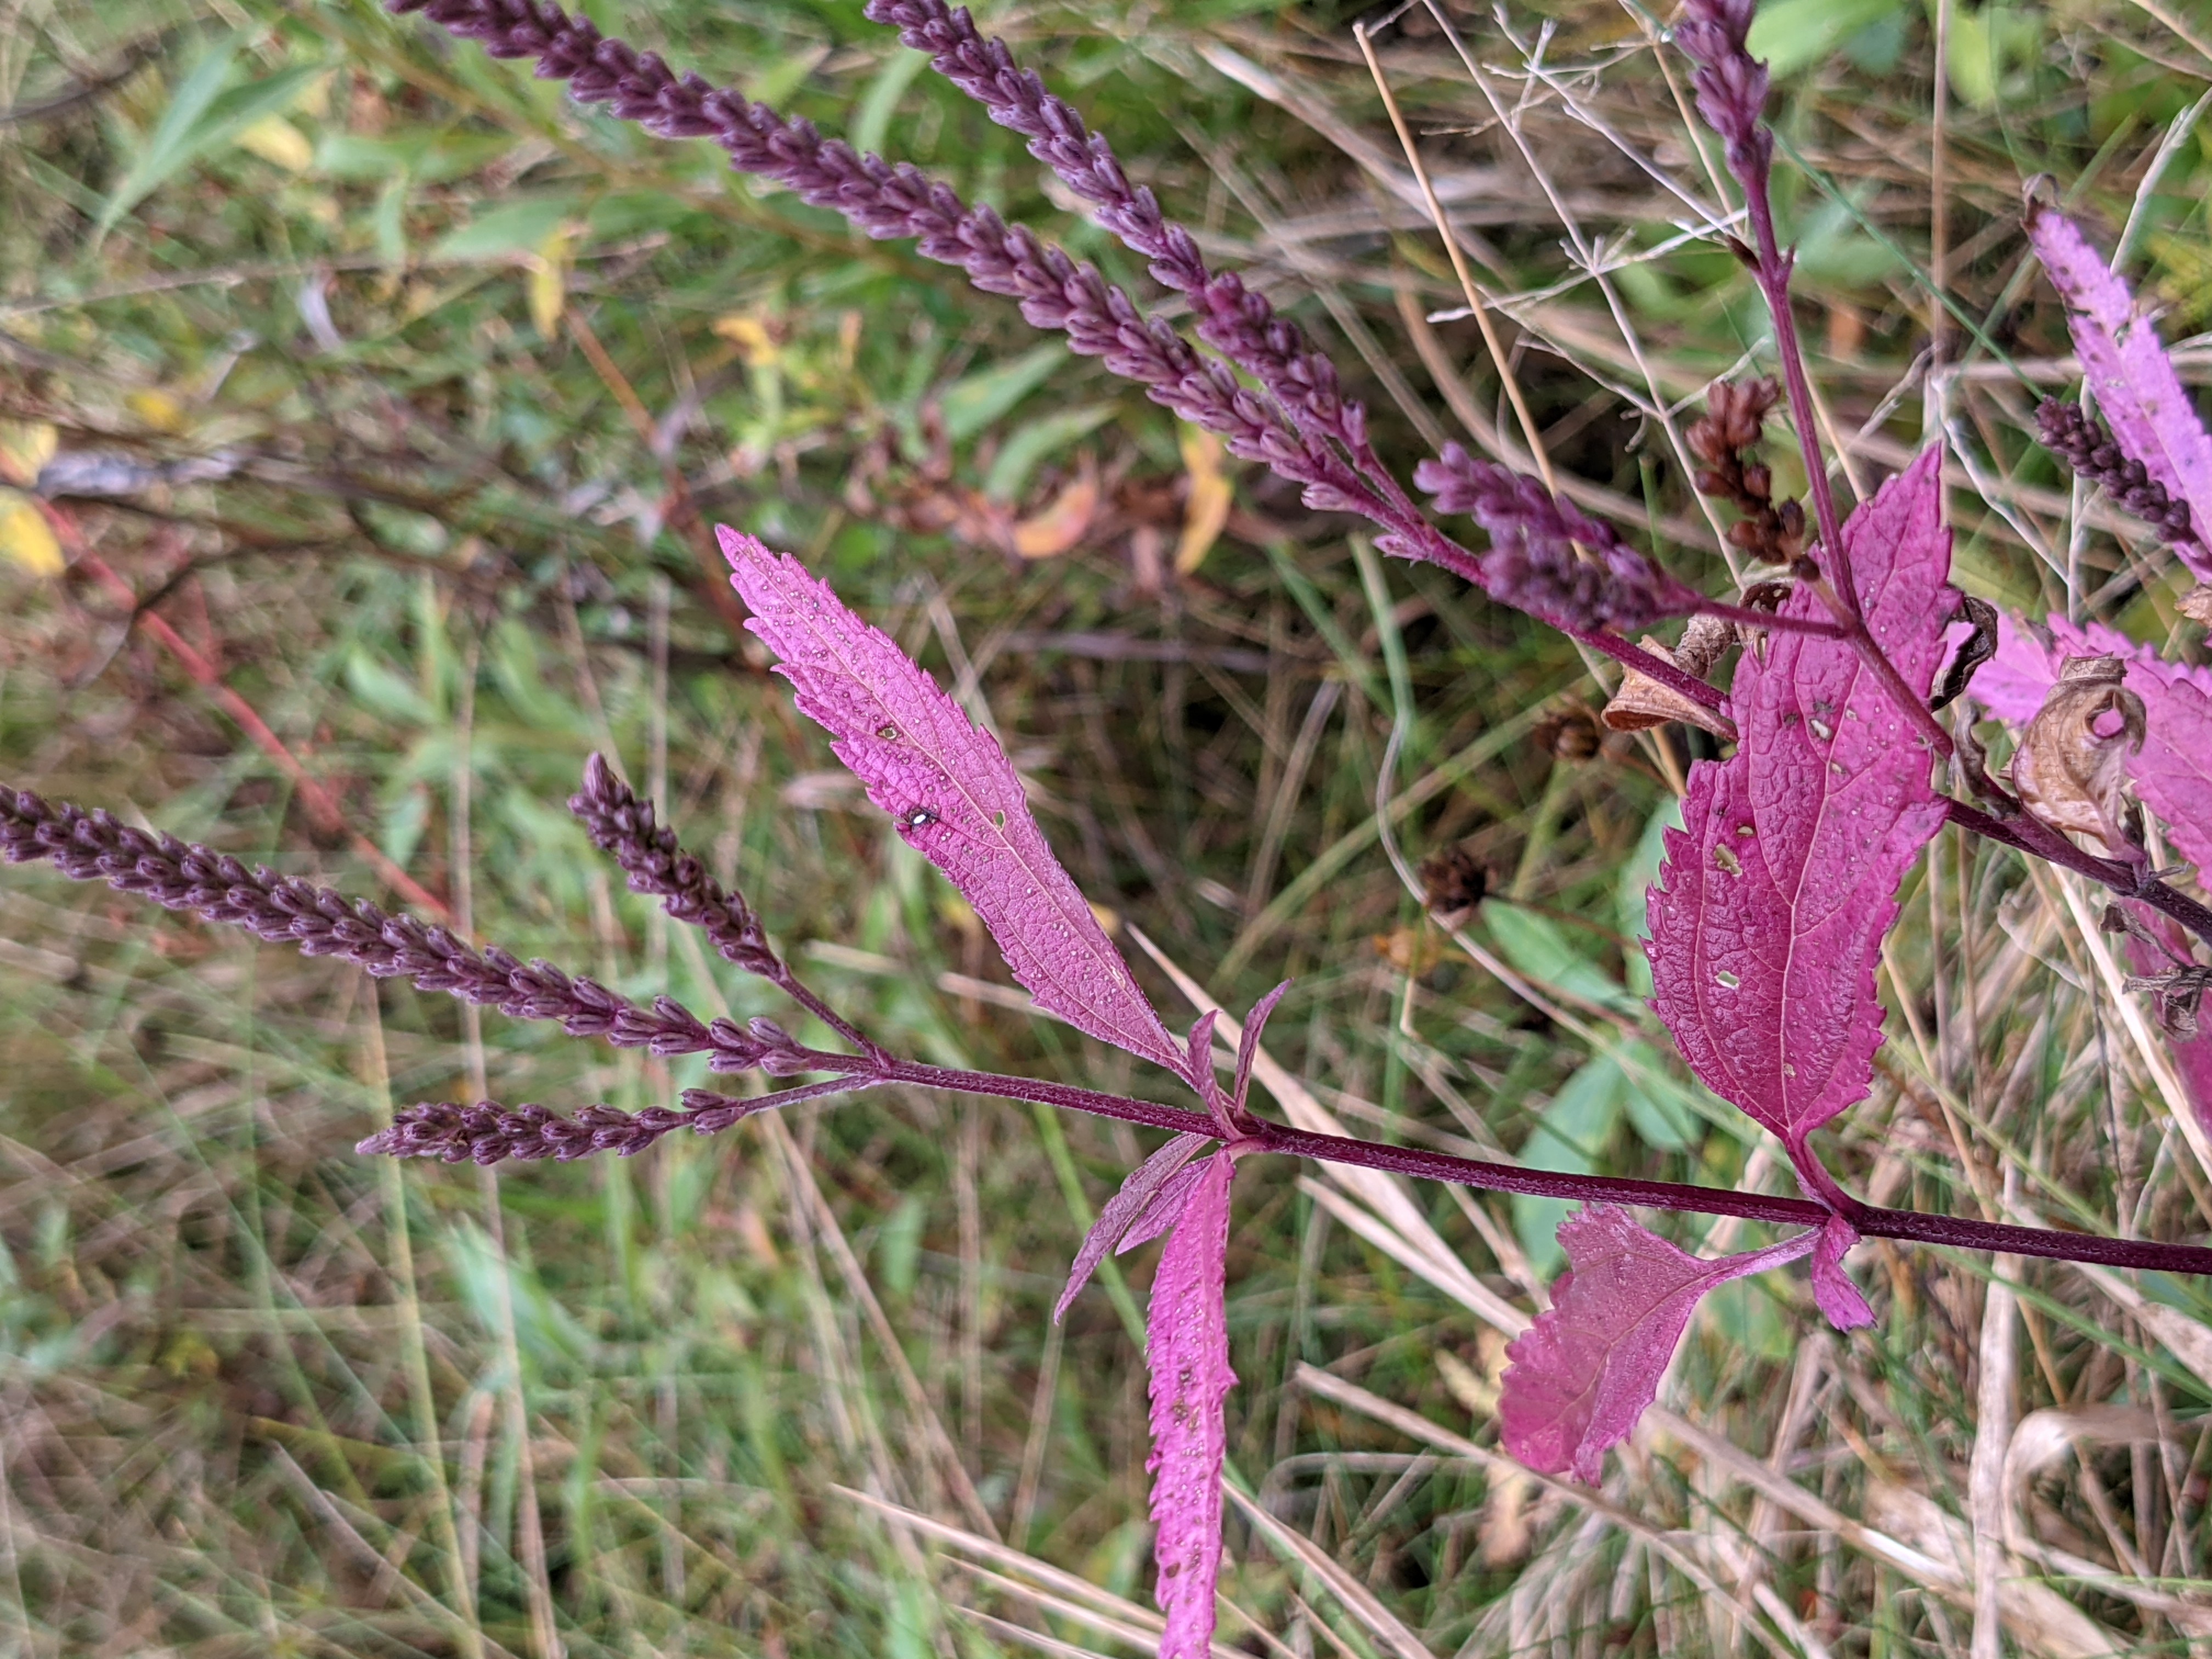
Leaves are opposite, lance-shaped (up to 6 in long and 1 in wide), coarsely toothed, strongly veined above, and usually short-hairy beneath; stems square, grooved, and green to purple, with flattened hairs, often branched in the upper half of the plant.
- Flower, fruit and seedhead
Flower: Individual flowers are blue-purple, ¼ in across, with five expanded lobes (petals) attached to a short tube; flowers are arranged in a branched “candelabra” (panicle) of spikes; spikes elongate through the flowering season as new flowers emerge in whorls (rings) near the tops while seeds (nutlets) mature near their bases.
Fruit/seedhead: Each calyx of fused sepals contains four developing seeds (nutlets); spikes ripen from the bottom up.
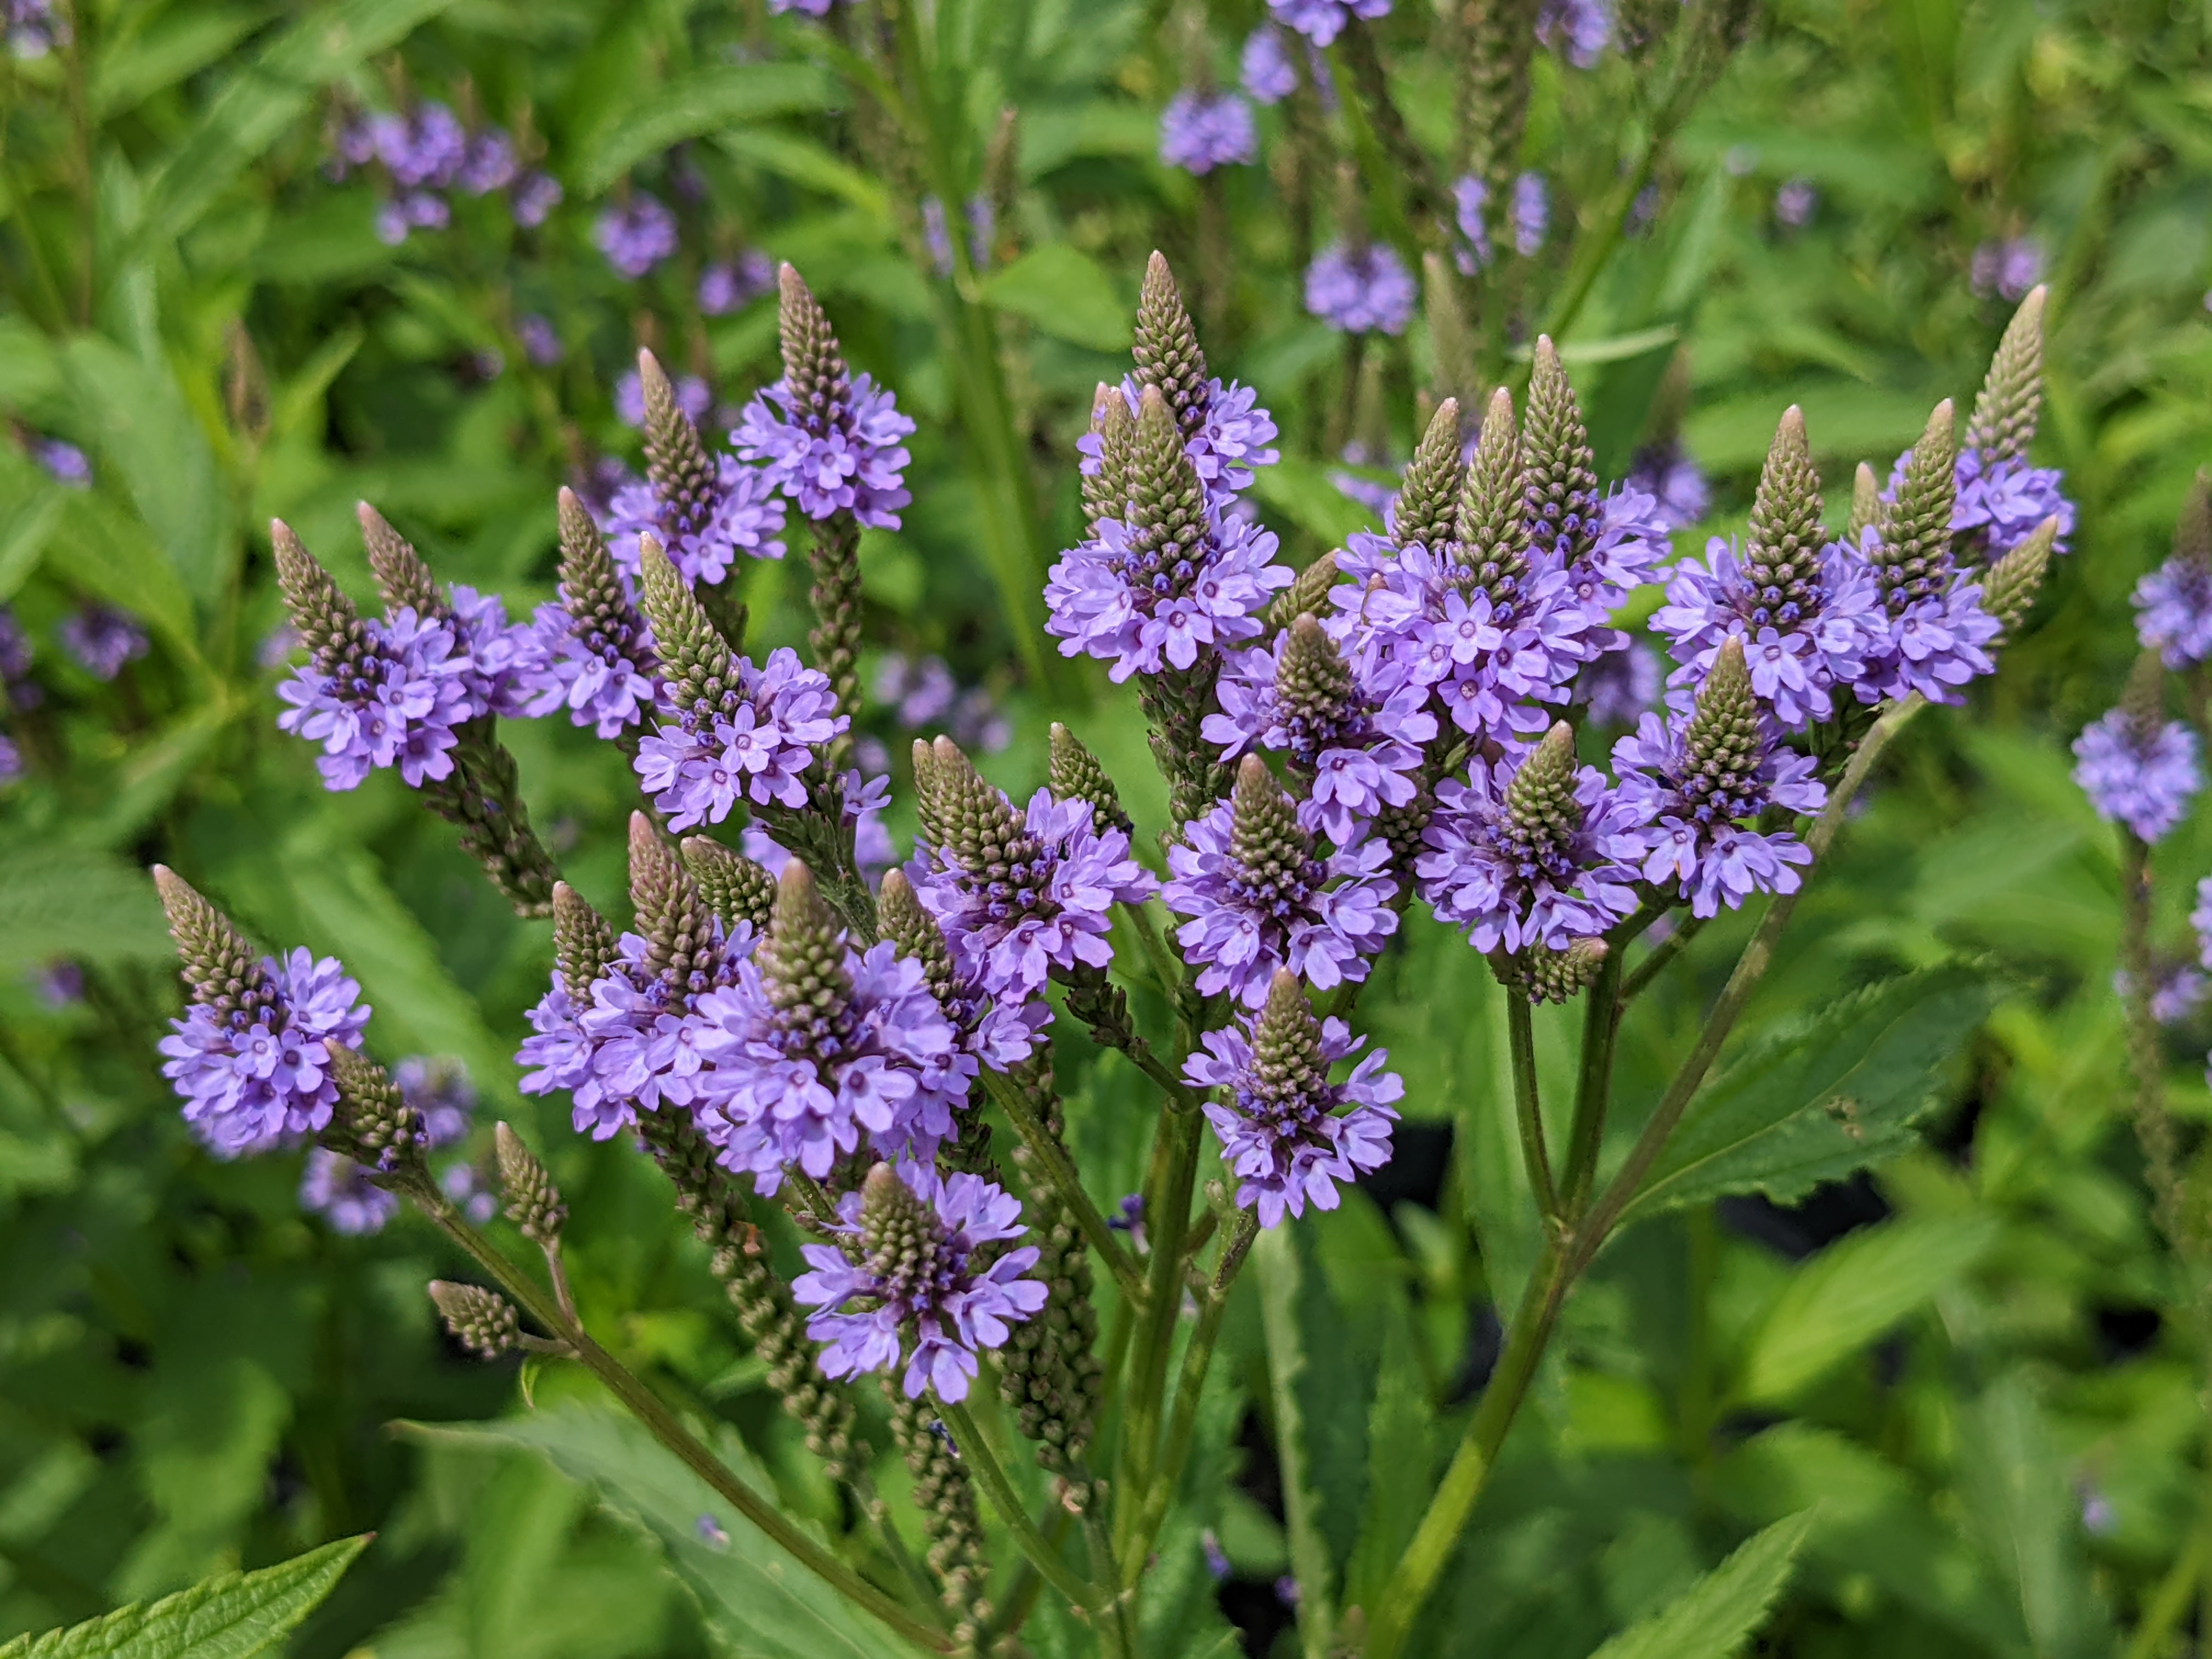
- Seed
Seed characteristics
Seeds per ounce: 93,000 (IA NRCS)
1000 seed weight: 0.23 g (Seed Information Database)
Description: Seed unit is technically a type of dry fruit called a nutlet. Rust-brown nutlets are 2 mm long and approximately 0.5 mm wide.
Typical seed test
PLS: 97%
Purity: 100%
Germination: 13%
Dormancy: 84%
(averages obtained from 5 tests of purchased seed lots)
- Habitat and range
Habitat: Swamp verbena grows best in full sun and moist to wet, organic-rich soils. Plants are typically found in wet places such as wet prairies, sedge meadows, fens, and ditches. Wetland Indicator Status is Facultative Wetland (FACW) for the Midwest. Production fields benefit from irrigation.
Conservation status: Global- G5, secure; North Carolina- S2/S3, imperiled to vulnerable; Wyoming- S3, vulnerable (NatureServe)
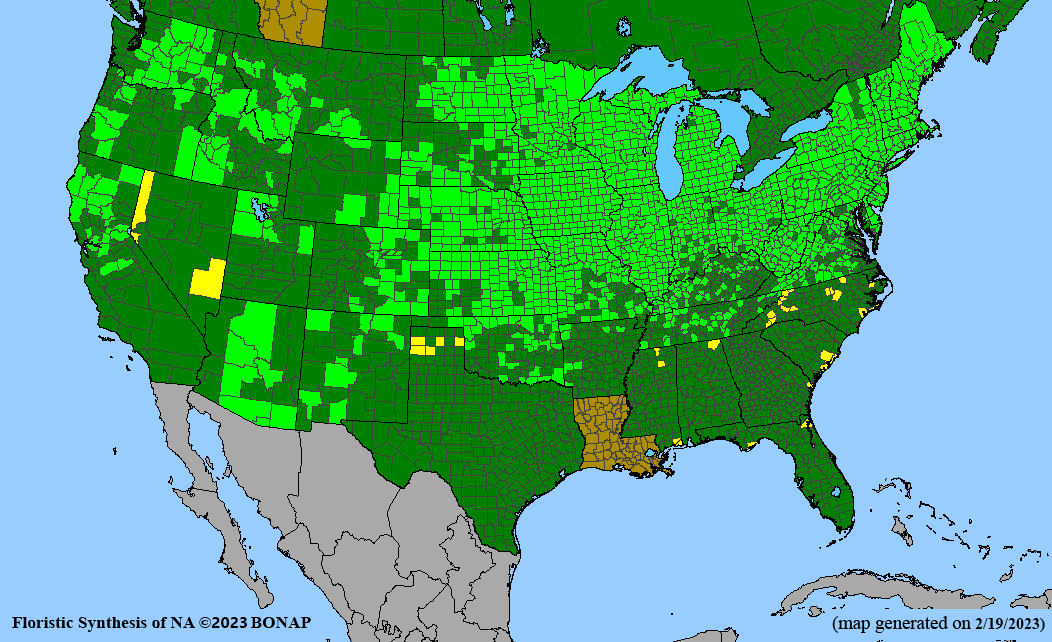
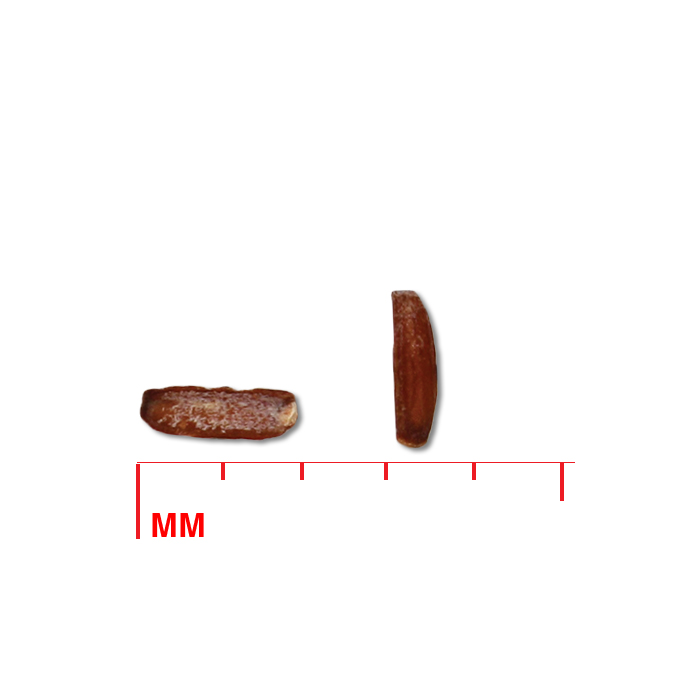
General Comments
Swamp verbena is well suited for planting in moist soils or seasonally wet sites such as roadside ditches. It grows quickly and flowers in the planting year, producing abundant seed that is relatively easy to harvest and clean. Most mammalian herbivores avoid the bitter foliage, hence this species has persisted even in heavily grazed, wet prairie pastures. Swamp verbena has a long flowering period and is visited by diverse species of bees and small butterflies. The seeds are eaten by native sparrows and juncos. Swamp verbena has numerous uses in traditional Native medicine, including as a treatment for digestive and obstetric complaints. Caution: Extracts of this species are known to interfere with prescription medication and can cause vomiting and diarrhea in high doses.
Recommendations for Seed Production
- Establishment for seed production
Direct seeding
We do not have experience direct seeding this species for seed production.
Seeding rate: 0.5 PLS pounds/acre (40 seeds/linear foot)
Row spacing: 30-36 in rows
Seeding time: Dormant (needs 30-90 days cold stratification).
Seeding depth: surface
Weed control: Prepare clean, firm, weed free seedbed prior to seeding.
Greenhouse
Seed pre-treatment: Cold/moist stratification is recommended. Different sources suggest a minimum of 30 days (RNGR) up to 3 months (NRCS Plant Guide). Most northern Iowa accessions showed high rates of germination after 30 day stratification, but a few accessions appeared to have a higher degree of dormancy. In these cases, we saw a second flush of germination after a week of very high temperatures in the greenhouse, more than 2 months after sowing.
Sowing: Sow seed on surface of germination mix (light needed for germination).
Transplanting: Seedlings grow rapidly with fibrous root systems that form firm plugs for transplanting. Plan on sowing seed in greenhouse containers 8-10 weeks before transplanting. If seedlings grow too tall in plug trays, they should be pinched back to adjust the shoot:root ratio.
- Stand management
Hybridization: Maintain separation between fields of swamp verbena and other species in the genus Verbena (e.g., hoary vervain, Verbena stricta) as hybrids readily form.
Weeds: Plastic mulch prevents weed competition in the first year, and tall fast-growing verbena plants are fairly competitive. Holes in the plastic may need to be widened to accommodate rhizomatous spread in the second and subsequent years. Focus weeding or roguing efforts on weeds that could contaminate the seed (i.e., species with small, elongated seed).
Pests: None noted. Bitter foliage deters mammalian herbivores.
Diseases: None noted, though plants appear to be short-lived (2-4 years) in production rows.
Soil moisture: Irrigation is recommended.
- Seed production
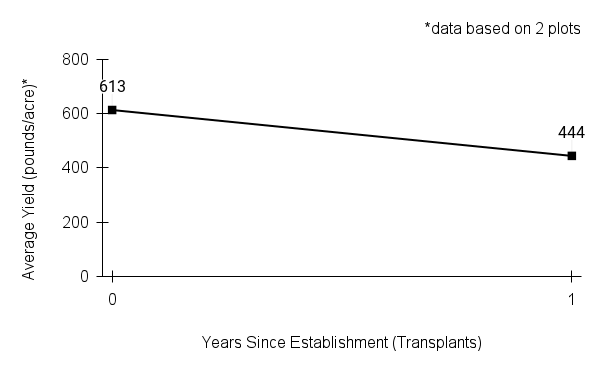 First harvest: In planting year, when grown from transplants.
Yield: 440-610 pounds/acre (based on 2 plots)
Stand life: Estimated 3-4 years, with peak harvest in year one.
Flowering date: late June - September
Seed maturity/Harvest date: mid-September - mid-October
Harvest date range at TPC (2021-2023): Sept 16 - Oct 19
Recommended harvest method: Seed heads turn from green to purple to brown as they mature. Harvest when all, or nearly all, parts of the spikes have turned brown. Some seeds will shatter from lower parts of spikes as the seeds in the upper parts mature, but most seed is retained on the plant. Hand harvest early maturing individuals to preserve genetic diversity, then combine the rest of the plot at peak maturity.
- Seed cleaning and storage
Cleaning process
Hand-collected material: Dry on tarp or in a cloth bag for 2 weeks. Thresh by passing through a stationary combine or by stomping/beating material on the tarp or in a plastic tub. Pass through a ¼ in and ⅛ in mesh to remove sticks before airscreening.
Combined material: Dry for two weeks. Pass through ¼ in and ⅛ in mesh to remove larger sticks (if any) before airscreening.
Note: Airscreening one-two times results in a very pure product.
Seed storage
cool/dry (orthodox)
Released Germplasm
Source Identified material: Natural Selections/Iowa Ecotype Zone NI
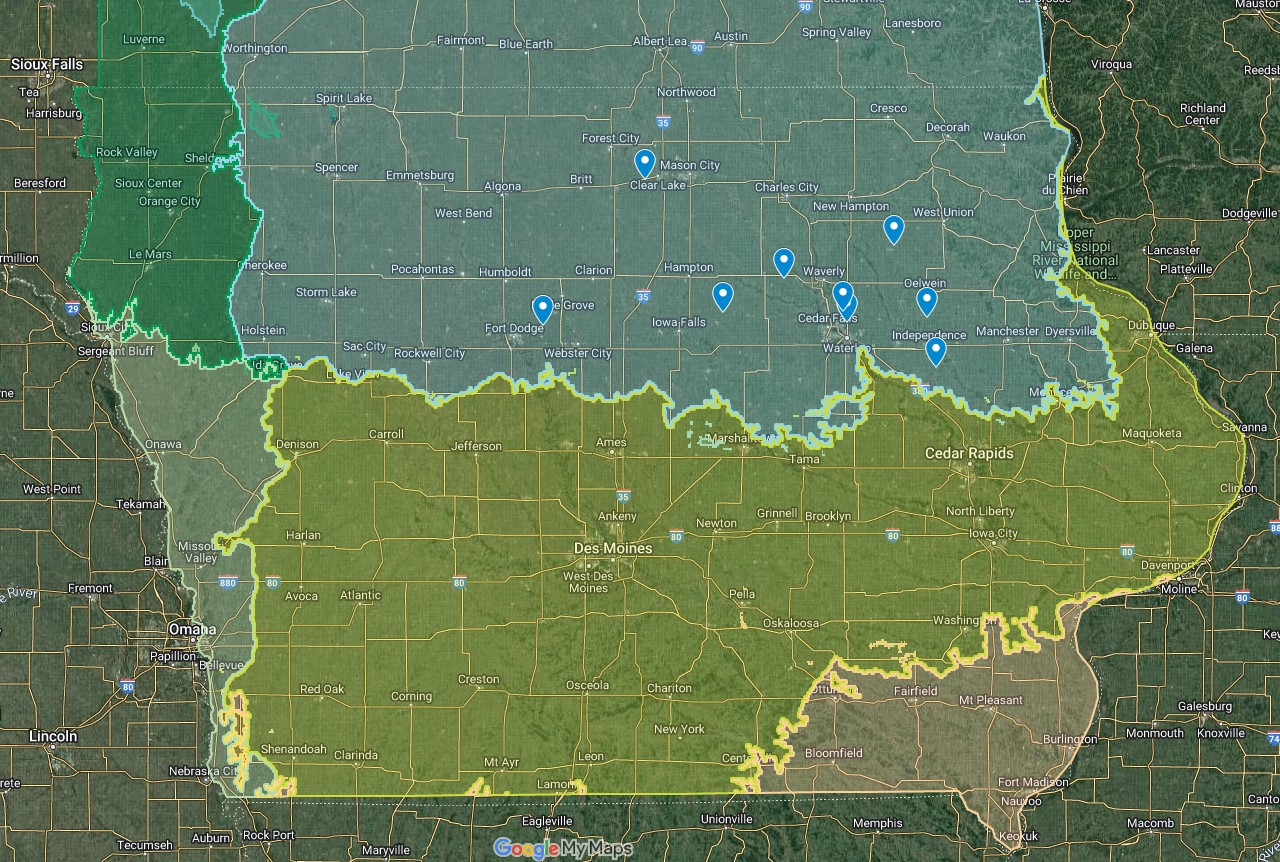
- References
Chayka, Katy. (n.d.). Verbena hastata (Blue Vervain). Minnesota Wildflowers. https://www.minnesotawildflowers.info/flower/blue-vervain
Hilty, J. (2019). Blue vervain - Verbena hastata. Illinois Wildflowers. https://www.illinoiswildflowers.info/wetland/plants/bl_vervain.htm
Kartesz, J.T., The Biota of North America Program (BONAP). 2023. North American Plant Atlas. (http://bonap.net/napa). Chapel Hill, N.C. [maps generated from Kartesz, J.T. 2023. Floristic Synthesis of North America, Version 1.0. Biota of North America Program (BONAP). (in press)]
Kirk, S. and S.Belt. (2010). Plant fact sheet for blue vervain (Verbena hastata). USDA-Natural Resources Conservation Service, Norman A. Berg National Plant Materials Center. Beltsville, MD 20705.
Moerman, D. (2003). Native American ethnobotany database. BRIT. http://naeb.brit.org/
NatureServe. 2024. NatureServe Network Biodiversity Location Data accessed through NatureServe Explorer [web application]. NatureServe, Arlington, Virginia. Available https://explorer.natureserve.org/. (Accessed: February 28, 2024).
Society for Ecological Restoration, International Network for Seed Based Restoration and Royal Botanic Gardens Kew. (2023) Seed Information Database (SID). Available from: https://ser-sid.org/ (February 2023)
USDA-NRCS. (2022). Iowa NRCS Conservation Cover Native Seeding Calculator. https://www.nrcs.usda.gov/wps/cmis_proxy/https/ecm.nrcs.usda.gov%3A443/fncmis/resources/WEBP/ContentStream/idd_D0038083-0000-C716-9B80-F4A34594D552/0/327_IA_OTH_Conservation_Cover-Native_Seeding_Calculator_2022.xlsm
USDA NRCS National Plant Data Team. (n.d.). Verbena hastata L. USDA plants database. https://plants.usda.gov/home/plantProfile?symbol=VEHA2
Species Guide Updated 3/5/2024
white sagebrush
white sagebrush parkecag
Artemisia ludoviciana, Nutt.
Alternate Common Names: white sage, prairie sage, western mugwort, Louisiana sage, prairie wormwood, cudweed, mugwort, dark-leaved mugwort, sagewort, western sage, sailor’s tobacco, sagebrush
Scientific Synonym: Artemisia vulgaris var. ludoviciana (Nuttall) Kuntze
Functional Group: forbs (wildflowers)
Family: aster or sunflower family (Asteraceae)
Description
- Life cycle and growth form
Perennial, spreading by rhizomes to form large colonies that exclude some other plants.
Height: 1-3 ft
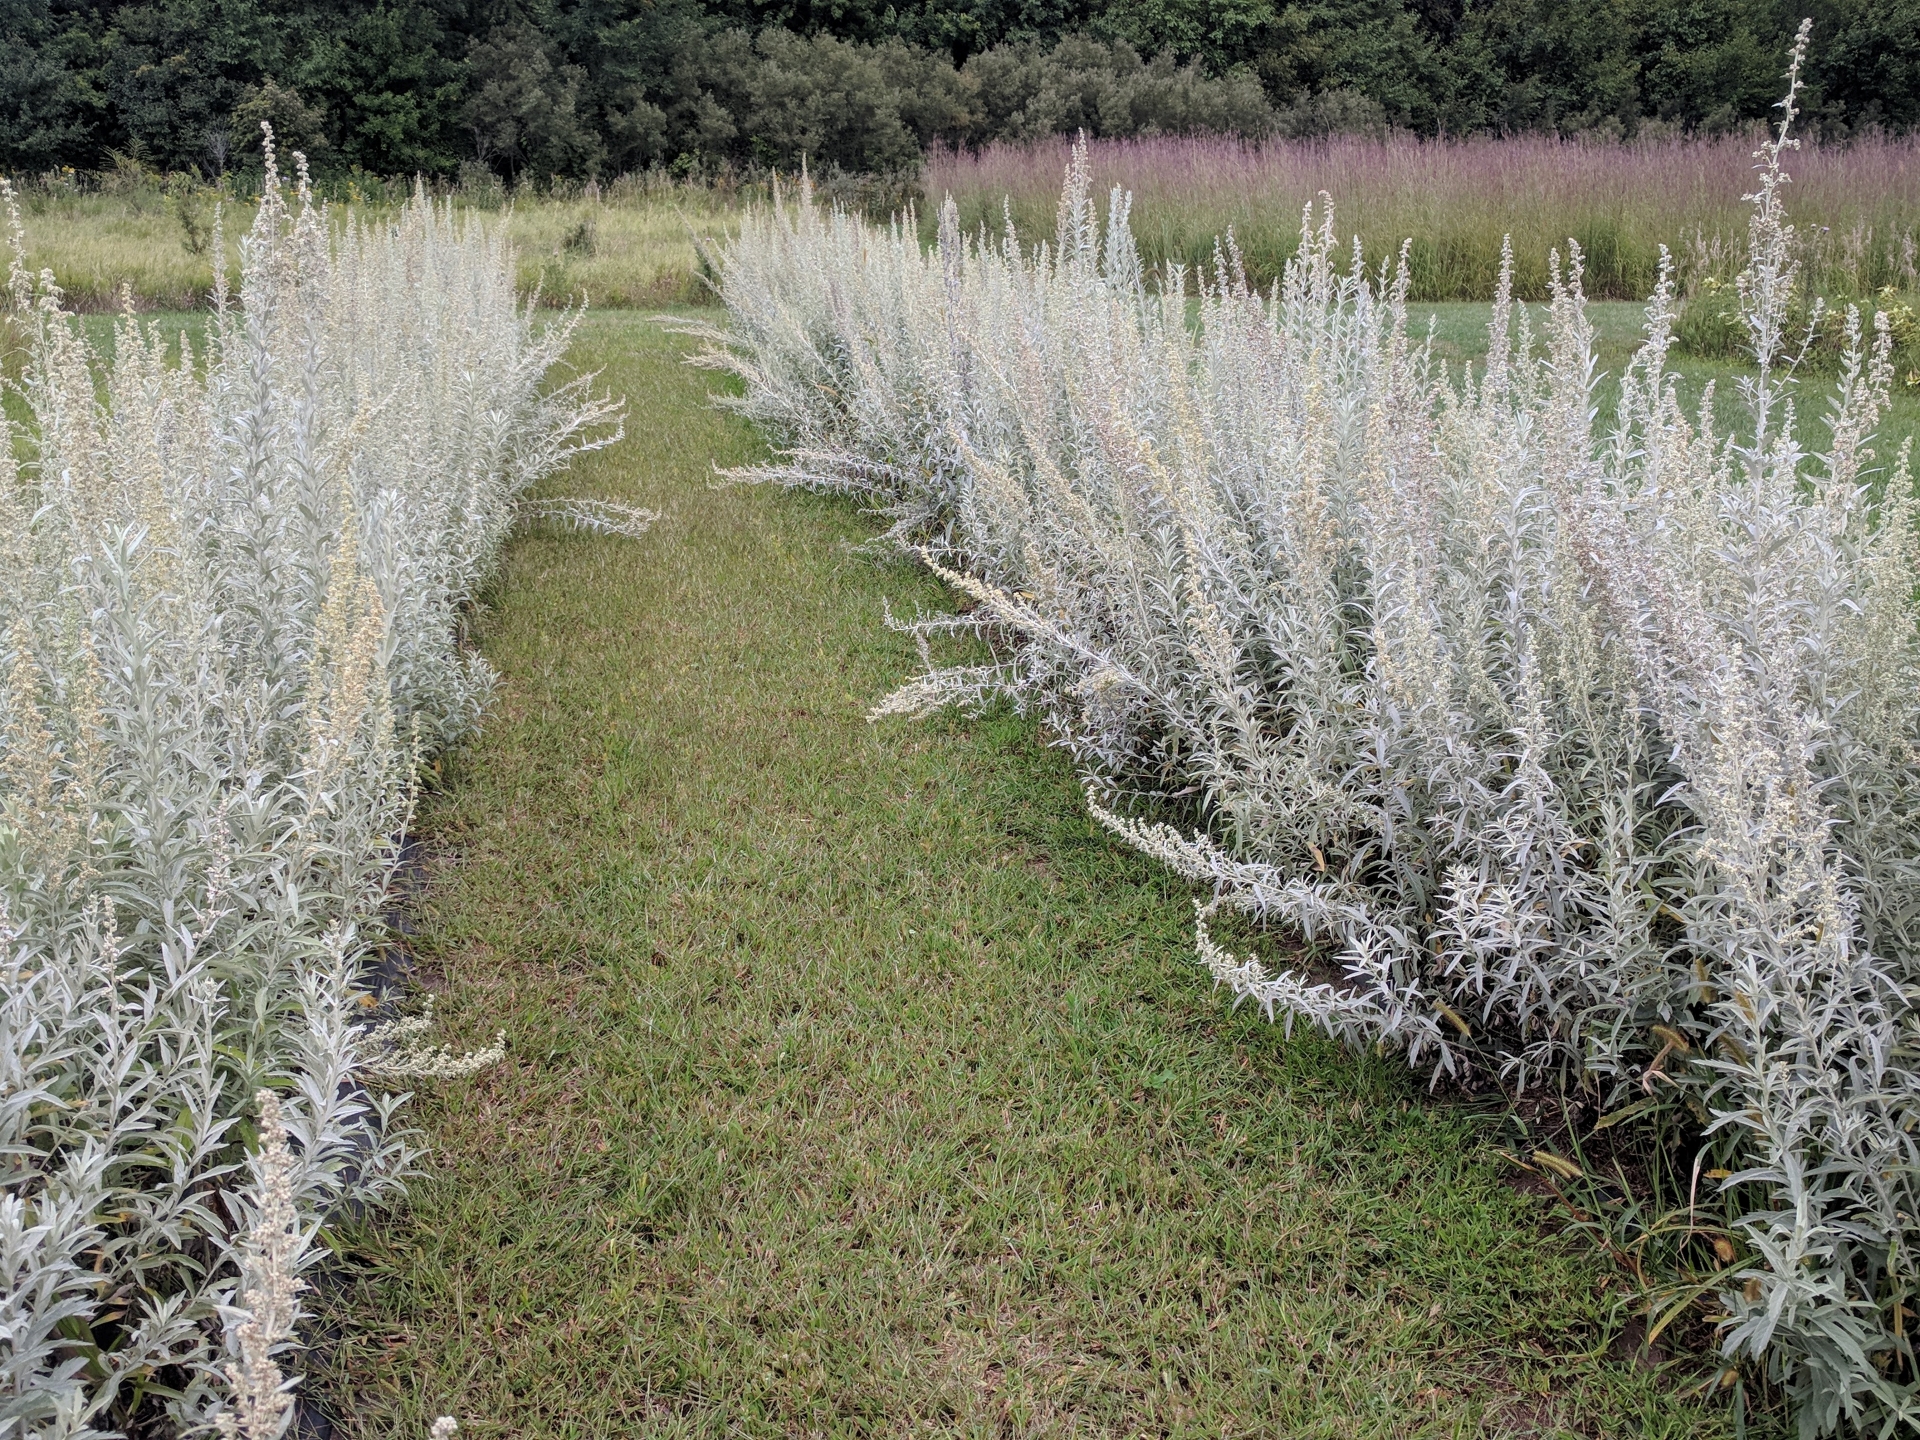
- Leaves and stem
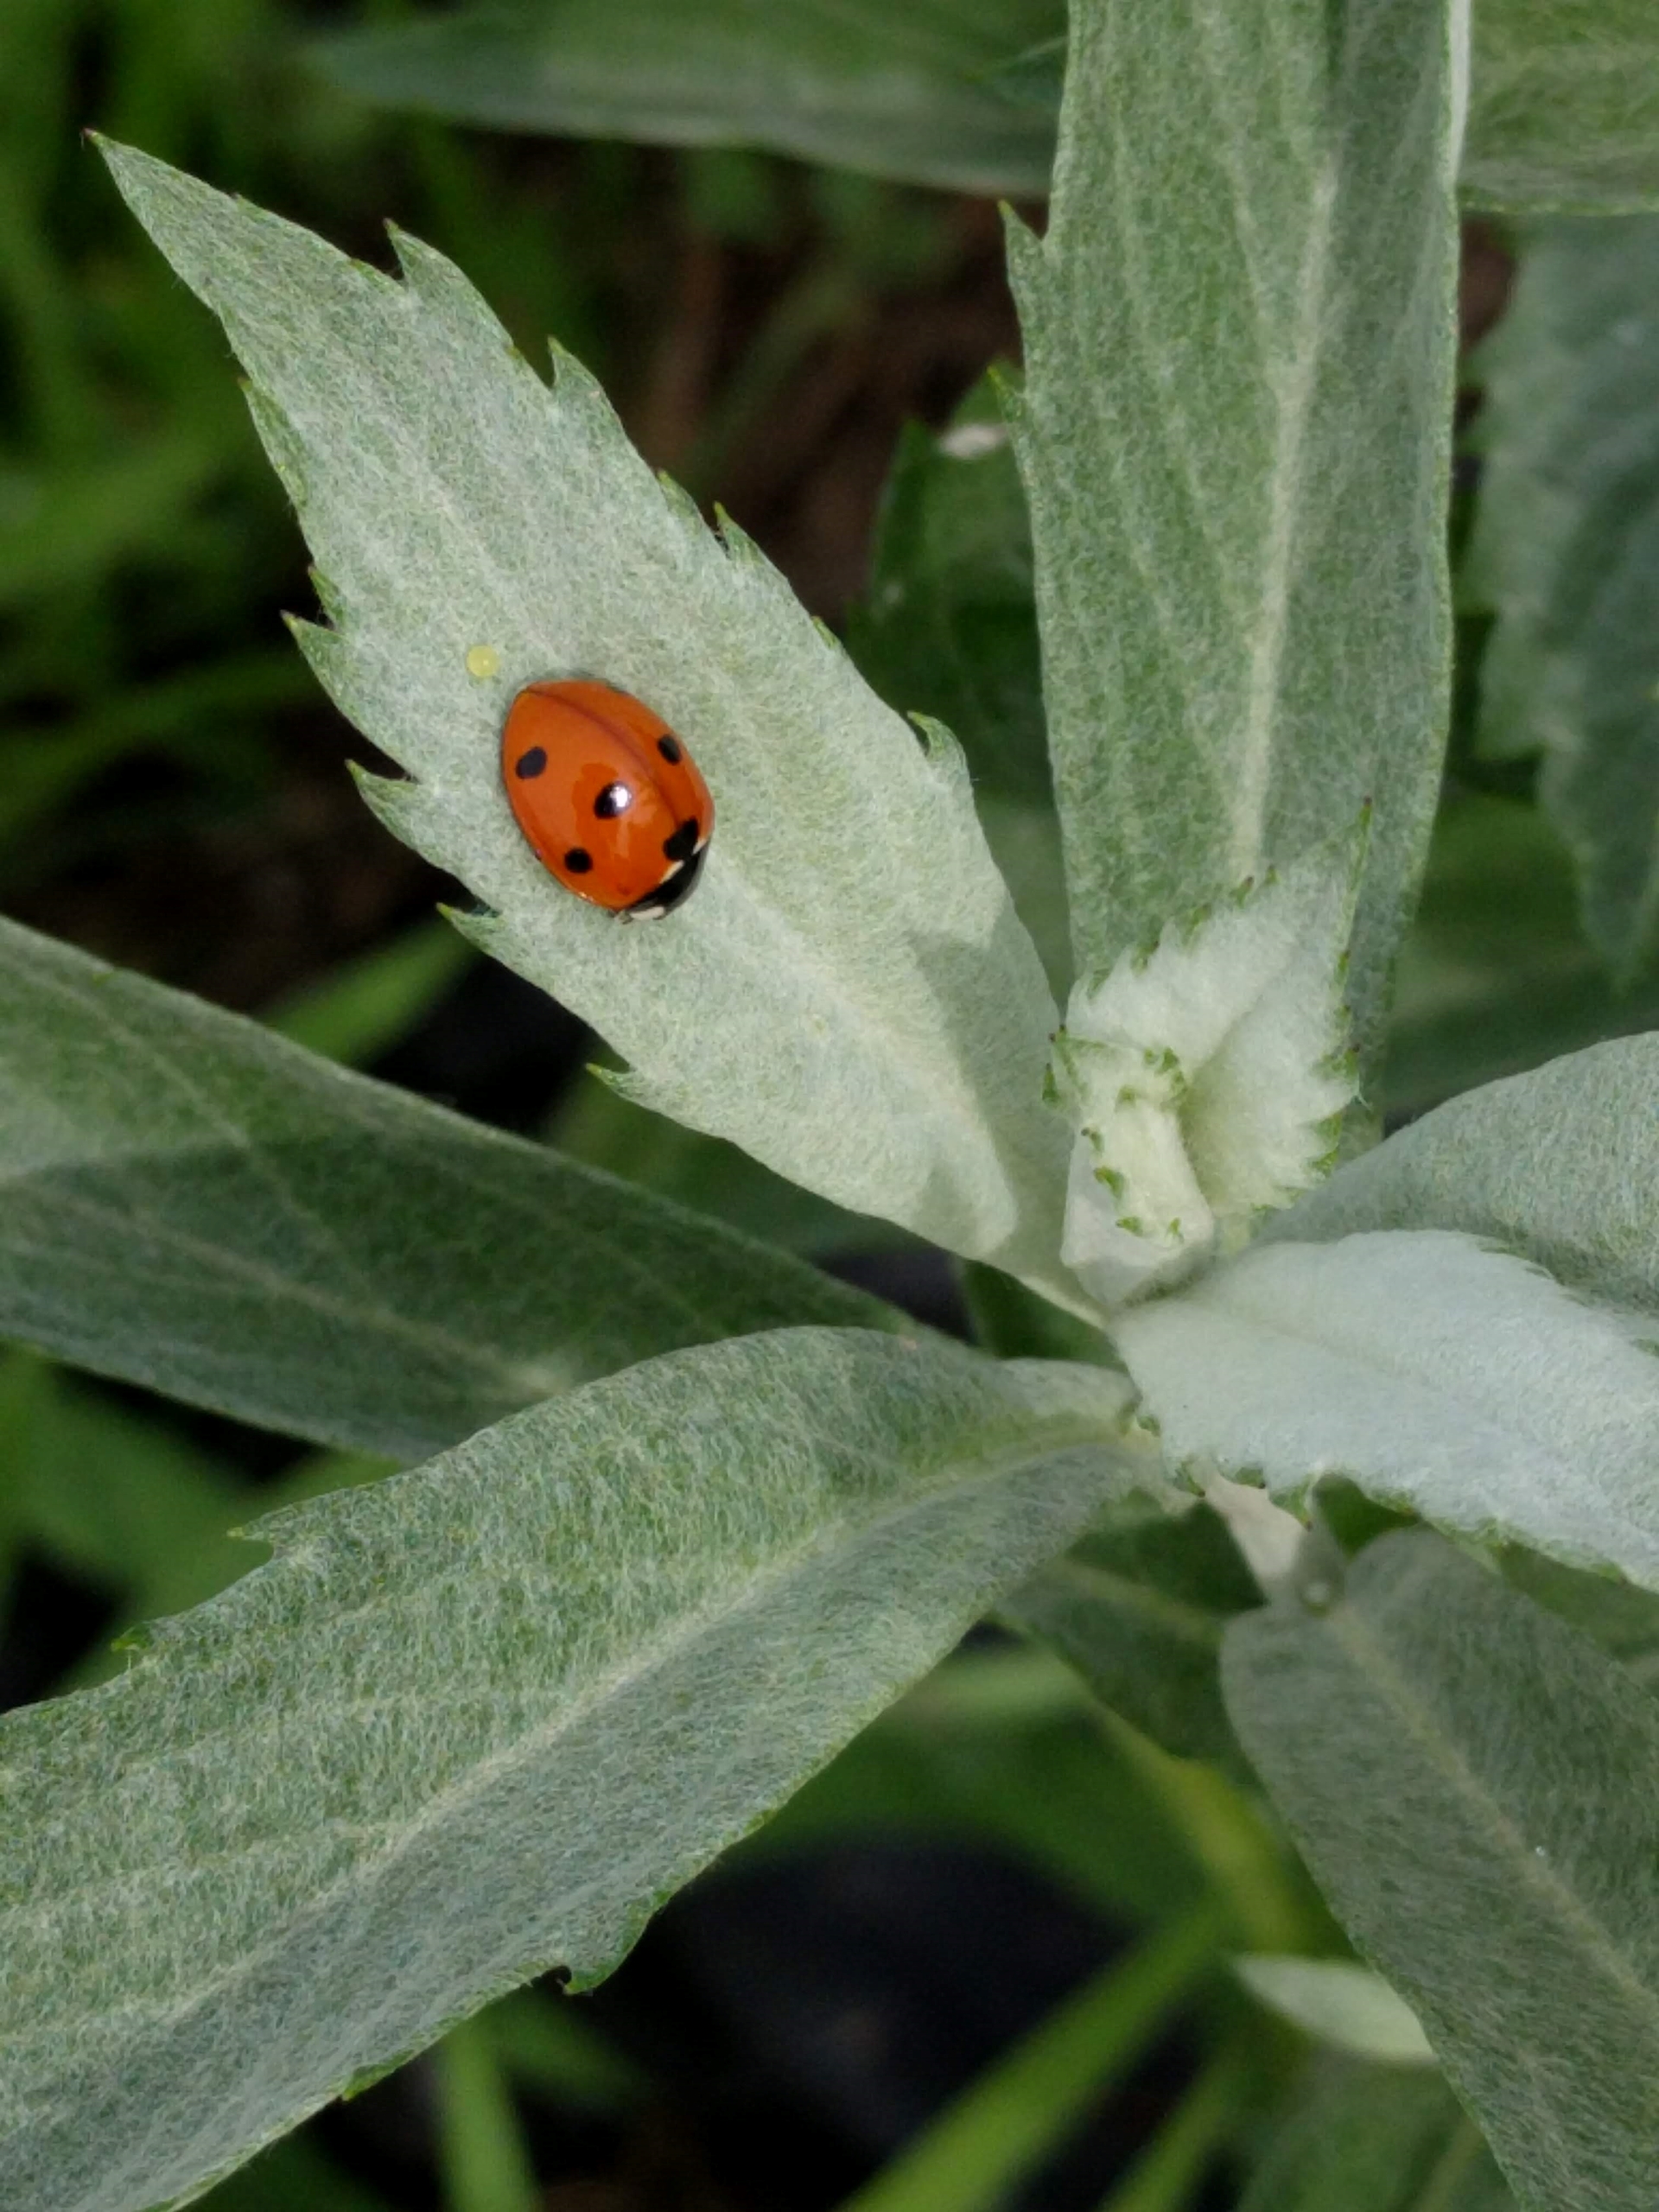
Alternate leaves, aromatic when crushed, of variable shape but mostly narrow, elongated ellipses up to 1 in wide and 3.5 (occasionally up to 5) in long, short-stalked or sessile, with silvery-white hairs on leaves and stems giving them a felt-like texture; stems may be branched or unbranched.
- Flower, fruit and seedhead
Flower: Individual florets are inconspicuous within silvery, barrel-shaped, ⅛ in heads arranged in clusters in upper leaf axils or in spike-like to open, branched arrays up to 17 in in length; at full flowering, yellow stamens and minute, yellow to reddish corollas may be visible; wind-pollinated.
Fruit/seedhead: Roughly cylindrical in shape, approximately ⅛ in long, pappus is absent, heads open to release seed (achenes) when mature.
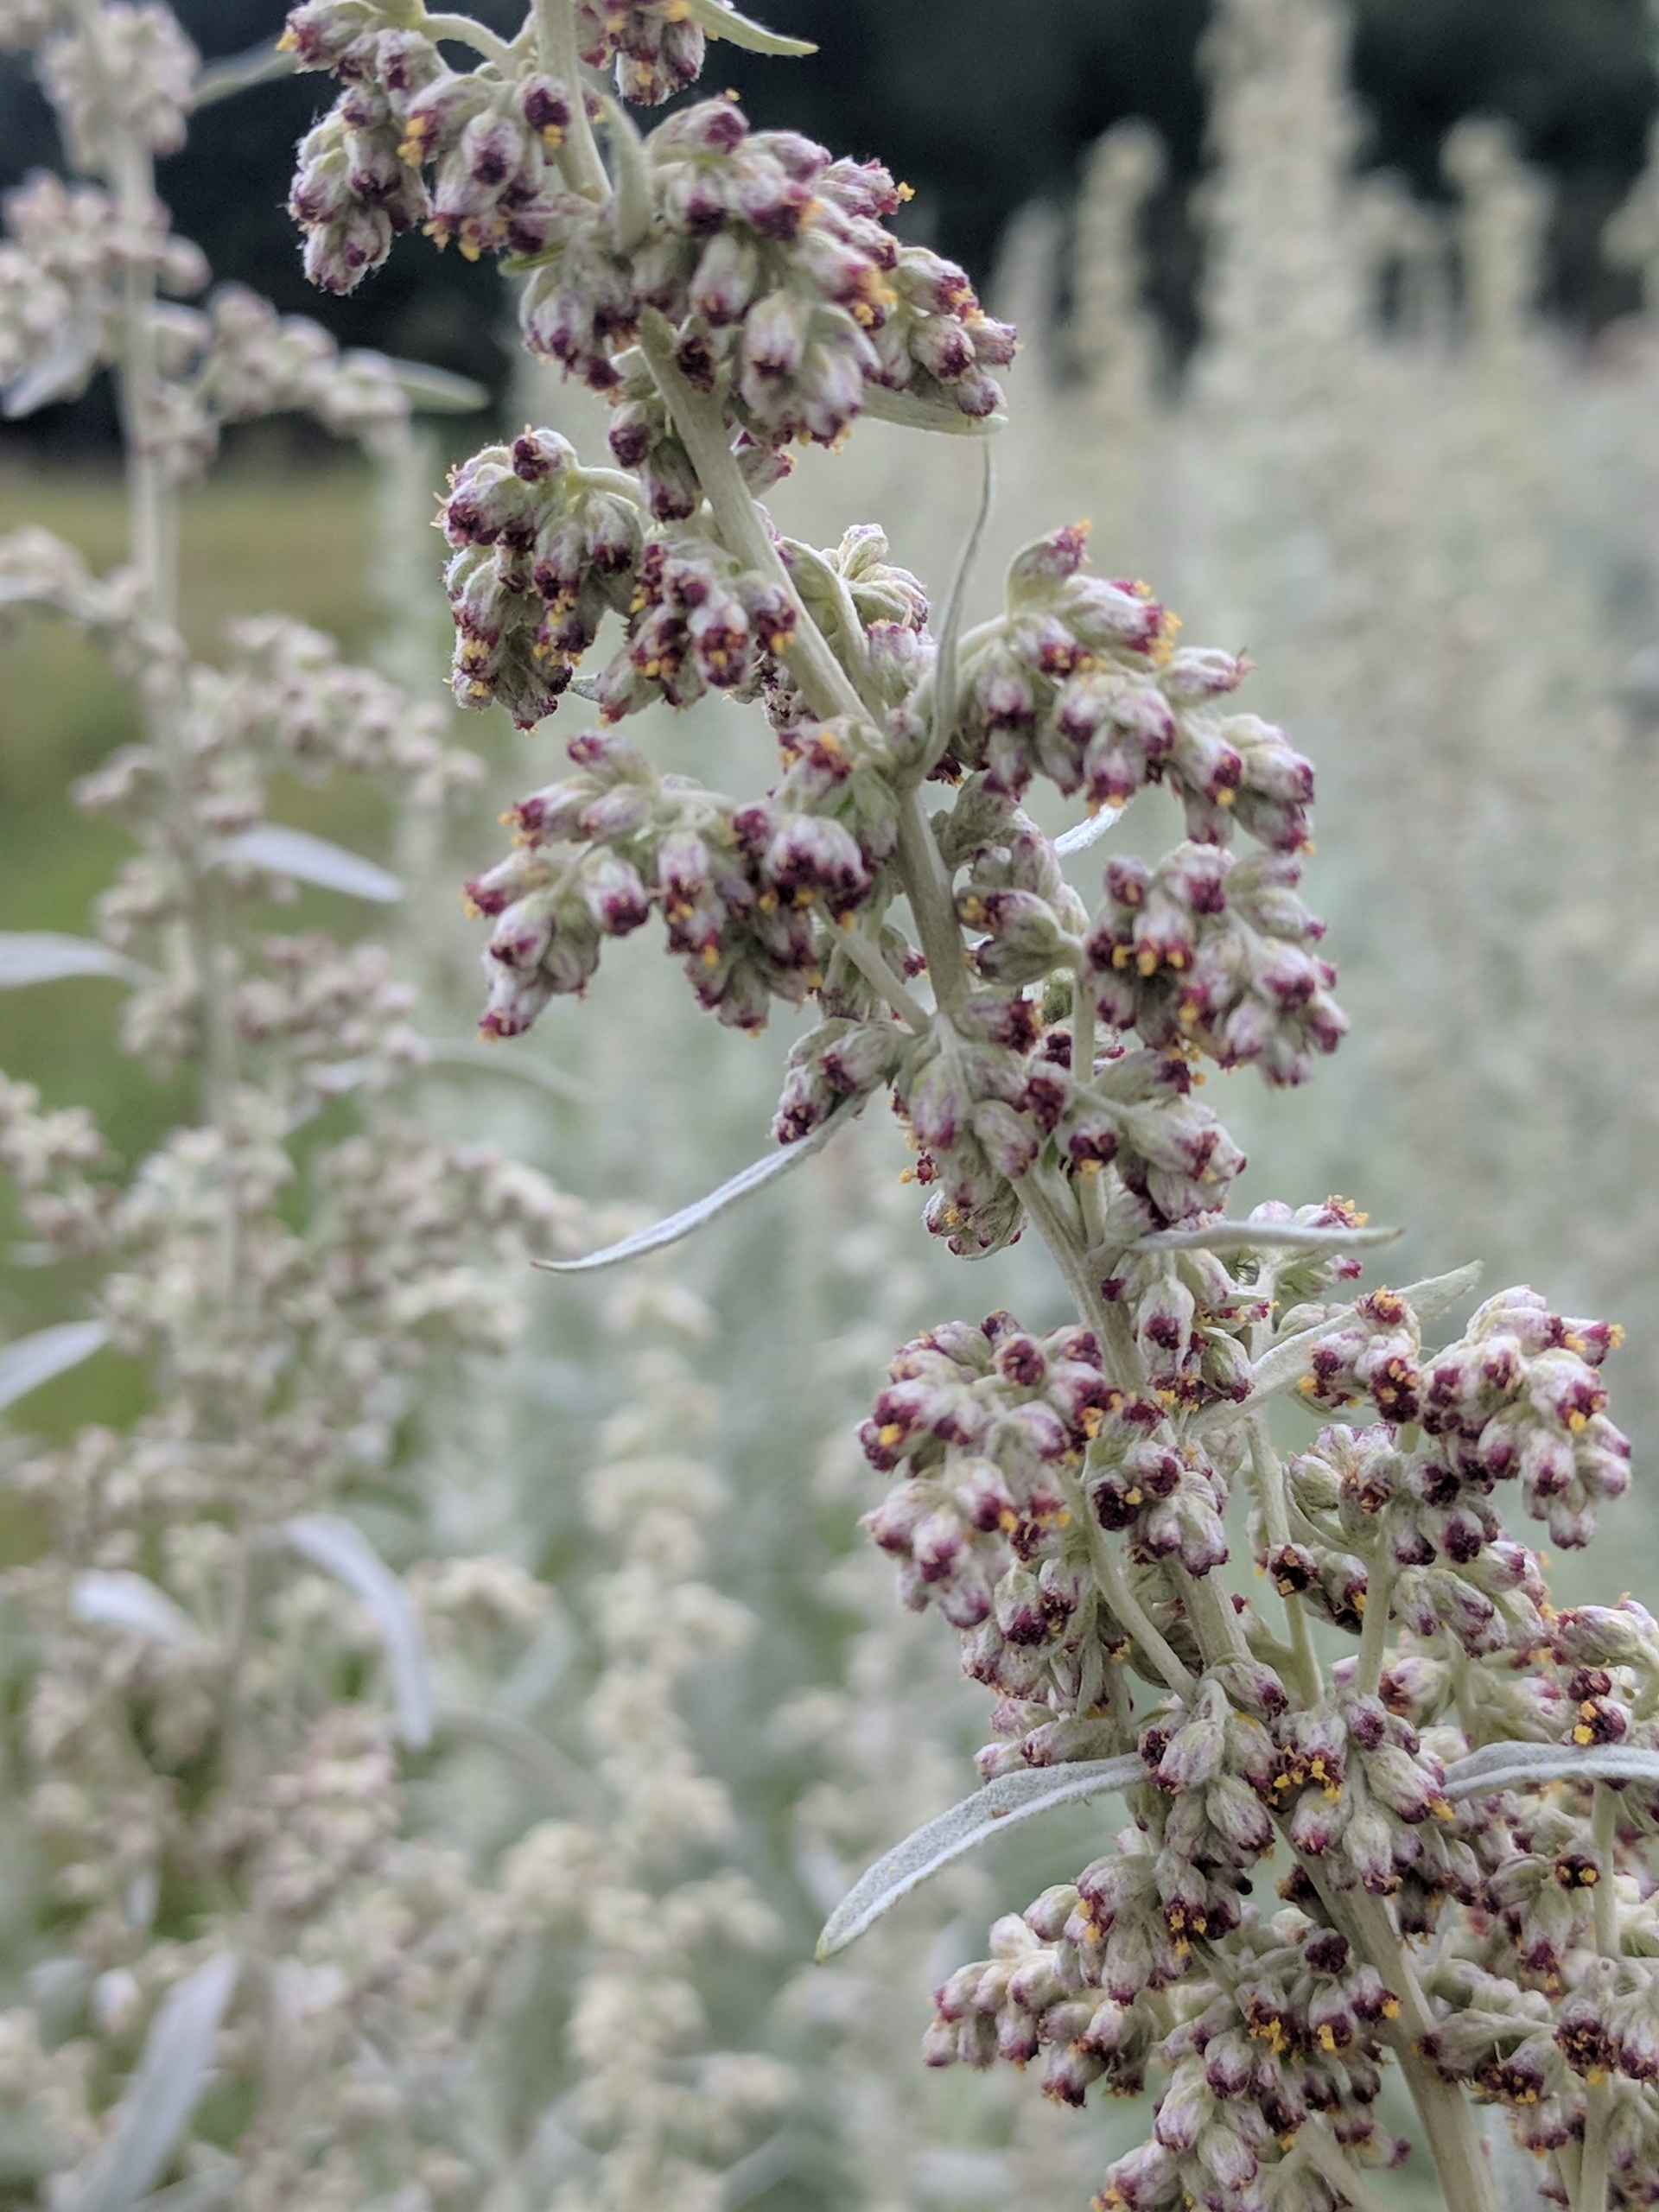
- Seed
Seed characteristics
Seeds per ounce: 250,000 (IA NRCS)
1000 seed weight: 0.11 g (Seed Information Database)
Description: Cypsela (achene), elliptical in outline, about 0.5 mm long, light grayish-brown, without hairs or attached fluff (pappus).
Typical seed test
PLS: 84% (n = 11)
Purity: 92% (n = 11)
Germination: 30% (n = 10)
Dormancy: 57% (n = 11)
(averages obtained from n tests of purchased seed lots)
- Habitat and range
Habitat: Full sun, mesic to dry, sandy, or rocky prairies, roadsides. Wetland Indicator Status is Obligate Upland (UPL) for the Midwest.
Conservation status: Global- G5, secure; Michigan- S1, critically imperiled (NatureServe)
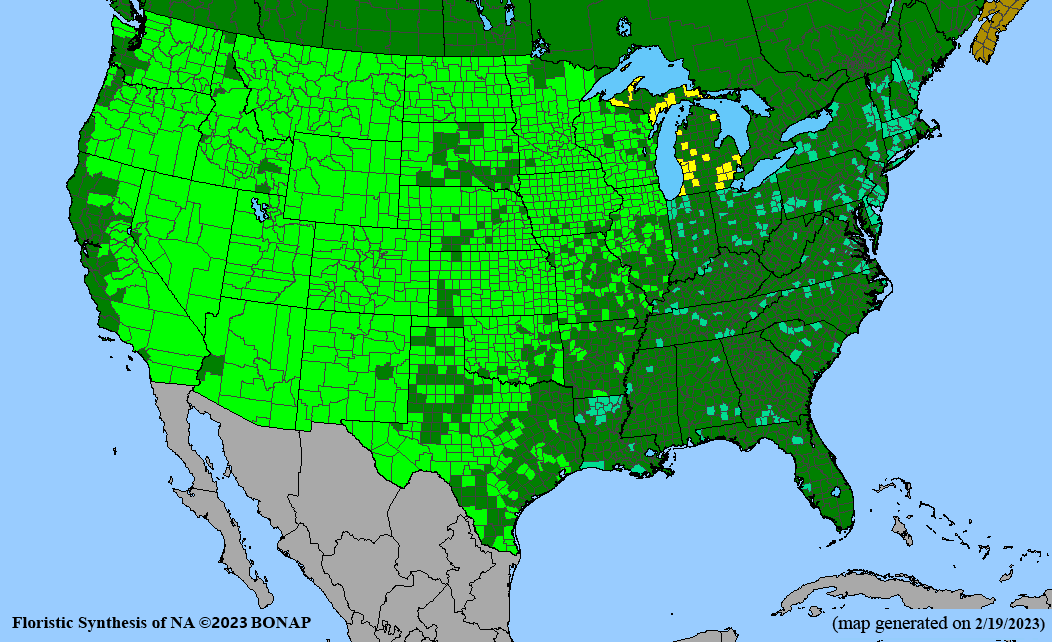
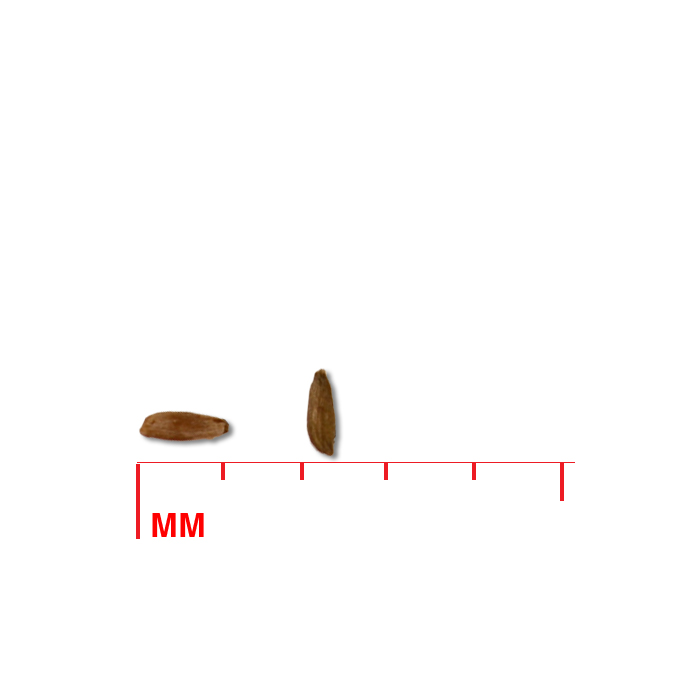
General Comments
All above ground parts of the plant have a distinctive sage-like fragrance when rubbed or crushed. This species has traditional medicinal and ceremonial uses among numerous Native American tribes. Because it is wind-pollinated, white sagebrush is not considered a resource for pollinators, though it is a larval host for at least one species of moth caterpillar, Phaneta argenticostana. Its mode of vegetative spread produces a dense network of rhizomes and roots that function in erosion control.
Recommendations for Seed Production
- Establishment for seed production
Direct seeding
We do not have experience direct-seeding this species for seed production.
Greenhouse
Seed pre-treatment: 60 days cold-moist stratification (fine silica sand)
Sowing: Surface (seed is small and must not be buried too deeply); seed directly onto plug flats or start seedlings in germination trays and dibble into plugs when seedlings have first true leaves; start in greenhouse about 8-10 weeks prior to transplanting.
Transplanting: Harden off seedlings 1-2 weeks prior to transplanting; transplant with 12 in plant spacing in plasticulture plots or into bare soil in 36 in rows, after danger of frost; cut or remove plastic after the first full growing season to allow plants to spread by rhizomes.
Note: Also readily propagated through division or rhizome cuttings (see NRCS Plant Guide referenced below).
- Stand management
Weeds: Few issues as dense, young colonies tend to exclude weeds; other small-seeded members of the aster family (e.g., frost aster, Symphyotrichum pilosum, and marestail, Erigeron canadensis) could contaminate seed and should be rogued out before harvest.
Pests: None noted.
Diseases: None noted.
- Seed production
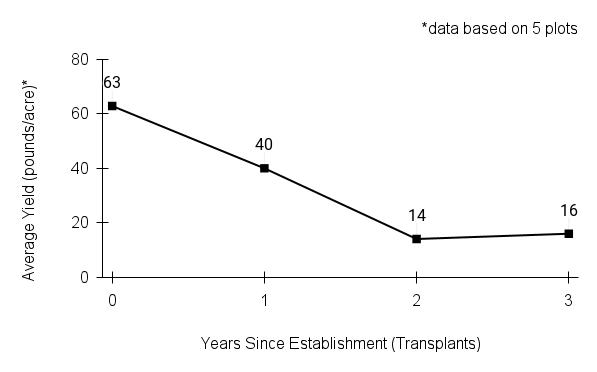 First harvest: In fall of first year when started from greenhouse transplants.
Yield: 15-60 pounds/acre (based on 5 plots)
Stand life: Peak seed production in the first two years, then declining.
Flowering date: late August - September
Seed maturity: Mid-October in northeast Iowa; gauge maturity by sampling heads from several plants and crushing to reveal developing seeds (a hand lens is helpful); mature seed will have a grayish-brown color and separate easily from the receptacle; watch for heads to open and release seed when mature; seed shatters easily and will be lost if harvest delayed.
Harvest date range at TPC (2005-2022): Oct 19 - 24
Recommended harvest method: Combine at maturity or cut/swath stems when about 10% of plants in the plot have open seed heads and lay to dry in shed, then run through stationary combine.
- Seed cleaning and storage
Cleaning process: Brush (Westrup LA-H) with stiff bristles and #14 screen mantle to release seed from heads, use minimal vacuum; airscreen several times.
Seed storage: cool/dry (orthodox)
Released Germplasm
Source Identified material: Natural Selections/Iowa Ecotype Project Zones 1, 2, and 3
NRCS release: ‘Summit’ Artemisia ludoviciana
Cultivated varieties: Several named cultivars are available in the horticultural trade.
- References
Chayka, K. (n.d.). Artemisia ludoviciana (white sage). Minnesota Wildflowers. https://www.minnesotawildflowers.info/flower/white-sage
Christiansen, P., & Muller, M. (1999). White sage - Artemisia ludoviciana Nutt. Prairie Plants of Iowa - Artemisia ludoviciana Nutt. https://uipress.lib.uiowa.edu/ppi/display.php?record=Artemisia_ludoviciana
Cochrane, T. S., Elliot, K., & Lipke, C. S. (2014). White Sage. In Prairie Plants of the University of Wisconsin, Madison Arboretum (3rd ed., p. 68). University of Wisconsin-Madison Arboretum.
Flora of North America Editorial Committee. 2006a. Flora of North America North of Mexico. Vol. 19. Magnoliophyta: Asteridae, part 6: Asteraceae, part 1. Oxford University Press, New York. xxiv + 579 pp.
Hilty, J. (2020). White Sage - Artemisia ludoviciana. Illinois Wildflowers. https://www.illinoiswildflowers.info/prairie/plantx/white_sagex.htm
Kartesz, J.T., The Biota of North America Program (BONAP). 2023. North American Plant Atlas. (http://bonap.net/napa). Chapel Hill, N.C. [maps generated from Kartesz, J.T. 2023. Floristic Synthesis of North America, Version 1.0. Biota of North America Program (BONAP). (in press)]
NatureServe. 2024. NatureServe Network Biodiversity Location Data accessed through NatureServe Explorer [web application]. NatureServe, Arlington, Virginia. Available https://explorer.natureserve.org/. (Accessed: February 16, 2024).
Runkel, S. T., & Roosa, D. M. (2009). Prairie sage. In Wildflowers of the Tallgrass Prairie: The Upper Midwest (Second, p. 237). University of Iowa Press.
Shultz, Leila M. (2020, November 6). Artemisia ludoviciana Nuttall. Flora of North America. http://floranorthamerica.org/Artemisia_ludoviciana
Society for Ecological Restoration, International Network for Seed Based Restoration and Royal Botanic Gardens Kew. (2023) Seed Information Database (SID). Available from: https://ser-sid.org/ (February 2023)
Stevens, M., & Roberts, W. (2000). Plant Guide - USDA Plants Database - White Sage, Artemisia ludoviciana Nutt. https://plants.usda.gov/DocumentLibrary/plantguide/pdf/cs_arlu.pdf
Shultz, Leila M. (2020, November 6). Artemisia ludoviciana Nuttall. Flora of North America. http://floranorthamerica.org/Artemisia_ludoviciana
Species Guide Updated 3/5/2024
Legumes
Legumes sagemThe Species Production Guides for legumes provide specific information about growing each of these species for seed production.
Scroll the list (alphabetized by scientific name) or press ctrl-f (or command-f) to search for any name in this page.
A printable file (pdf) is also provided on each species page for those needing a print version.
This section is a work in progress. We will continue to add new species guides as they are completed.
Amorpha canescens / leadplant
Astragalus canadensis / Canada milkvetch
Baptisia alba / white wild indigo
Baptisia bracteata / longbract wild indigo
Dalea purpurea / purple prairie clover
Desmodium canadense / showy ticktrefoil
Desmodium illinoense / Illinois ticktrefoil
Glycyrrhiza lepidota / American licorice
- Lespedeza capitata / roundhead lespedeza
Warm Season Grasses
Warm Season Grasses sagemThe Species Production Guides for warm season grasses provide specific information about growing each of these species for seed production.
Scroll the list (alphabetized by scientific name) or press ctrl-f (or command-f) to search for any name in this page.
A printable file (pdf) is also provided on each species page for those needing a print version.
This section is a work in progress. We will continue to add new species guides as they are completed.
Andropogon gerardii / big bluestem
Bouteloua curtipendula / sideoats grama
Muhlenbergia racemosa / marsh muhly
Panicum virgatum / switchgrass
Schizachyrium scoparium / little bluestem
Sorghastrum nutans / Indiangrass
Spartina pectinata / prairie cordgrass
Sporobolus compositus / composite dropseed
Sporobolus heterolepis / prairie dropseed
Cool Season Grasses
Cool Season Grasses sagemThe Species Production Guides for cool season grasses provide specific information about growing each of these species for seed production.
A printable file (pdf) is also provided on each species page for those needing a print version.
This section is a work in progress. We will continue to add new species guides as they are completed.
Calamagrostis canadensis / bluejoint
Elymus canadensis / Canada wildrye
Elymus villosus / hairy wildrye
Elymus virginicus / Virginia wildrye
Festuca paradoxa / clustered fescue
Glyceria striata / fowl mannagrass
Hesperostipa spartea / porcupinegrass
Koeleria macrantha / prairie Junegrass
Woody Species
Woody Species sagemThe Species Production Guides for woody species (prairie shrubs) provide specific information about growing each of these species for seed production.
A printable file (pdf) is also provided on each species page for those needing a print version.
This section is a work in progress. We will continue to add new species guides as they are completed.
Rosa arkansana / prairie rose
- Spiraea alba / white meadowsweet
false indigo bush
false indigo bush sagem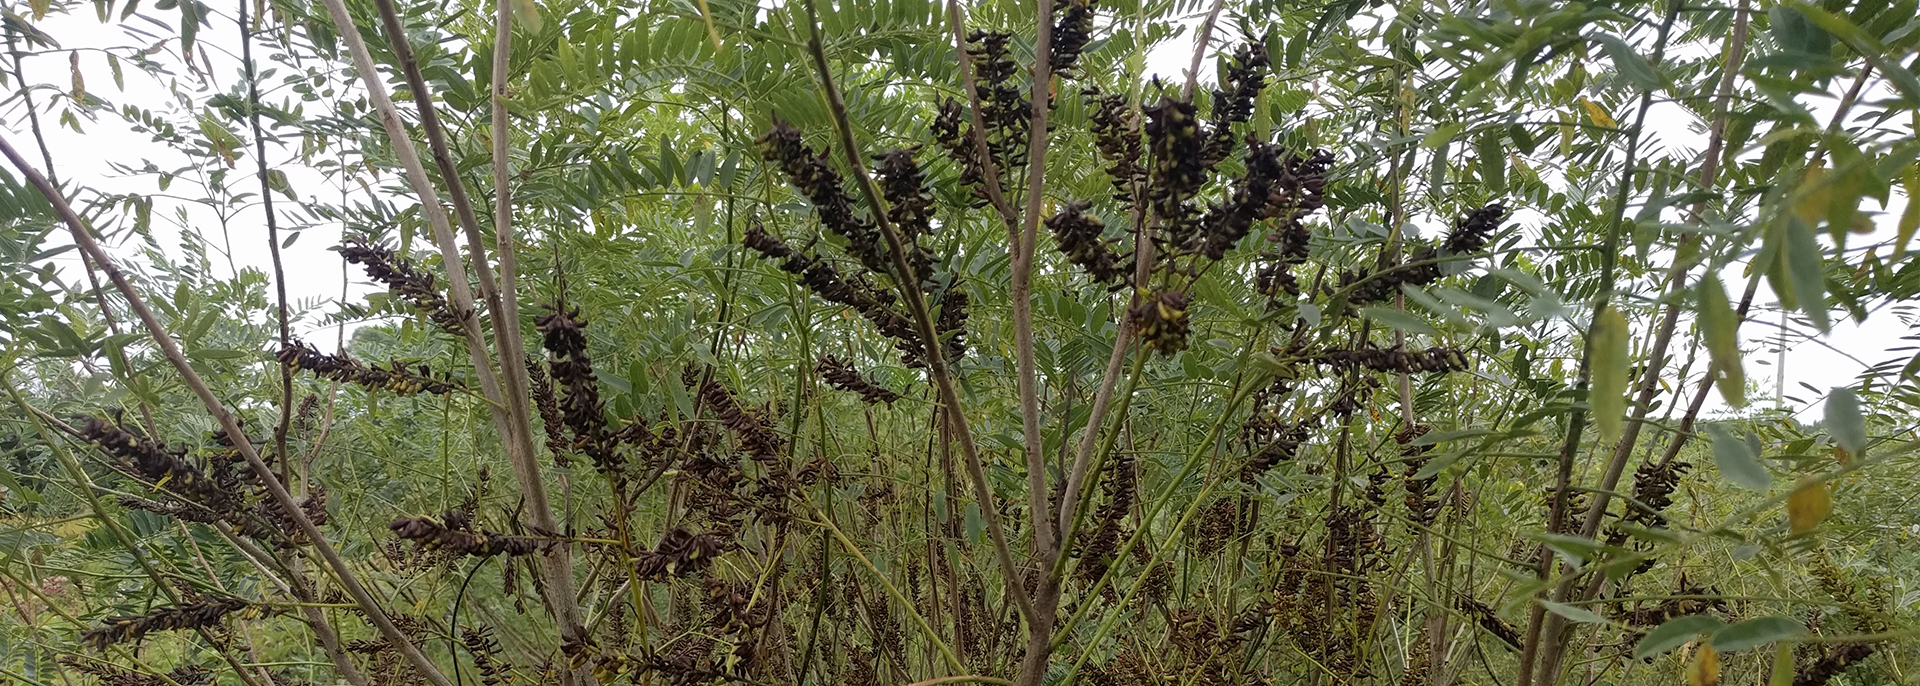
Amorpha fruticosa, L.
Alternate Common Names: false indigo, bastard indigo, river locust, wild indigo, indigo bush, desert false indigo
Scientific Synonyms: Amorpha angustifolia (Pursh) Boynt., Amorpha bushii Rydb., Amorpha croceolanata P.W. Watson, Amorpha curtissii Rydb., Amorpha dewinkeleri Small, Amorpha occidentalis Abrams, Amorpha tennesseensis Shuttlw. ex Kunze, Amorpha virgata Small
Family: legume or pea family (Fabaceae (Leguminosae))
Functional Group: woody species, shrubs
Description
- Life cycle and growth form
Fast-growing, long-lived perennial shrub, spreads by self seeding and suckering, flowers on second-year wood.
Height: 3 -12 ft
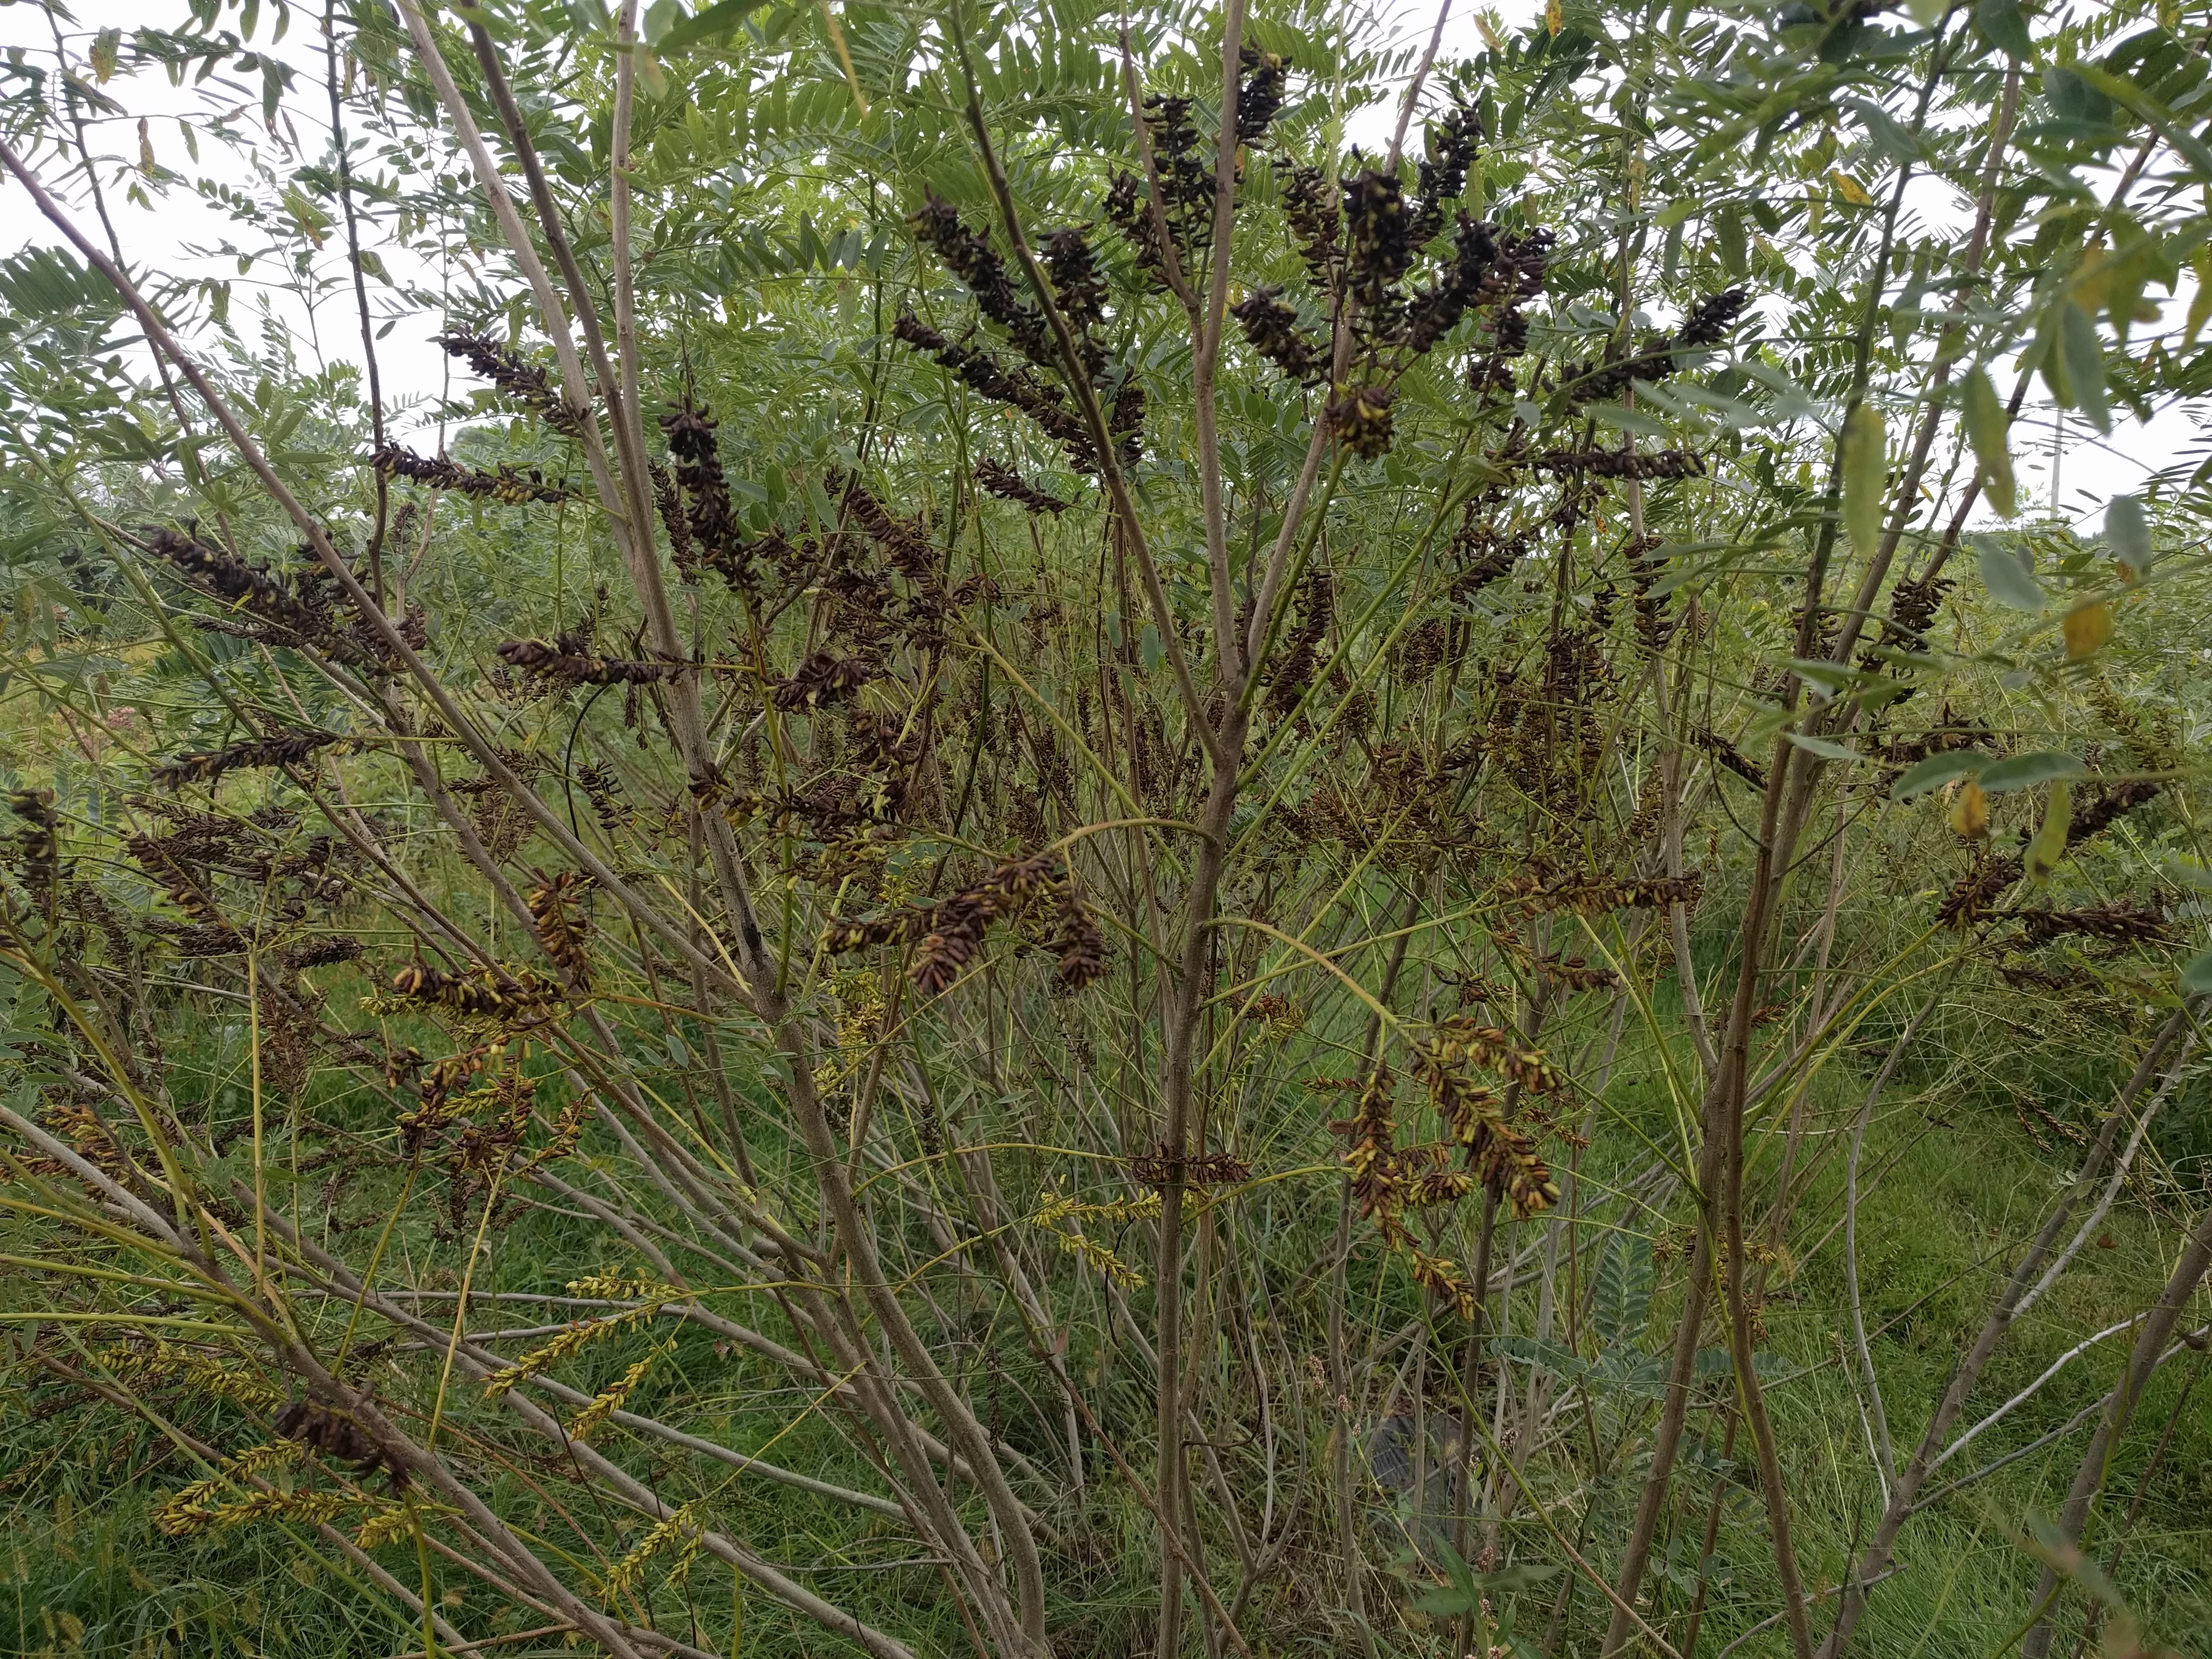
- Leaves and stem
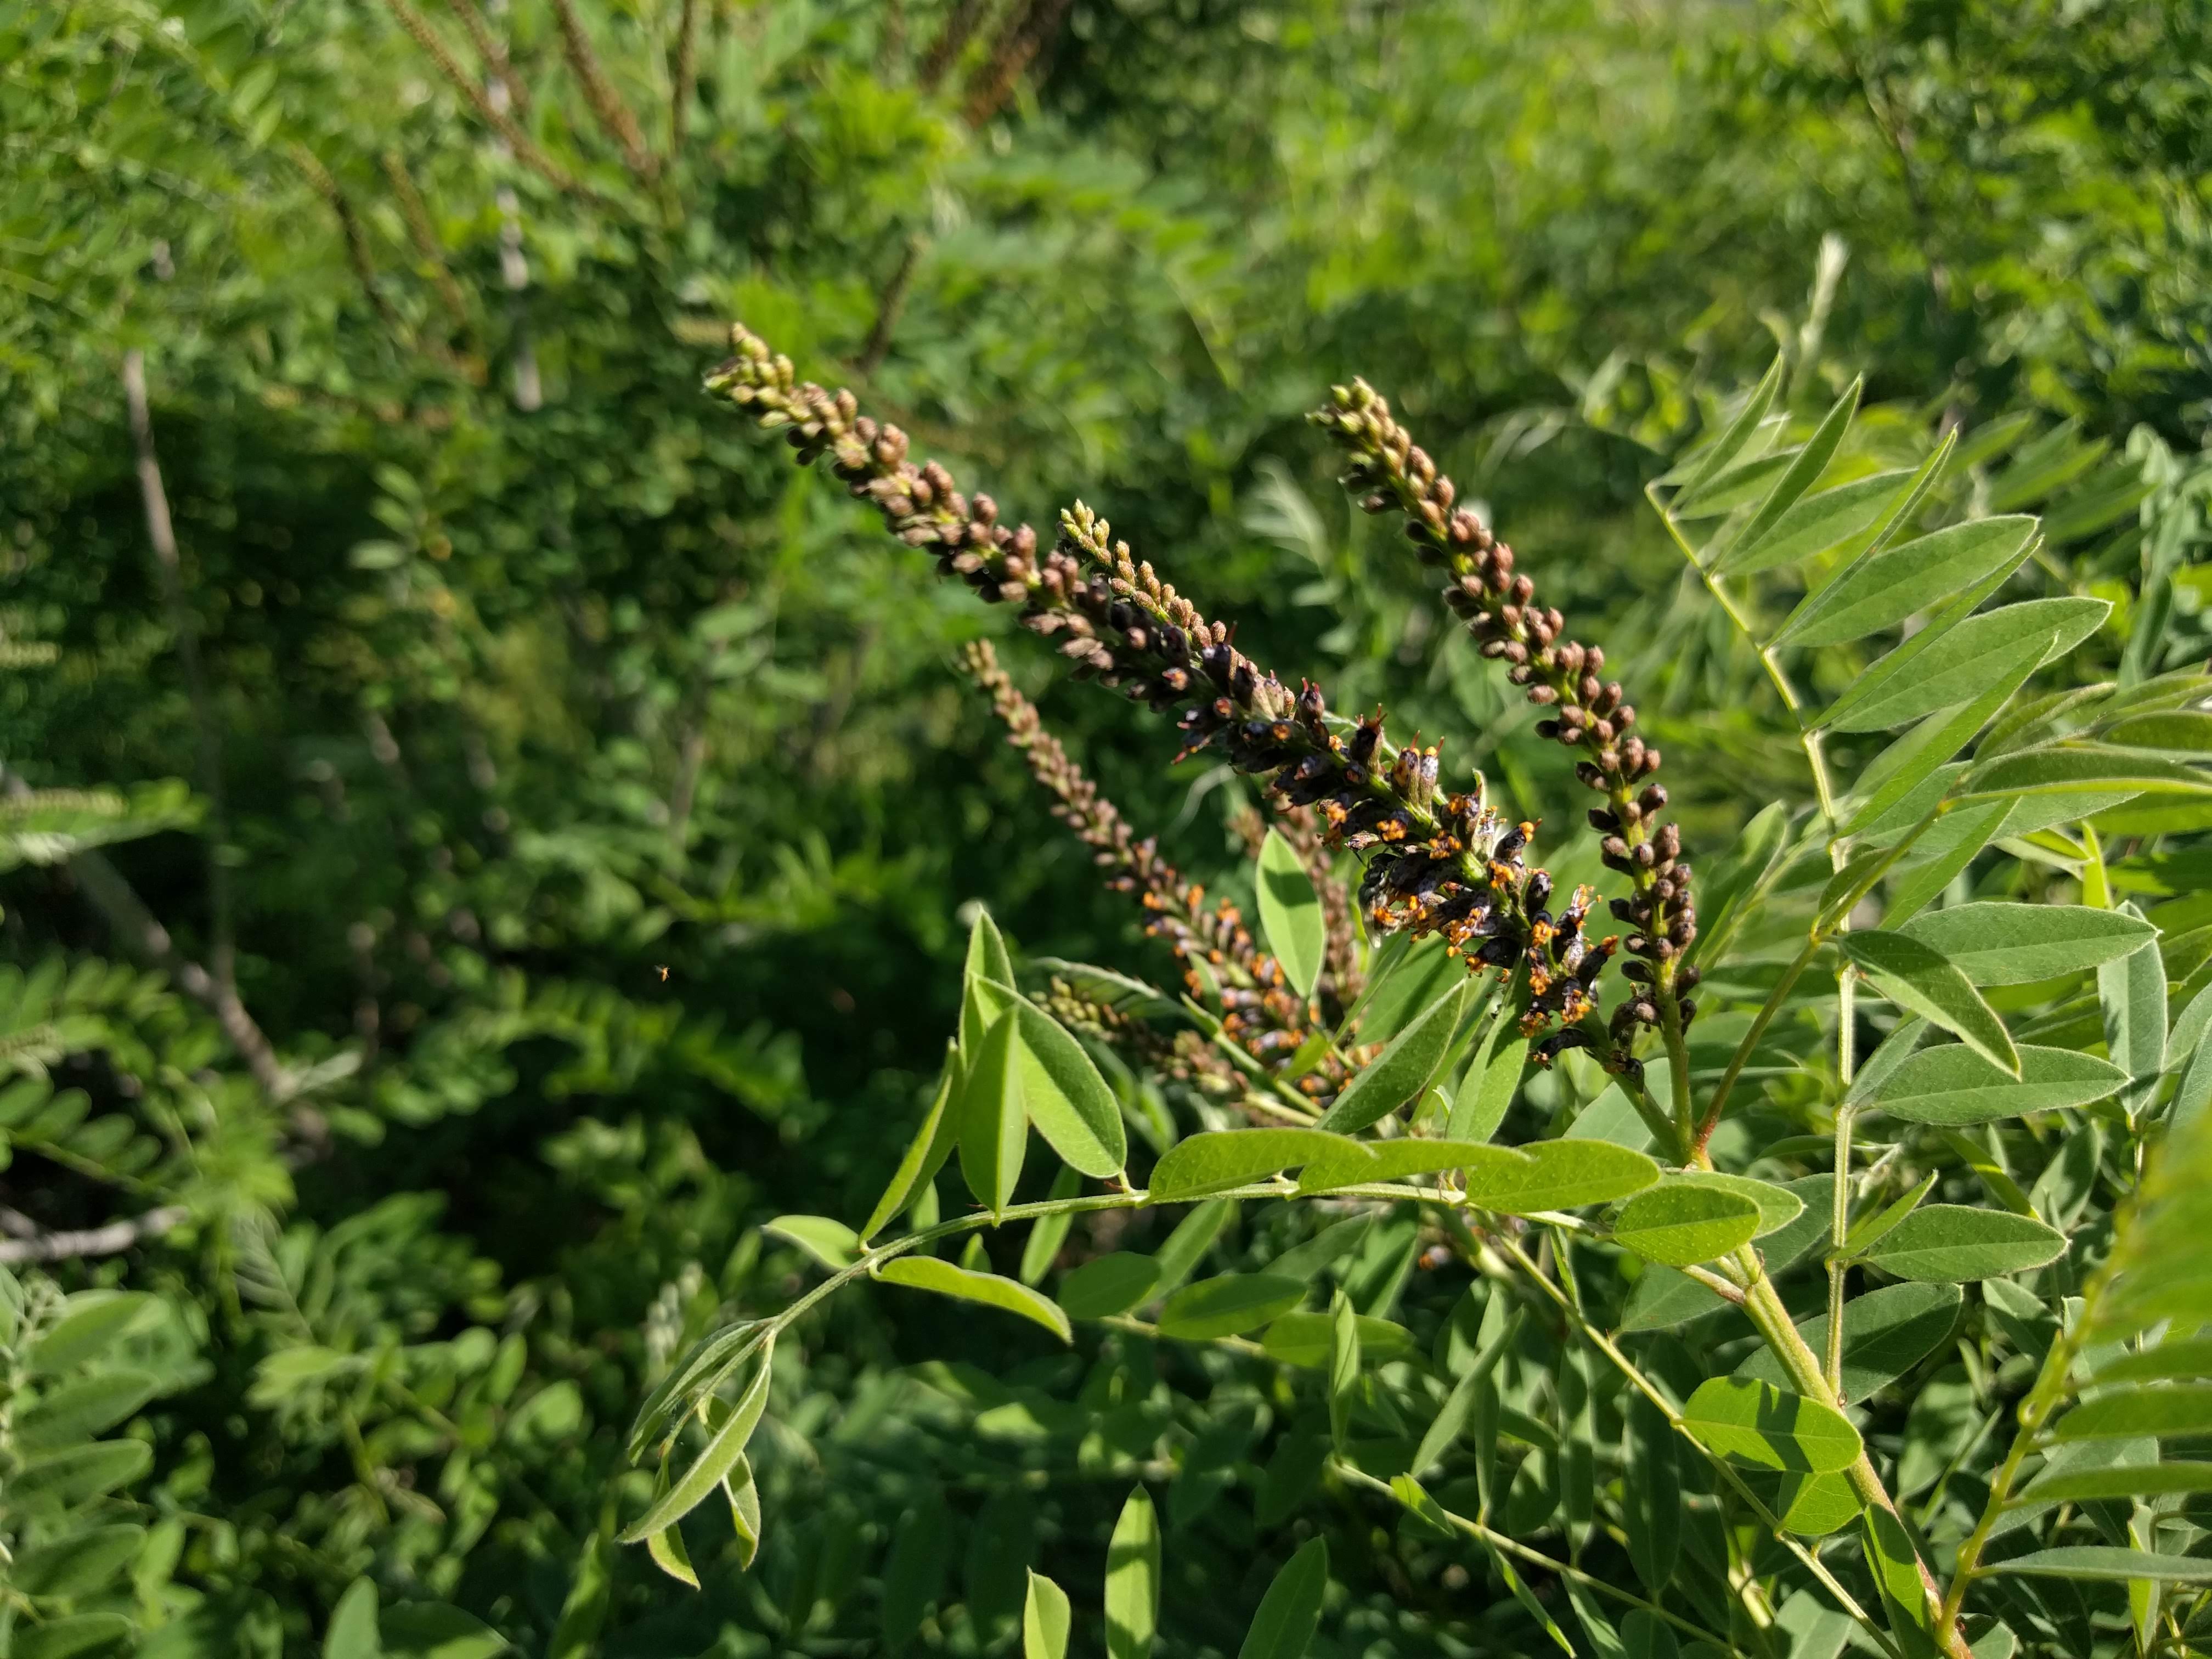
Leaves 4-8 in long, pinnately compound with 11-25 oblong leaflets, alternate arrangement; multi-stemmed shrubs with smooth, gray, woody stems, forming thickets of spreading, cane-like stems that begin sparsely branching at about 3-4 ft in height.
- Flower, fruit and seedhead
Flower: Irregular, with one slightly enlarged petal (unlike the typical legume flower), deep purple corolla ⅓ in long, with bright orange stamens that stick out prominently; flowers tightly packed in spikelike racemes 3-6 in long (each looking like a tapered bottle brush).
Fruit/seedhead: ¼ in long, tough, leathery seed pods with prominent oil glands, each pod with one seed (sometimes two).
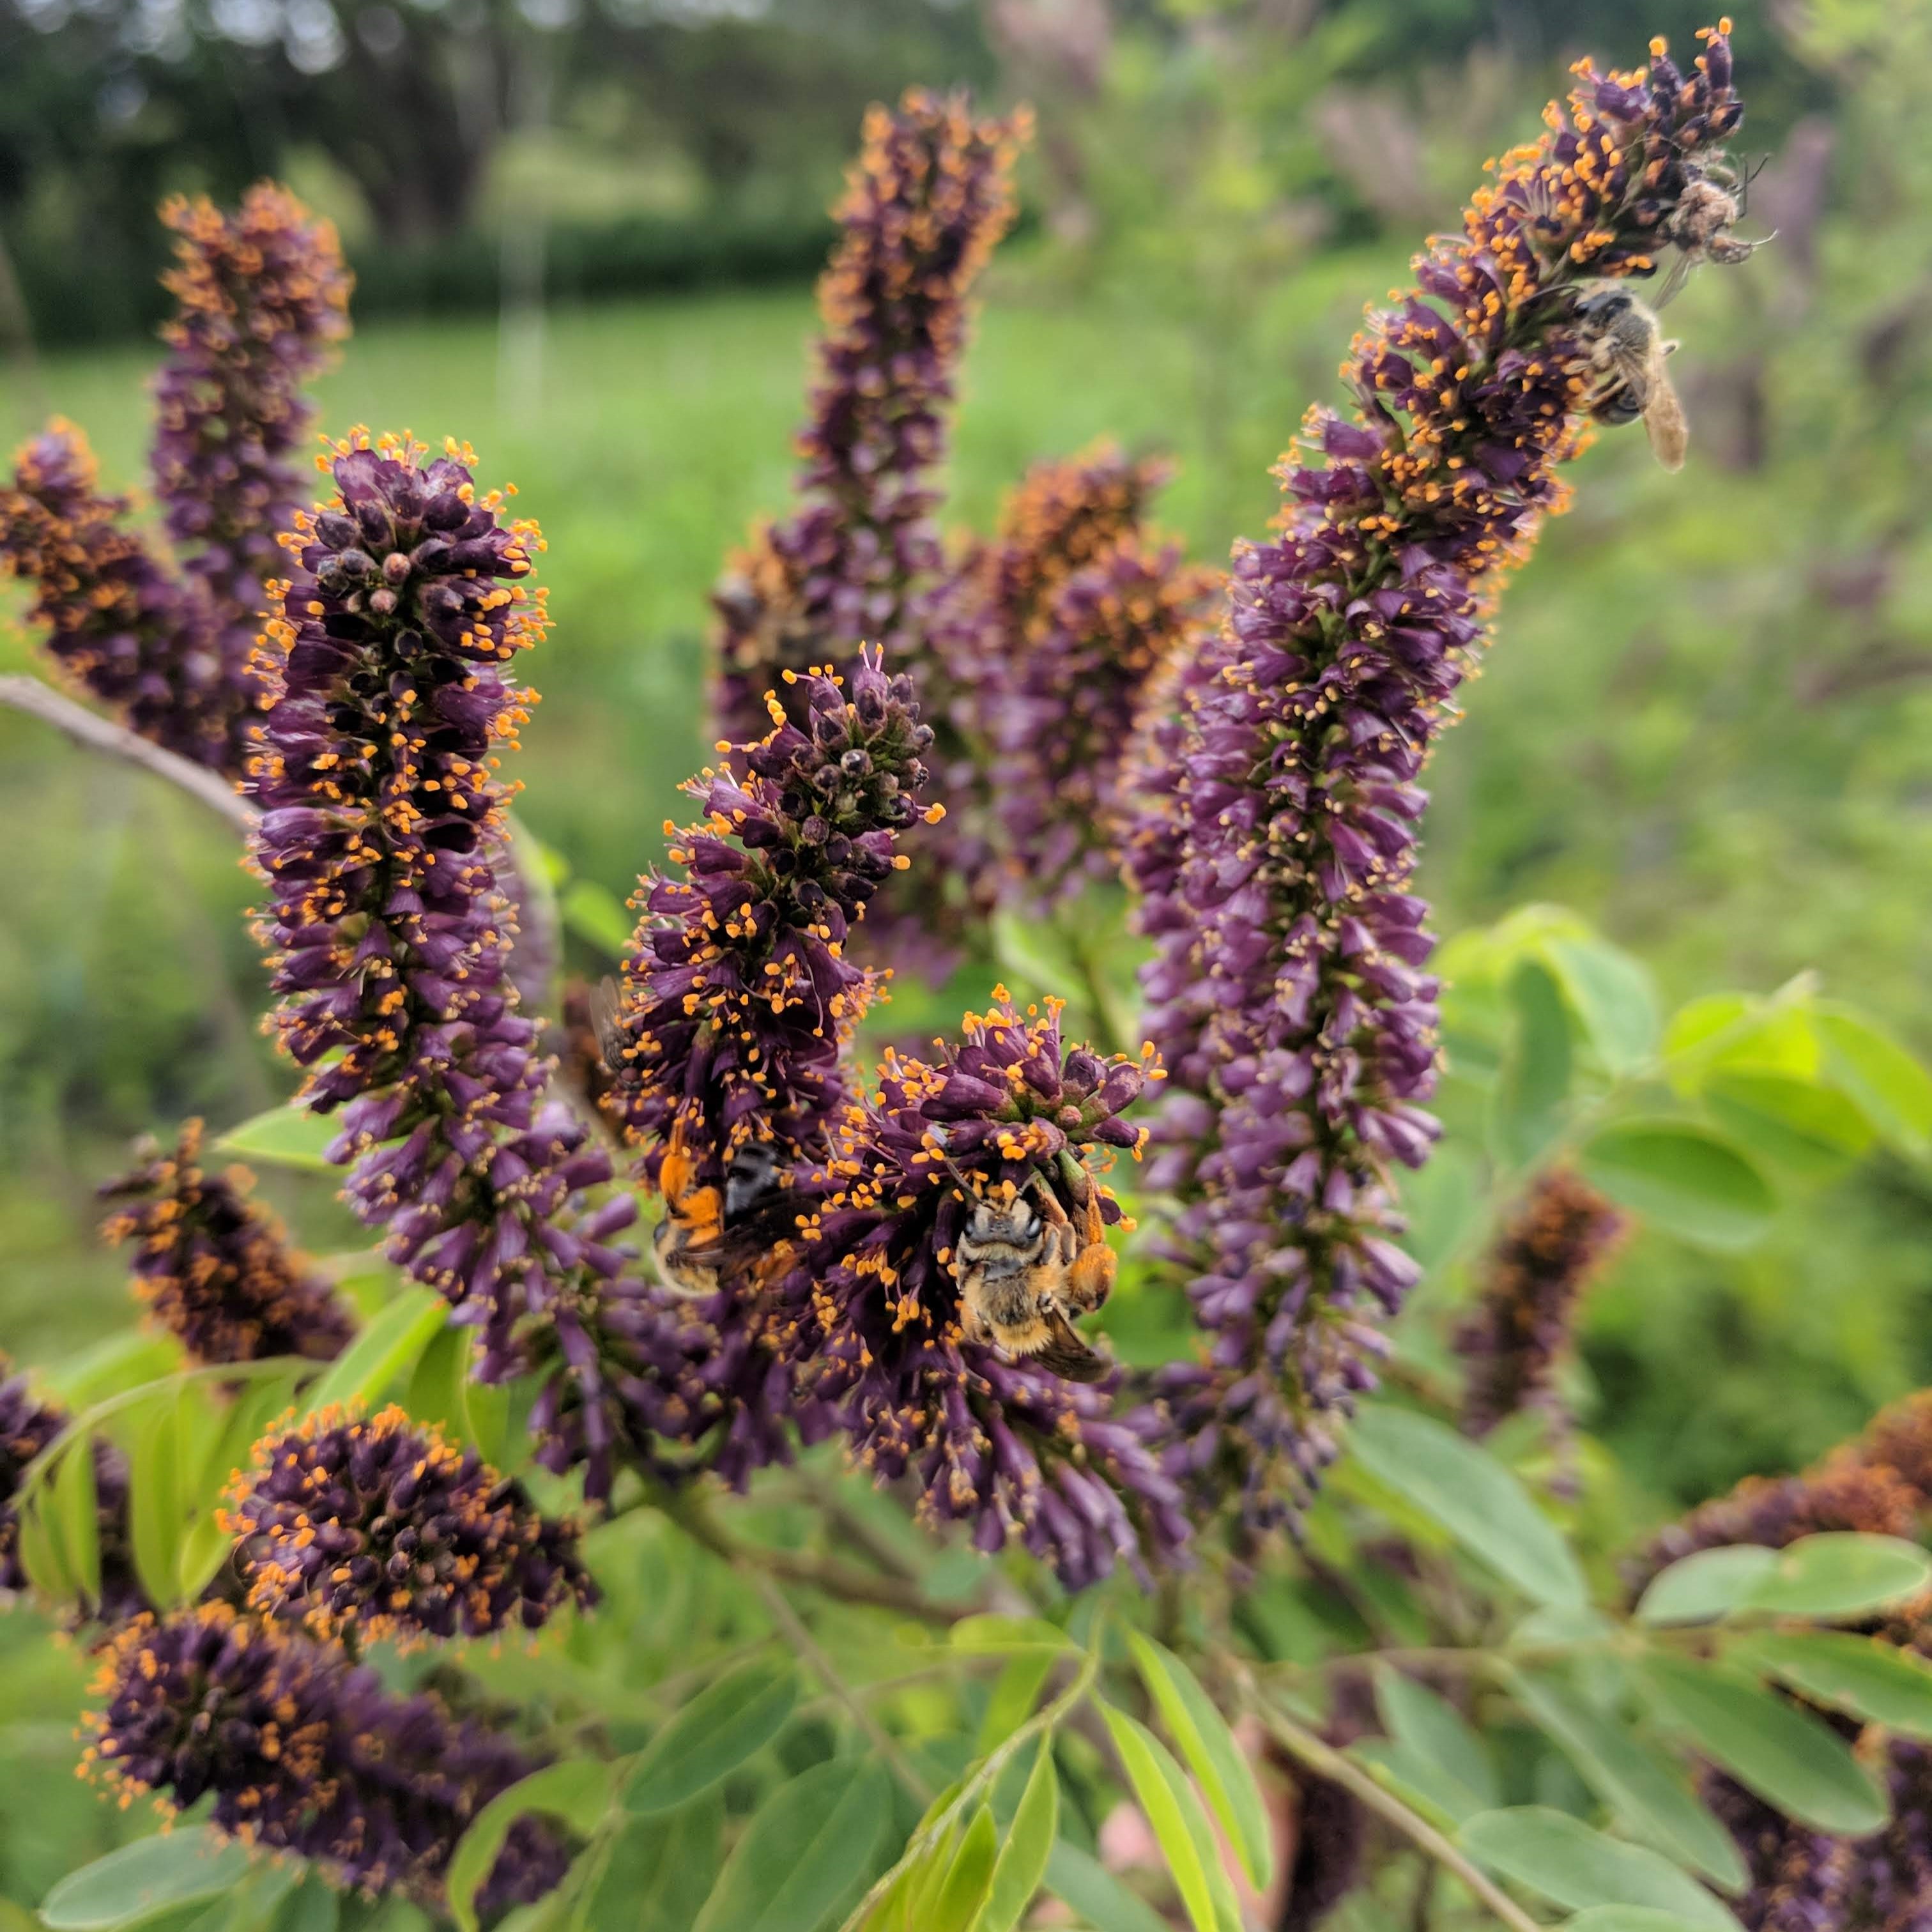
- Seed
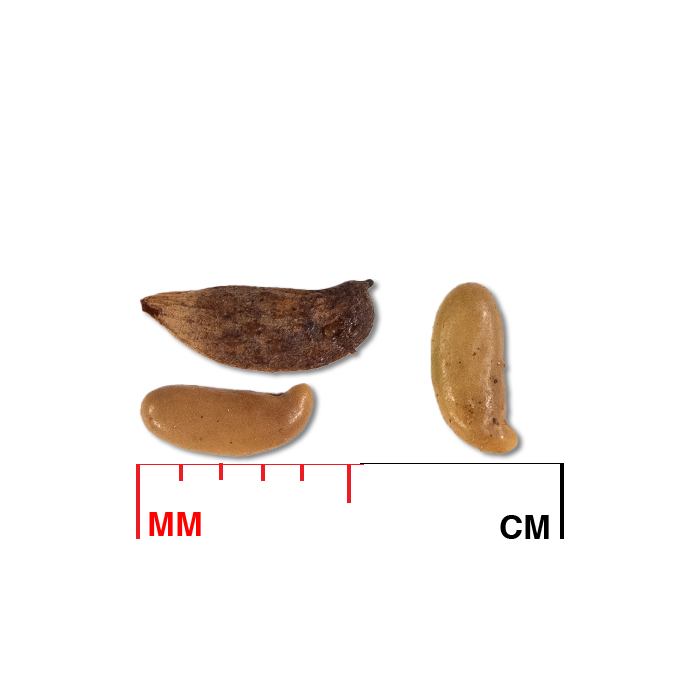
Note: Seed produced from unirrigated rows at the TPC had much lower viability (PLS: 16-23%, not included in the typical seed test above).
Seed characteristics
Seeds per ounce: 3,700 (IA NRCS)
Seeds per pound: 77,000 (Woody Plant Seed Manual)
1000 seed weight: 7.76 g (Seed Information Database)
Description: Glossy, light-brown seed resembles a small bean, 4 mm long and 1.5 mm wide, with a slightly hooked end.
Typical seed test
PLS: 90-94%
Purity: 98%
Germination: 31-92%
Dormancy: 0-65%
(based on tests of one lot of commercial seed and one lot produced at the TPC)
- Habitat and range
Habitat: Moist soil; partial to full sun; along river and stream banks, islands, ditches, wet prairies, and seeps; designated a Facultative Wetland species for the Midwest by the USDA. Plants survive for many years in mesic soils without irrigation, but seed yield (and possibly viability) increases with irrigation.
Conservation status: Global- G5, secure; Wyoming- S2, imperiled; West Virginia- S2/S3, imperiled to vulnerable (NatureServe); Listed as a noxious weed or invasive plant in Maine, Rhode Island, New Jersey, New Hampshire, Oregon, and Washington.
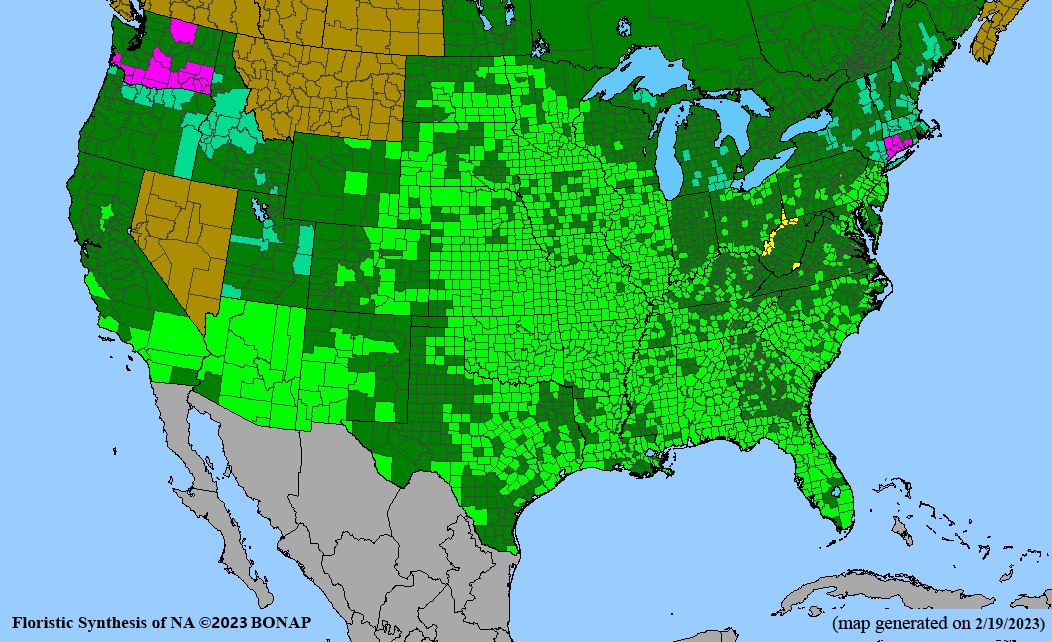
General Comments
The dark purple flower spikes with brilliant orange pollen-bearing stamens attract numerous species of native bees in great abundance, along with skippers, other butterflies, and moths. The foliage and pods, when crushed, have an unusual scent, reminiscent of cumin, citrus, and creosote. Aromatic compounds from this species have been investigated as medicines, natural insecticides and insect repellents. The foliage is eaten by larvae of silver-spotted skipper and southern dogface butterflies, larvae of amorpha borer beetles live within the stems and roots, and tiny bruchid beetles feed on the seeds. The long, weakly branched stems have been used in arrow-making and as a foundation for bedding materials by Native peoples. The functions this species provides in restoration include erosion control, streambank stabilization, wildlife cover, and windbreaks, and it shows potential for use in living snow fences.
Recommendations for Seed Production
- Establishment for seed production
Direct seeding
We do not have experience with direct seeding this species for seed production. Widely spaced rows (6 ft or more) are recommended.
Greenhouse
Seed pre-treatment: Start seed pretreatment about 3-4 months before outplanting. Mechanical or chemical scarification is recommended as these seeds have physical dormancy, followed by 10-14 days cold/moist stratification (40°F).
Sowing: Cover seed lightly (¼ in depth) with potting mix; adding a layer of perlite or chick grit to the surface of the soil may help prevent damping off.
Transplanting: Seedlings are ready for transplanting when roots have reached the bottom of the plug and are well-branched, creating a firm plug. Harden off outdoors, then transplant into plasticulture rows with drip irrigation, 2-3 plants per linear foot.
- Stand management
Weeds: Plastic mulch controls weeds in year one. Shrubs grow vigorously and shade out most weeds.
Pests: In very snowy winters, rabbits feed on bark and may girdle stems. Shrubs will resprout but flowering and seed set will be delayed for a year. Deer occasionally browse the tops of plants. Some native insects feed on foliage or within stems/roots, but not at densities that cause production issues. Bruchid beetles feed on developing seeds within pods and can reach significant densities. However, seed yield is still high in “good years” and when rows are irrigated.
Diseases: An unidentified rust fungus causes leaves to appear distorted in some years.
Note: Rows can be cut back to the ground in the dormant season if plants have become too lanky for efficient harvesting. Note that this shrub species does not flower or set seed on first year growth.
- Seed production
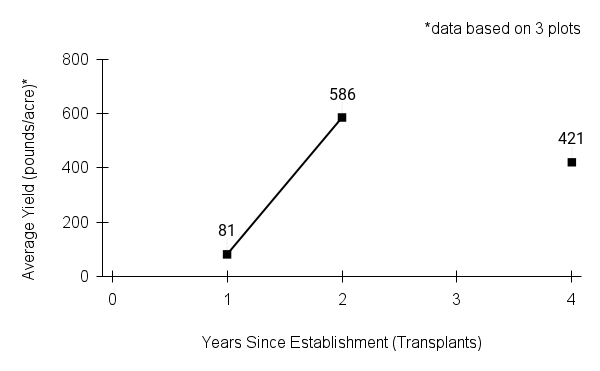 First harvest: Plants flower and set seed one year after transplanting.
Yield: 80-580 pounds/acre (based on 3 plots)
Stand life: More than 10 years (estimated) for these long-lived shrubs.
Flowering date: June
Seed maturity: October
Harvest date range at TPC (2018-2021): Oct 17 - 31
Recommended harvest method: Strip pods from stalks by hand (wear sturdy gloves). We have not attempted to combine this species due to the woody stems. A more efficient approach might be to cut the fruiting stems onto tarps using a hedge trimmer, then run the material through a stationary combine.
- Seed cleaning and storage
Cleaning process: Pass hand-collected pods through a coarse screen (¼ to ½ inch hardware cloth) to remove sticks. Run through a brush machine with canvas beater bars. Seed pods have oil glands (visible under low magnification) and become very sticky when brushed. Spread oily material on a tarp and dry with a fan for a few days. Material may need to be brushed a second time after drying and before airscreening.
Seed storage: Cool/dry (orthodox) - seed retains viability for 3-5 years at room temperature (Woody Plant Seed Manual).
Released Germplasm
Source Identified material: Natural Selections/Iowa Ecotype Zones 1, 2, 3
NRCS releases: Iowa Covey Germplasm, Illinois Covey Germplasm, Missouri Covey Germplasm, Survivor Germplasm
- References
Bonner, F. T., Karrfalt, R. P., & Nisley, R. G. (Eds.). (2008). Woody Plant Seed Manual. RNGR - Reforestation, Nurseries, and Genetic Resources. https://rngr.net/publications/wpsm
Hilty, J. (2019). False Indigo - Amorpha fruticosa. Illinois Wildflowers. https://www.illinoiswildflowers.info/trees/plants/false_indigo.htm
Kartesz, J.T., The Biota of North America Program (BONAP). 2023. North American Plant Atlas. (http://bonap.net/napa). Chapel Hill, N.C. [maps generated from Kartesz, J.T. 2023. Floristic Synthesis of North America, Version 1.0. Biota of North America Program (BONAP). (in press)]
Lady Bird Johnson Wildflower Center - The University of Texas at Austin. (2022). Amorpha fruticosa. Plant Database. https://www.wildflower.org/plants/result.php?id_plant=amfr
Moore, L. M. (2006). Desert false indigo - Amorpha fruticosa L. Plant Guide. USDA-NRCS National Plant Data Center. https://plants.usda.gov/DocumentLibrary/plantguide/pdf/pg_amfr.pdf
NatureServe. 2024. NatureServe Network Biodiversity Location Data accessed through NatureServe Explorer [web application]. NatureServe, Arlington, Virginia. Available https://explorer.natureserve.org/. (Accessed: February 22, 2024).
Newcomb, L. (1977). Shrubs / Leaves Divided. In Newcomb’s Wildflower Guide (pp. 106–107). Little, Brown and Company.
Runkel, S. T., & Roosa, D. M. (2009). Indigo bush. In Wildflowers of the Tallgrass Prairie: The Upper Midwest (2nd ed., pp. 66–67). University of Iowa Press.
University of Georgia - Center for Invasive Species and Ecosystem Health. (n.d.). Indigobush (Amorpha fruticosa) - eddmaps. EDDMapS.org. https://www.eddmaps.org/species/subject.cfm?sub=5086
USDA NRCS National Plant Data Team. (n.d.). Amorpha fruticosa L. USDA plants database. https://plants.usda.gov/home/plantProfile?symbol=AMFR
Species Guide Updated 3/5/2024
white meadowsweet
white meadowsweet sagem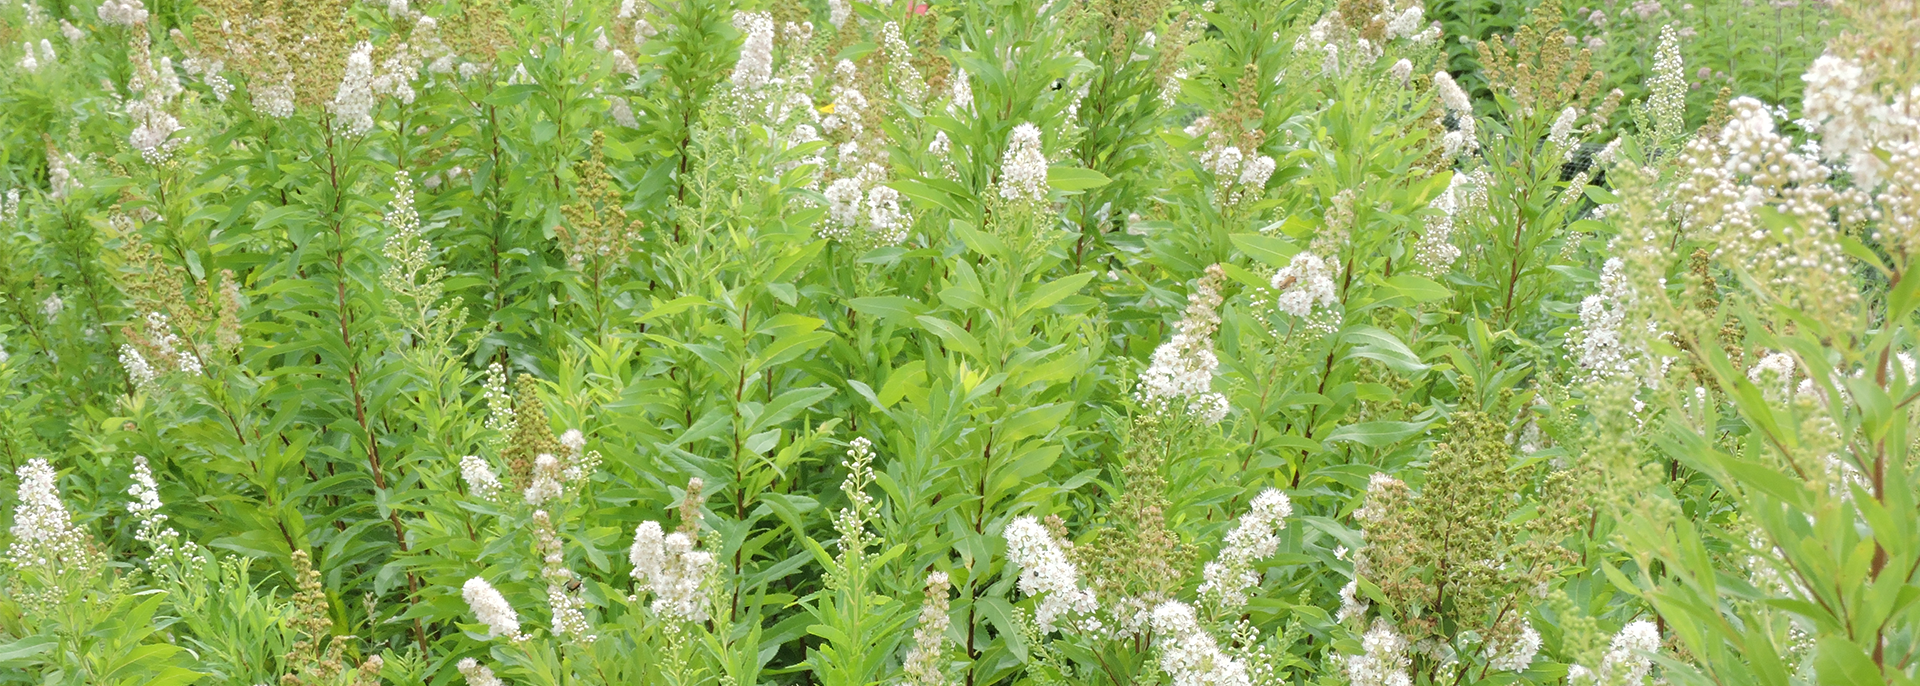
Spiraea alba, Du Roi
Alternate Common Names: meadow sweet, meadowsweet, narrow-leaved meadowsweet, American meadowsweet, pale bridewort, pipestem, queen of the meadows
Family: rose family (Rosaceae)
Functional Group: woody species, shrubs
Description
- Life cycle and growth form
Perennial shrub with woody root system, growing in colonies of slender stems.
Height: 2-4 ft
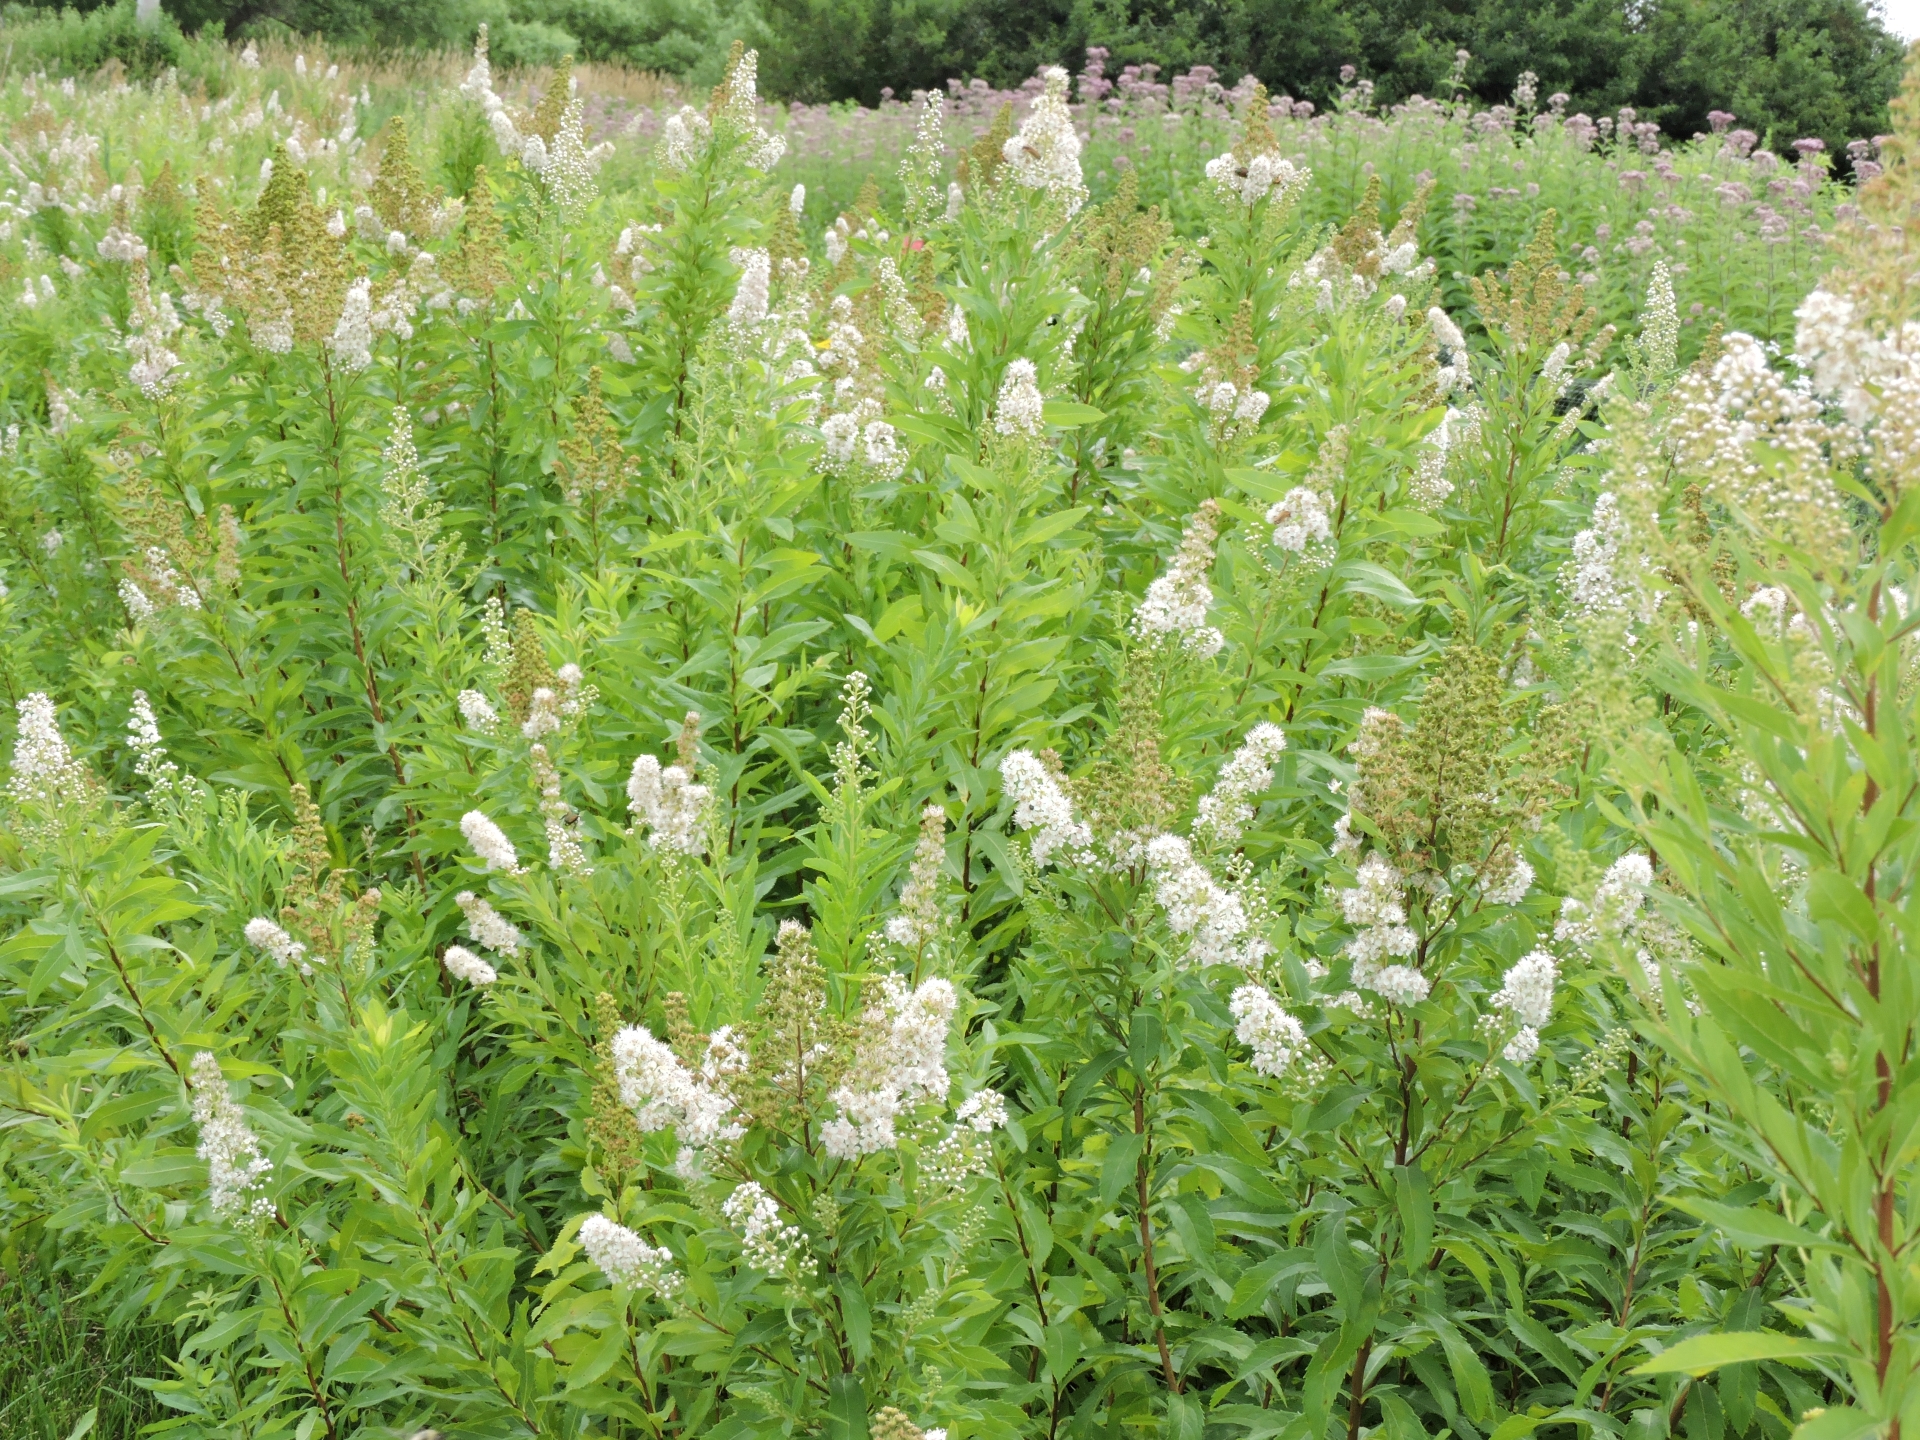
- Leaves and stem
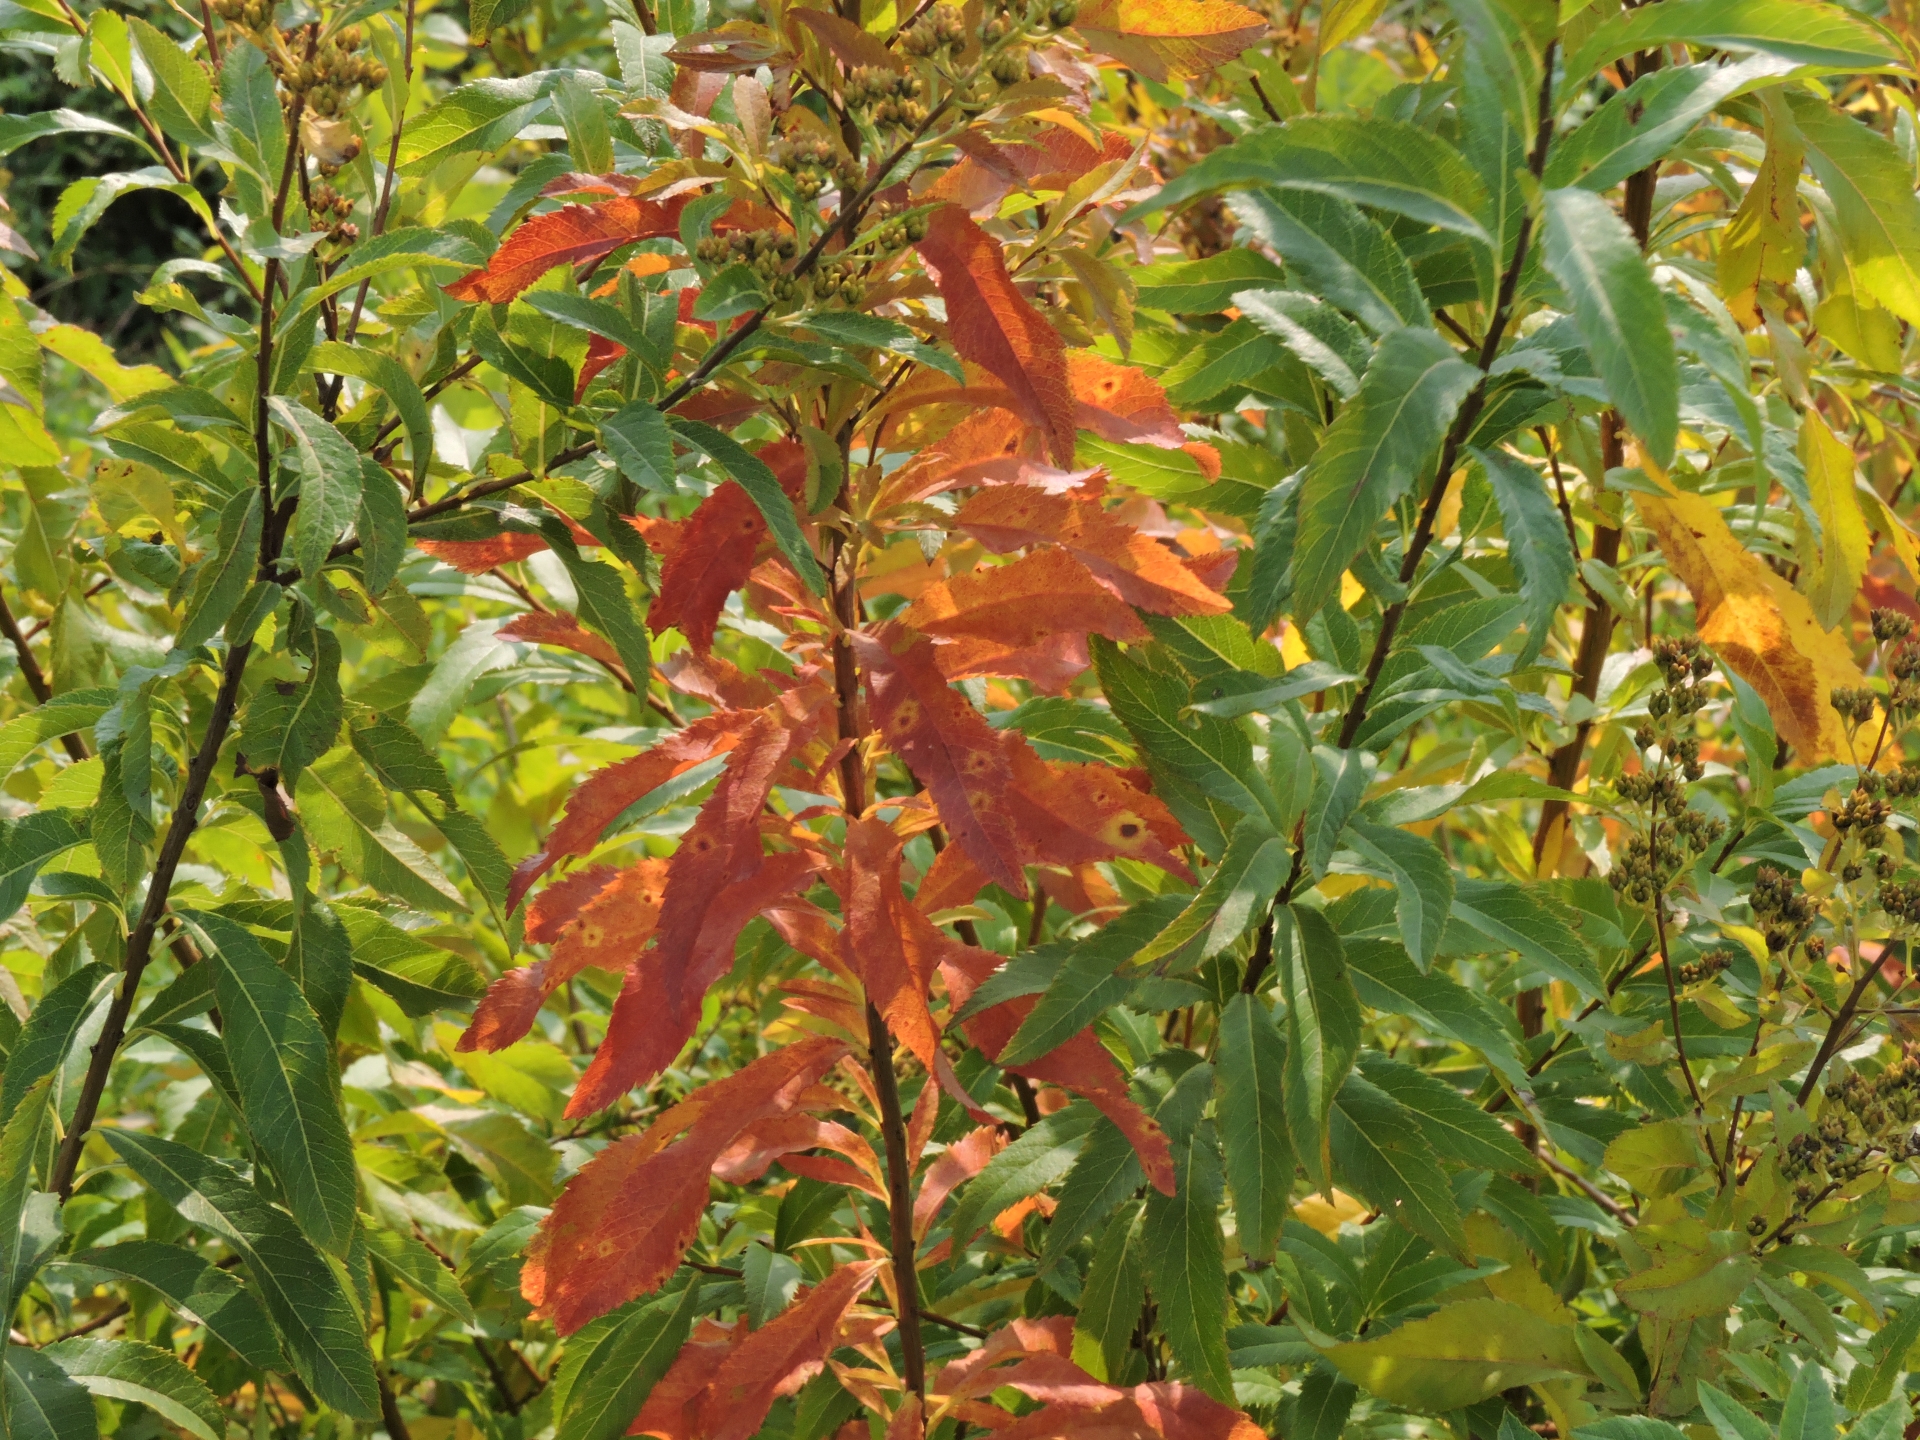
Leaves alternate, mostly hairless, narrowly elliptic, 2-3 in long and ¾ in wide, with finely serrate margins and short petioles; stems smooth, slender, and woody, with few branches, becoming brown with age, multiple stems produced from the same rootstock.
- Flower, fruit and seedhead
Flower: Radially symmetrical, ¼ in wide flowers are five-parted with white petals, a pink, yellow, or orange center ring, and long stamens that stick out from the flowers; inflorescence is a branched cluster of spikes 2 - 6 in long, each with numerous flowers, blooming from the top down.
Fruit/seedhead: Each flower forms four to six (usually five) dry, reddish-brown fruits (follicles), arrayed in a star-like cluster; each follicle is tough, short-beaked, hairless, and contains 2-5 seeds; ripe follicles split open along one side to release the seeds.
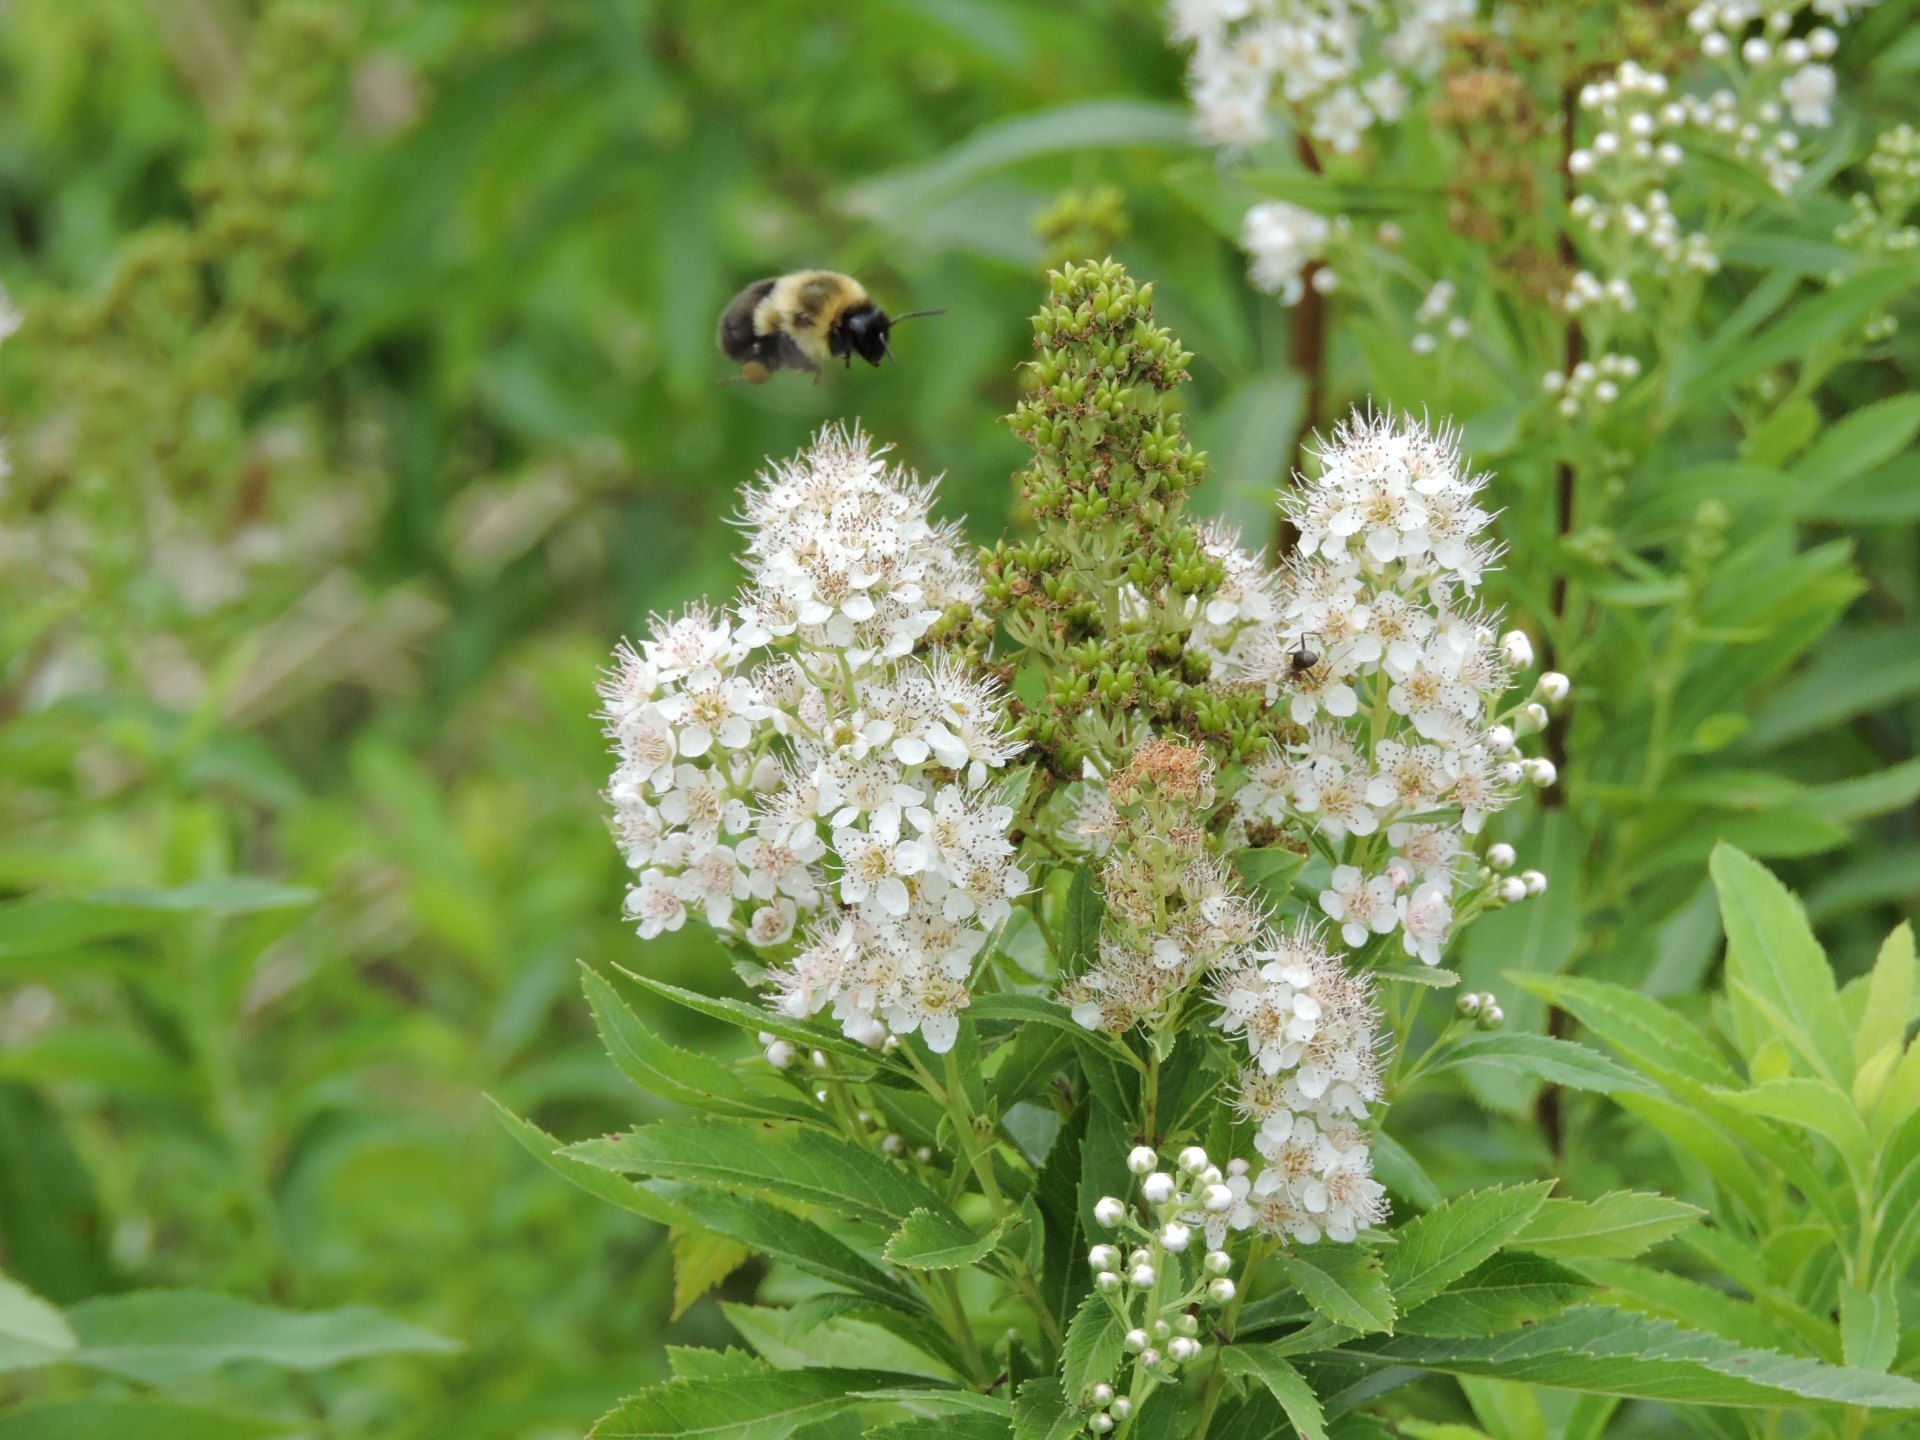
- Seed
Seed characteristics
Seeds per ounce: 300,000 (Prairie Moon)
1000 seed weight: 0.88 g (Seed Information Database)
Description: Slender, banana-shaped seeds are 2 mm long by less than 0.5 mm wide and a rusty orange color.
Typical seed test
TZ-PLS: 53%
Purity: 60%
TZ: 88%
(based on 3 seed lots produced at TPC)
- Habitat and range
Habitat: Grows in moist to wet soil in full sun; found in wet prairies, along streams, bogs, marsh edges, ditches; Facultative Wetland status in Midwest (USDA Plants Database); benefits from irrigation in seed production systems.
Conservation status: Global- G5, secure; Delaware and Tennessee- S1, critically imperiled; North Carolina- S2, imperiled; South Dakota- S3, vulnerable (NatureServe)
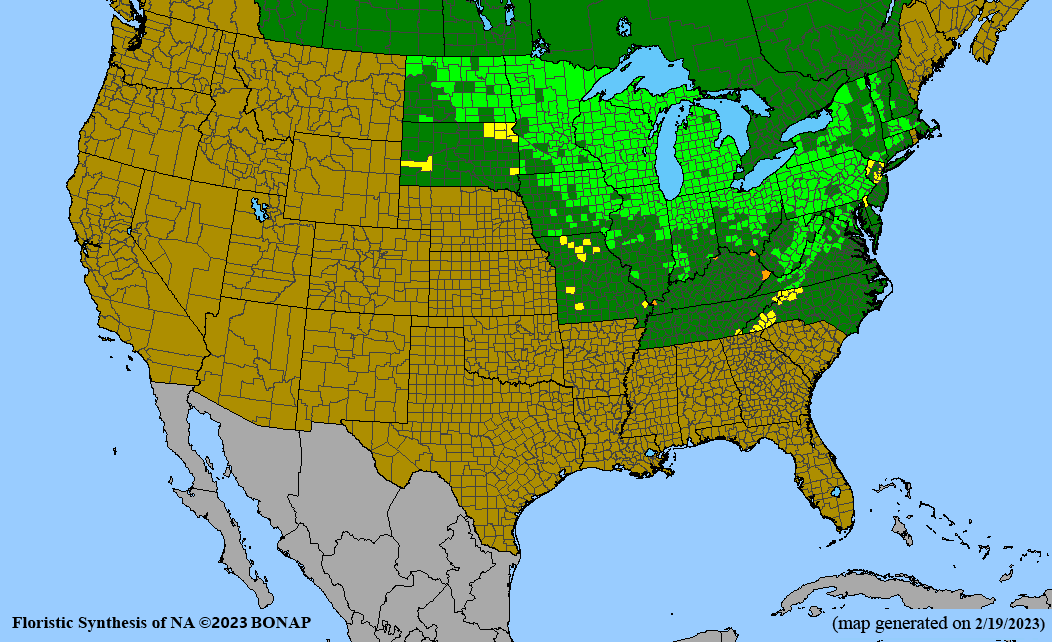
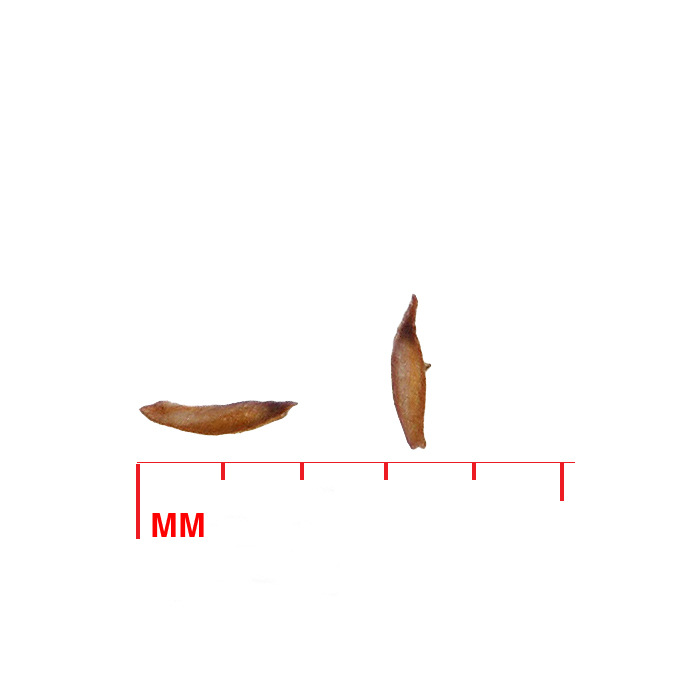
General Comments
The long flowering time and abundance of nectar and pollen make this an important food plant for many kinds of bees as well as small butterflies, wasps, beetles, and flies. We have observed the endangered Rusty Patched Bumble Bee visiting the flowers in white meadowsweet seed production plots. The dense colonies of stems provide shelter and nesting habitat for some bird species. The leaves, stems, and/or roots have uses in the traditional medicine and foodways of several Indigenous groups within the plant’s native range. Recommended for use as a low hedge, in perennial borders, wet prairie restorations, and roadside plantings.
Recommendations for Seed Production
- Establishment for seed production
Direct seeding
We do not have experience with direct seeding this species for seed production.
Greenhouse
Seed pre-treatment: 45 days cold-moist stratification.
Sowing: Seeds are small and must be surface-sown; stratified seed germinates quickly (starting 5 days from sowing).
Transplanting: Seedling plugs (2.5 in deep, 73-cell trays) are ready to transplant about 12 weeks from germination. After several weeks in plugs, seedlings benefit from fertilizer application such as a sprinkling of coated fertilizer pellets. Harden off outside, then dibble into a weed barrier in irrigated production rows.
- Stand management
Weeds: Few issues if weed barrier used in planting year; dense foliage shades out most weeds in subsequent years; mow and trim between rows.
Pests: A few stems are affected by dark colored aphids that cause distortion of leaves and growing shoot tips.
Diseases: None noted.
Note: Mow plots down to 4 in during the dormant season every other year to stimulate production of robust new stems.
- Seed production
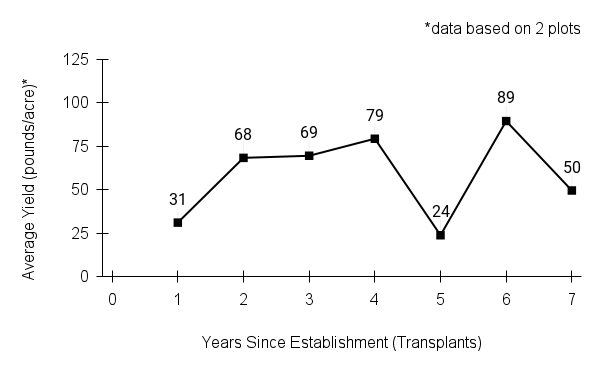 First harvest: second year
Yield: 25-90 pounds/acre (based on 2 plots)
Stand life: at least 8 years
Flowering date: June - August
Seed maturity: late October - early November
Harvest date range at TPC (2017-2023): Oct 17 - Nov 1
Recommended harvest method: Check plots frequently from mid-October through early November; hand clip or combine when follicles (dry fruits) have split open on most stalks.
- Seed cleaning and storage
Cleaning process: Do NOT use a brush machine. Brushing pulverizes the dried leaves, making it very difficult to extract the fine seed. Hand-clipped material can be beaten in a cloth bag to release seed. Combined or hand collected material can then be treated in the same way: run through ¼ in hardware cloth to remove sticks, then airscreen. If greater purity is desired, passing the cleaned seed through soil sieves can remove residual chopped leaf material.
Seed storage: cool/dry (orthodox)
Released Germplasm
Source Identified material: Natural Selections/Iowa Ecotype Zones 1 and 2
- References
Chayka, Katy. (n.d.). Spiraea alba (White Meadowsweet). Minnesota Wildflowers. https://www.minnesotawildflowers.info/flower/white-meadowsweet
Cochrane, T. S., Elliot, K., & Lipke, C. S. (2014). White Meadowsweet. In Prairie Plants of the University of Wisconsin-Madison Arboretum (3rd ed., p. 314). University of Wisconsin-Madison Arboretum.
Hilty, J. (2019). Meadowsweet - Spiraea alba. Illinois Wildflowers. https://www.illinoiswildflowers.info/wetland/plants/meadowsweet.htm
Kartesz, J.T., The Biota of North America Program (BONAP). 2023. North American Plant Atlas. (http://bonap.net/napa). Chapel Hill, N.C. [maps generated from Kartesz, J.T. 2023. Floristic Synthesis of North America, Version 1.0. Biota of North America Program (BONAP). (in press)]
NatureServe. 2024. NatureServe Network Biodiversity Location Data accessed through NatureServe Explorer [web application]. NatureServe, Arlington, Virginia. Available https://explorer.natureserve.org/. (Accessed: February 28, 2024).
Runkel, S. T., & Roosa, D. M. (2009). Meadow sweet. In Wildflowers of the Tallgrass Prairie: The Upper Midwest (2nd ed., pp. 142–143). University of Iowa Press.
USDA NRCS National Plant Data Team. (n.d.). Spiraea alba Du Roi. USDA plants database. https://plants.usda.gov/home/plantProfile?symbol=SPAL2
Species Guide Updated 3/5/2024
Sedges
Sedges sagemThe Species Production Guides for sedges and rushes provide specific information about growing each of these species for seed production.
Scroll the list (alphabetized by scientific name) or press ctrl-f (or command-f) to search for any name in this page.
A printable file (pdf) is also provided on each species page for those needing a print version.
This section is a work in progress. We will continue to add new species guides as they are completed.
Carex annectens / yellowfruit sedge
Carex bebbii / Bebb's sedge
Carex bicknellii / Bicknell's sedge
Carex brevior / shortbeak sedge
Carex buxbaumii / Buxbaum's sedge
Carex cristatella / crested sedge
Carex gravida / heavy sedge
Carex hystericina / bottlebrush sedge
Carex interior / inland sedge
- Carex laeviconica / smoothcone sedge
Carex molesta / troublesome sedge
Carex pellita / woolly sedge
Carex sartwellii / Sartwell's sedge
Carex scoparia / broom sedge
Carex stricta / upright sedge
Carex suberecta / prairie straw sedge
Carex tribuloides / blunt broom sedge
Carex vulpinoidea / fox sedge
Scirpus atrovirens / green bulrush
Scirpus cyperinus / woolgrass
Appendices
Appendices sagemThe third section provides extensive tables summarizing seed production information for native plant species which have been grown for seed production at the Tallgrass Prairie Center. Included are establishment recommendations, seed germination protocols, harvesting and seed cleaning information, sample seed test results, and seed counts per unit weight.
This section is under construction and new material will be added as soon as it is complete.
Appendix A
Appendix A sagemAppendix A is under construction. Check back later to find the following information:
- Table 1A - Establishment recommendations for seed production
- Table 2A - Seed pre-treatments for germination
Appendix B
Appendix B sagemAppendix B is under construction. Check back later to find the following information:
- Table 1B - Harvest characteristics and recommendations
Appendix C
Appendix C sagemAppendix C is under construction. Check back later to find the following information:
- Table 1C - Settings for Westrup Laboratory Air Screen Cleaner
- Table 2C - Settings for Westrup Laboratory Brush Machine
- Table 3C - Screen sizes and conversions
Appendix D
Appendix D sagemAppendix D is under construction. Check back later to find the following information:
- Table 1D - Typical seed test results
- Table 2D - Seed weight
- Table 3D - Soil moisture indications
- Table 4D - Relative degree of difficulty for seed increase
Supplemental Information
Supplemental Information sagemThis last section includes reference material for native plant propagation, native and weed species identification, and research publications on seed germination. Also provided is an abbreviated list of purveyors of seed-related equipment and horticultural supplies.
This section is under construction and new material will be added as soon as it is complete.
References
References sagemThis section is under construction and new material will be added as soon as it is complete.
Equipment
Equipment sagemThis section is under construction and new material will be added as soon as it is complete.